


Vogler
-
Posts
102 -
Joined
-
Last visited
-
Days Won
5
Content Type
Profiles
Forums
Events
Gallery
Blogs
Posts posted by Vogler
-
-
While I am *really* thankful for the fact that you're spending your valuable time to the forum and that people are working on initiatives like these, I'm sorry that I have to add that this section is only useful if the supporter status (and hence access) is truly attributed to the people who have the right to it..
I have a standing order since (IIRC) autumn 2020, so well over a year, but my status has never been adapted accordingly. I didn't really mind since I mainly want to support the forum and don't really care about the decorum of a supporter's badge, so I have only bothered to send a reminder once or twice via PM, but in this case I feel that I should touch the subject more publicly.
I really don't want to come over as harsh, as again I really appreciate the efforts of all volunteers and mods, especially after having personally experienced how time can be endlessly claimed when volunteering in an organisation.
Kind regards,
Joris
-
 1
1
-
-
Ah, of course. I feel a bit stupid now...😨
-
A bit off topic, but isn't there a nut missing on the second picture? It looks like there's nothing pulling the triangular hook down. I'd put a nyloc not on there.
J
-
I once asked an electronics engineer about contact cleaners, and he told me that a proper/professional job consists of several stages. The actual cleaning is a slightly aggressive process which should be followed by protection measures. I remember that he talked about three stages, but I don't remember the third one. I couldn't find any multiple step products either when I looked for them to give this post validity. I did however found an interesting blog post where the researcher (with chemical experience) states that the actual cleaning agent in a popular cleaner is most likely naphta, or lighter fluid.
Also, its a process that can't be repeated endlessly.
-
Just looked up a photo of our Sprint's spare OD. It mentions GKN Laycock J Type

-
On 9/10/2021 at 2:26 PM, Peaklander said:
Of course. I should have known / remembered that. I also drove a Dolomite Sprint. What a car that was. Don’t think it had an OD but all the fun was getting up to top anyway!
Sounds good! I have a partly dismantled Emerald Green Sprint patiently awaiting its restoration, but our 110 Td5 and too much other plans keep me from picking up the project.
It rolled off the line between Christmas '73 and New Year, when I was two months old, so we share our birth year.
It has an overdrive BTW.
(Apologies for veering off-topic).
-
 1
1
-
-
What about the dark spot on the bulkhead, LH side under the windscreen? Photos are too lowres to clearly discern, but looks like a hole.
-
Will do Ben. I'll have to get trough the quadrizillion photo's first. Got more pics than kilometers... I wasn't aware of that section BTW.
J
-
I'm just back from a long Iceland trip with a lot of miles on "bad" highland roads. I have a Hannibal roof rack with full length gutter bars, which I simply cut between the legs before my departure, so it kept the body less from flexing.
Seems to have worked. Despite having driven considerably more than the previous trips with the same load, everything held up nicely. (Not mentioning the driver's door hinges and rear upper shock mount wearing out 🙄)
J
-
2
-
-
Promising! Very much looking forward to the next video, so subscribed too.
J
-
That looks really nice!
-
2 hours ago, paime said:
The rear door opening the wrong way round
Looks right to me 🙃
-
1
-
-
Oneandtwo, Western,
thank you for pointing that out. I haven't had the opportunity to properly investigate on the car (currently extremely busy at work) and hadn't realised there are two layers. They aren't visible in the LR part diagrams, and even replacement bulkheads don't seem to have the inner layer.
Rovers North seem to have the proper parts, see screenshots below taken from their website:


Likely costly thing due to US import... One could possibly fabricate a double layered part combining a Defender and series footwell.
Edit: YRM does offer inner panels too
Cheers,
J

-
My front diff (Td5 MY06) went at 160k in the same way. The remaining bolts could be removed by hand too.
I used it as an opportunity to install an ATB and used Allen bolts with Nordlock washers on the crown wheel. And loctite obviously!
J
-
Thanks both of you!
Meanwhile I stumbled on a YT video which makes it look a bit less daunting.
-
Hi all,
I'm planning to replace the right hand footwell in our LHD Td5 Defender (MY06). A YRM footwell is at the ready.
When I think of it, it seems to ask quite some preparation: remove the Safari snorkel, right wing, heater (and probably empty the cooling system). So a lot of things that involve hard-to-reach nuts and bolts and will undoubtedly cost a lot more time than expected.
Any useful hints? Things that should be tackled while I'm at it?
Greetings,
Joris
-
Well, three months later I discover that I have posted the wrong link. On this facebook page (Td5 Mafia) is a link to the Android APK hosted on Google Drive.
Regards,
Joris
-
A local club member had been looking for a death wobble cause for months on a brand new defender. It turned out to be a faulty damper.
J
-
Nice one Filip! I always liked XJS's, never got further than a Dinky.
Congratulations!
-
1
-
-
I was told a while ago that Dana made the diff gears during the last few years. That was confirmed when I ordered a genuine crown wheel & pinion last year and received Dana stamped gears in a LR labeled box.
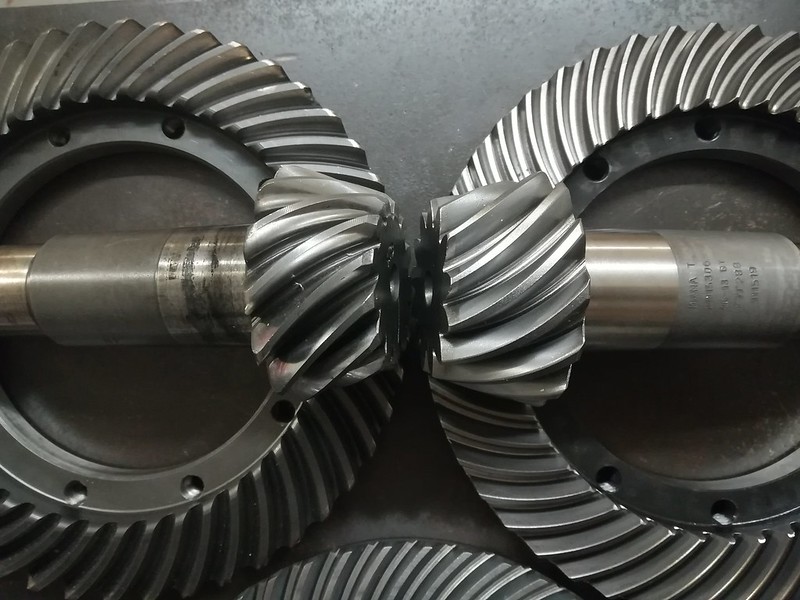
First I made an attempt with a CW&P set that I ordered at Ashcroft, they turned out to be Antonio Maziero / AM Gears. Unfortunately I didn't manage to get backlash settings consistent enough: I kept getting different readings, although I measured at the same CW teeth, so eventually ordered genuine. The Dana gears delivered good measurements immediately. Here are the original, Dana and AM CW&P huddling together. Original upper left, Dana upper right, AM below:
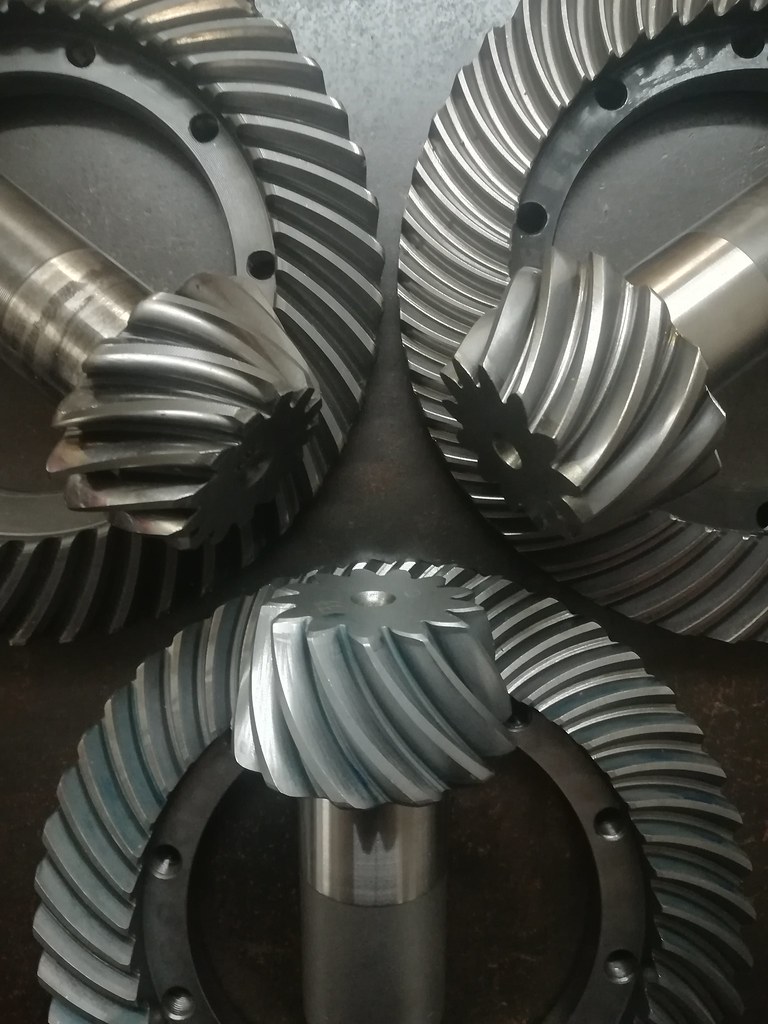
The original looks the beefiest, and the faces of the Dana CW pinion seem a bit thinner, but one can also see that it increases towards the outer diameter. The Dana teeth also seem more curved than the others, and they are more polished than the AM gears.
Here's the Dana compared to our Td5's original CW&P. The latter suffering damage from broken CW bolts:
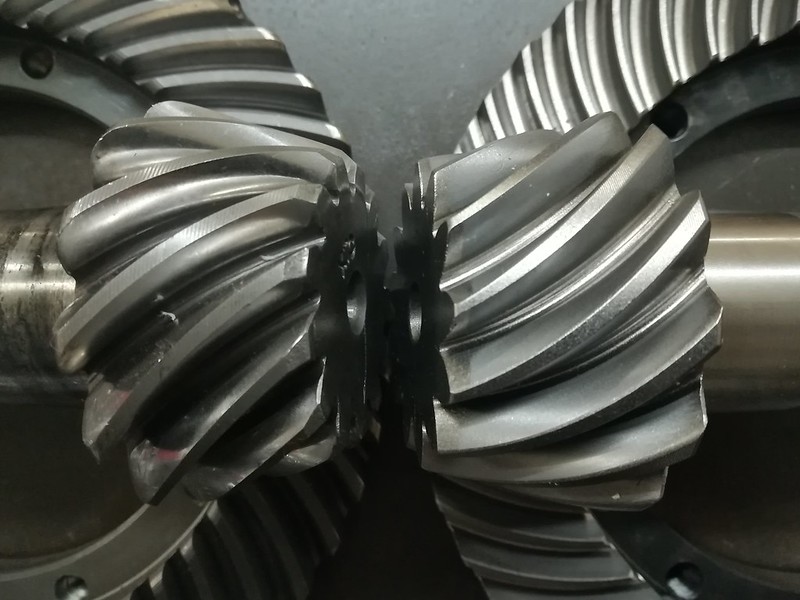

The original pinion was stamped 'XTC'. Don't know if that refers to a manufacturer.

And some data from the Dana pinion:

J
-
1
-
-
16 hours ago, Farhan said:
Yes I did turn the key five times
I guess you wrote it wrong but just in case you haven't: you have to turn the key, then press the accelerator pedal 5 times. The car will then start a purge cycle which lasts a couple of minutes, during which it won't do anything else.
-
-
Here's an opportunity to chuckle some more. Make sure to look at the whole thing, so you can fully enjoy the last two seconds. I couldn't help but laugh out loudly:
-
1
-
 2
2
-
-
33 minutes ago, Chicken Drumstick said:
I believe Dana had been supplying the Rover axles for many years however.
I ordered a new genuine crown wheel and pinion for the front diff of our Td5 earlier this year, and found Dana stamped gears in the box.
-
1
-


Grease nipples on inside of Defender door hinges
in International Forum
Posted
Hi all,
It’s been a while since my last posting, didn't really have a lot to say, but I think the following might be of interest to some.
Since I always use too much words when writing, here's in one sentence what is more leghtily explained below: M6 DIN3405 grease nipples fit at the back of Defender hinges and it works.
The door hinges on our Td5 were due for replacement, and no way the new ones were to go on without adding measures to extend their life.
Oddly enough, it's only very recent that the channel 'Defender Mods and Travels' popped up in my YT feed, and just when I wanted to finally tackle the hinges (which had been lying around for two or so years already), his video on the very subject popped up so I was bound to put ball type nipples on the outside of the new ones.
Fortunately, all the grease nipples I had were too long. 'Fortunately' because when looking for shorter ones, I stumbled by chance on M6 "D-type" / DIN3405 flat funnel nipples which looked like they might fit at the back of the hinge. They’re used with a pointed tip on the grease gun.
Putting on the nipples is quite straightforward, nothing special here.
First I established the available space by sliding a wooden shim of the same thickess as the protruding hexagon head of the nipple into the closed hinge, and scribed the end of it, and then it's just a matter of aligning the nipple just short of the line, marking its axis, and to drill and tap the hole.
I drove out the hinge pin and separated the halves before drilling.
It's a tight fit, and in retrospect I might have installed the nipples a little more to the rear, more offset from the hinge pin. I needed to shorten the threaded end of the nipple so much that a couple of times the spring came out, I destroyed 4 nipples this way.
There’s plenty of space around the hinge pin to offset. The hinge looks like it is cast with a larger diameter hole after which inserts were pressed in.
The offset just might make a difference, chances are that now some of the nipple springs are kept in by just the flimsiest slither of metal.
I was very happy to see it work. The Pressol push type gun I used worked perfectly, there’s no grease spilling between the tip and the nipple. You can also see how the nipple grazed the paint as a sign of the tight fit.
I bought the push grease gun for the UJ's and at the time it already came with a pointed tip additional to the usual one for ball-type nipples. 12 003 is the item number for the separate tip, which has an M10x1 thread. I also found pointy tipped grease guns for chainsaws, but those machines I know nothing about. Without a doubt several people here do and can shed more light on it.
Hope it is of use to some.
Regards,
Joris