


PaulMc
-
Posts
949 -
Joined
-
Last visited
-
Days Won
4
Content Type
Profiles
Forums
Events
Gallery
Blogs
Posts posted by PaulMc
-
-
Yes please!!!!!!!
I have the seatbox male connectors, with terminals and wire seals (not pictured) at £11.95 for a pair of connectors -

I also have two types of panel clip - both at £1.25 each
The Black type is for clipping into a ¼" hole -

The Translucent type is for 2002 TD5/Puma seatboxes, which already have an oblong hole punched into the panel.
These go in at an angle and twist to square, to lock them in place -

Panel clips shown fitted to the male connector -


I also have the proper seatbox grommets (269257) that fit into the existing 25mm hole in the 2002 TD5/Puma seatboxes, at £1.50 each -

Crimping the sealed MQS terminals isn't easy without the proper crimping tool.
The crimped male terminal and seal look like this (the Green arrow is pointing at the terminal latch) -

If you wanted, I can supply the connectors crimped and assembled to the correct colour cables, over-sleeved with un-split convoluted tubing, to whatever length you require -

PM me

.
-
Hi,
I finally managed to get a new set of seats for my Military 110 from the recent Newbury meet - no more plastic cushions for me - I now have a set of Techno Defender seats with Heating - feel like a Range Rover Owner
 - if I can every work out how to connect them - that's another job.
I am about to fit the seats and I noticed I only have one of the plastic plugs/guides that the two pins on the back of the seat bases slide into.
Pic below.
I would really appreciate if anyone could tell me the part number/what it is to buy another three - and also where you found it please so I can avoid such posts - I have searched oh yes but still learning the dark art of "Part Number Sourcing"
Thanks
Taffia.
If they have the factory connectors on the seat 'tails' -

Then, I can help with seatbox connectors and other bits
.
-
Apologies for the thread hijack, but is the vehicle side of the sumitomo 9 way connector (female) available anywhere? The one on my td5 loom is goosed and I have a genuine set of electrics to plug in. Failing that it'll be hacked off and suitable weatherproof connectors used.
I've not managed to find a source for the Grey 9-way connector.
Although, it's not a single part number, there are several component parts, all with their own part numbers and MoQs (Minimum order Quantities) -
Grey hybrid 9-way female connector housing with retainer
090 (2.3mm) female terminals and wire seals
187 (4.8mm) female terminals and wire seals
I have some of the terminals and wire seals to fit this connector, but not the housing.
There is a Black version of the female 9-way housing, which I am able to source - but, Sumitomo describe it as "special shape" and don't specifically state that the Black female housing wlll mate with the Grey male housing.
From Sumitomo's images of the two versions, they look identical -
Grey
Black
But, without comparing the two, I wouldn't like to say whether or not that is the case.
The next time I place an order, I will add a couple of Black connector housings, to see if they will substitute for the Grey housing.
My Isuzu has the 13 pin socket which disables the vehicles rear fog light when a trailer is connected. Could it be for that? I found that 'feature' out as it nearly failed it's first MOT when I left the 13 - 7 pin adaptor in

At first, I thought it might be for that - but, it breaks the trailer's fog lamp connection, not the towing vehicle's
.
-
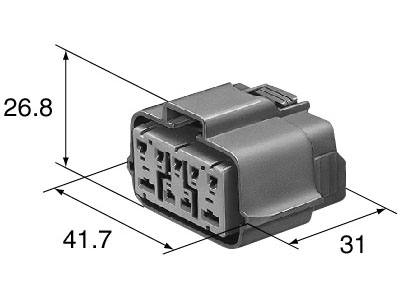
I'm after a plug and terminals for a switch in a friends Disco. I'm wiring up some rear work lights for him and he's bought another switch to go in the surround by the steering wheel (Fog light switch I think).
Does anyone know a source for a new plug and terminals? PaulMC I think might do?
Thanks in advance!
Yes, I do... ME

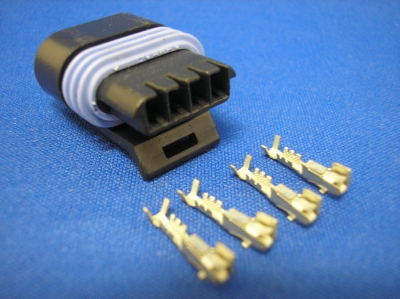
If it's AMR3751 -
it uses the Black 5-way connector, which I can supply (cheaper direct, rather than on eBay).
PM me
.
-
Thanks Paul, yes it's a new vehicle.
So - the LR005920? Is worth the extra cash?
Found it online at island4x4 for a tad under £40... Just seems a lot...
Cheers
Doug
Yes, that's the one
However, the one you've seen at Island 4x4, is an 'OEM' kit made by Britpart
As you'll learn, anything in a 'Blue Box' labelled Britpart, is usually to be avoided.
They use the term 'OEM' (Original Equipment Manufacturer) a bit too liberally - as, their kit bears little resemblance to the Genuine Parts kit.
If it is made by the OEM (which I very much doubt) - then, it's been 'made to a price' - as, it's been made from much cheaper, inferior components.
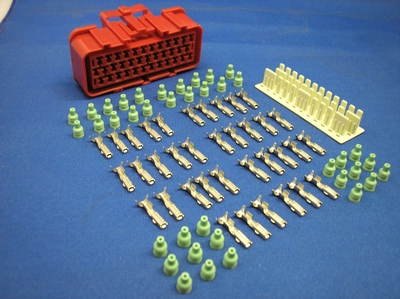
Britpart kit -

As you can see in the above picture -
The 12N socket is separate from the harness and has to be assembled to it, with a separate gasket.
The harness is covered in PVC sleeving.
The 'tap-off' for reversing lights and permanent live (for the 12S socket) is an unsealed 2-way AMP 'fastin' connector.
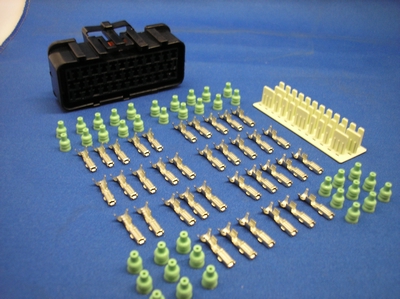
The Genuine Parts kit (these are my pictures of one I sold on eBay, a while back) -


As you can see from the above pictures -
The 12N socket is assembled to the wires and sealed against water ingress.
The harness is covered in convoluted tubing, offering more protection than PVC sleeving.
The 'tap-off' for reversing lights and permanent live (for the 12S socket) is a Delphi MetriPack sealed 2-way connector.
There's also an additional 'tap-off' on the rear fog lamp circuit, using a 2-way sealed Econoseal connector with a loop-back, which would allow you to break the fog lamp circuit to the trailer - I'm not sure what that's actually for, and there's no reference to using it, in the instructions
The only thing that the two kits have in common, is the Sumitomo Grey DL sealed 9-way connector, to pick-up the mating connector on the vehicle.
One thing I would recommend, regardless of which kit you opt for, is that once you've plugged the Grey connectors together, use spray Waxoyl to liberally coat over both connectors and their wires, to keep the water out of them.
Although the Sumitomo connectors are environmentally sealed, they're in one of the most inhospitable places on the vehicle - under the wheelarch, right behind the wheel, and they are subjected to mud and spray from the tyre.
The connector would have been better placed, inside the vehicle, behind the rear light cover - but, this would necessitate a large grommet in the wheelbox, or the connector(s) left unassembled until the wiring had been passed through the grommet in the wheelbox.
Anyway, as Mo has said, on a new (expensive) vehicle, why spoil it by fitting inferior accessories.
.
-
Hi guys,
Complete newbie here and expecting my first LR in couple of weeks.
Have bought some LED roof lights but everywhere I look for a switch (YUG000540LNF?) it costs over £50. This seems like a lot to me...especially when some other LR switches are about a tenner?
Can anyone direct me to a more affordable way (ideally using the same look and feel, rather than Carling style switches)
Any help gratefully received.
Cheers
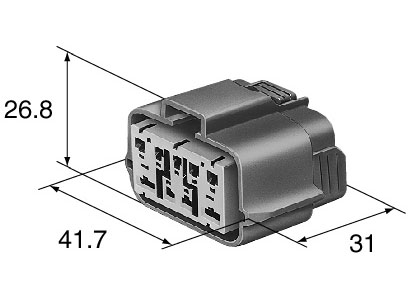
Unfortunately, YUG000540LNF is now ridiculously expensive.
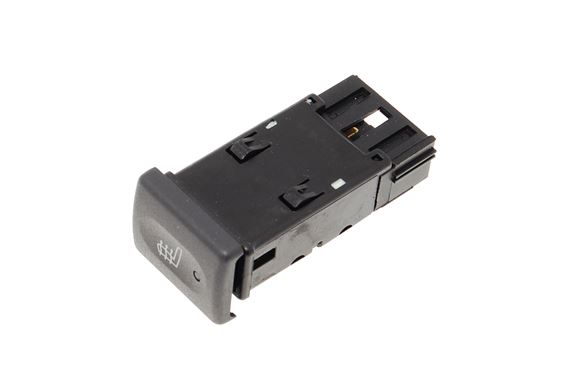
A cheaper alternative is to use the Puma Defender heated seat switch - YUF500150LNF
This costs just over £5 - http://www.rimmerbros.co.uk/Item--i-YUF500150LNF
Unlike YUG000540LNF, it's a live-switching switch, so the circuit diagram in my previous post isn't correct for this switch.
It's wired, as follows -
Pin 1 - Live in from fused supply
Pin 2 - Dash illumination
Pin 3 - Not used (but is internally connected to Pin 5 - Earth)
Pin 4 - Switched live out to accessory (relay)
Pin 5 - Earth
It uses the Black 5-way switch connector, which is available from a couple of sources, including me
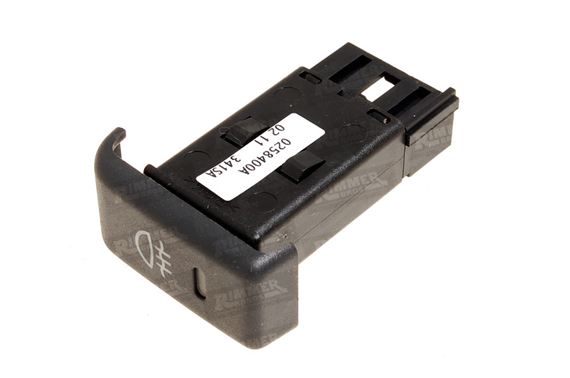
The switch's 'heated seat' front can be un-clipped and replaced with a modified blank front -

Or, the front from another switch, such as the rear fog lamps switch, which is just over £10 -
http://www.rimmerbros.co.uk/Item--i-YUG000530LNF

You can't just use another rear fog lamps switch, as this switch doesn't latch, and switches to earth.
.
-
If I read the OP's post correctly, in this thread - http://forums.lr4x4.com/index.php?showtopic=68392
He's awaiting delivery of a new Defender.
Hi guys,
Complete newbie here and expecting my first LR in couple of weeks.In which case, the Genuine Land Rover kit is the one I would recommend.
The Genuine kit plugs-in to a socket under the O/S rear wheelarch.
The wires into the back of the 12N socket are sealed.
It also has sealed connectors on its harness for plugging-in some of the 12S circuits.
The generic 12N kits don't usually have the wires sealed into the 12N socket and, at the other end, are just bare wires.
.
-
TD5 instrument binnacle complete with harness and 14-way sumitomo connector + warning lights connectors + temp. sender + Econoseal connector ( for speedo transducer [not included] )
£130 Buy it Now - http://www.ebay.co.uk/itm/defender-td5-instrument-cluster-1998-2006-/221577811938

Not me selling it (although, he did buy the connectors from me
) - just thought that someone thinking of doing this conversion might be interested..
-
one of the harness plugs has corroded it is on front passenger side lower a post behind plastic trim lowest one of the 3 is possible just to bypass the connector or are they joined within the spacer between plugs its the lower 4 connectors all in one block on connector, one controls the interior lights purple/blue have bypassed this and interior lights now work, but are they strait through on the others ,cannot meter them as they are kaput any help would be appreciated thks
The connectors in the D2's (LH) passenger footwell are straight-through, there's no 'spacers' between them.
If you look closely, you'll see that the wire colour going-in on one side of the connector junction, is the same colour coming-out the the other side.
They are the junction between the main harness and the body/roof harness, as well as the main harness to LH front door harness.
You can bypass the connectors by cutting the wires and soldering/sleeving them, or by using inline adhesive-lined heat-shrink splice crimps.
If you wanted to replace the corroded terminals, I can supply both the male and female terminals to fit these connectors.
.
-
Yes, those are Sumitomo HW Sealed Series 090 connectors.
The female connectors are used on the main harness, with male connectors on the wing harnesses.
Econoseal wire seals are very slightly larger than the Sumitomo wire seals - but, will fit OK (I've used them before with this connector series).
You asked about how to remove a terminal from this connector series -
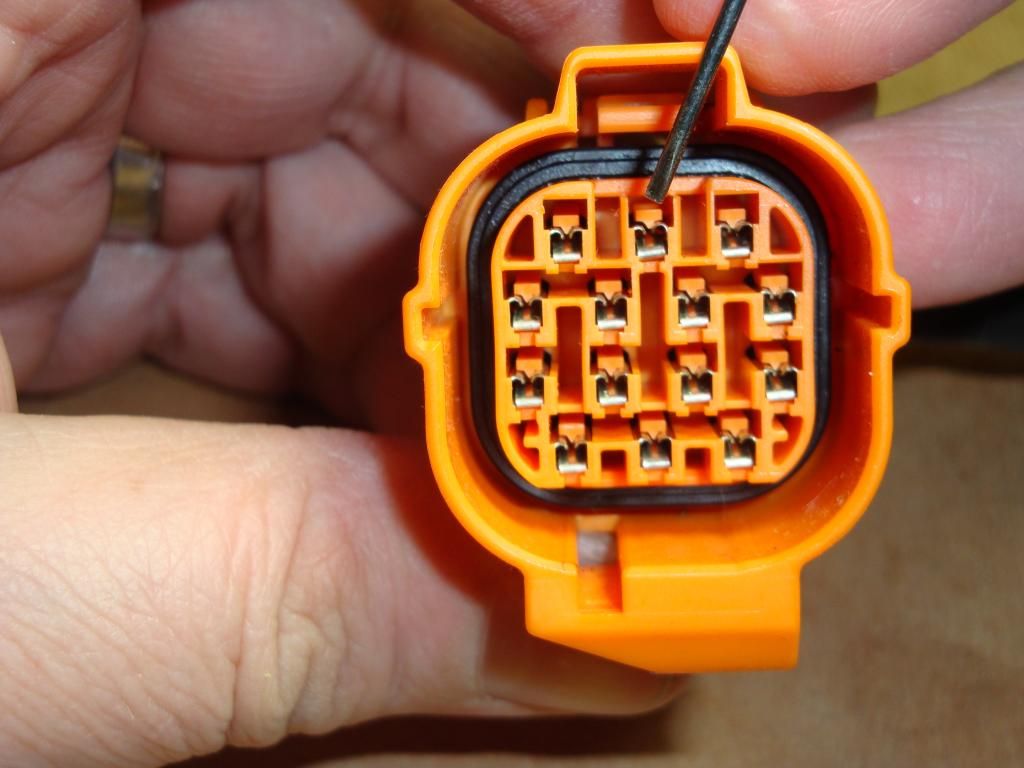
This is the 14-way female Orange version from a DII main harness (the procedure is the same for the male connector) –
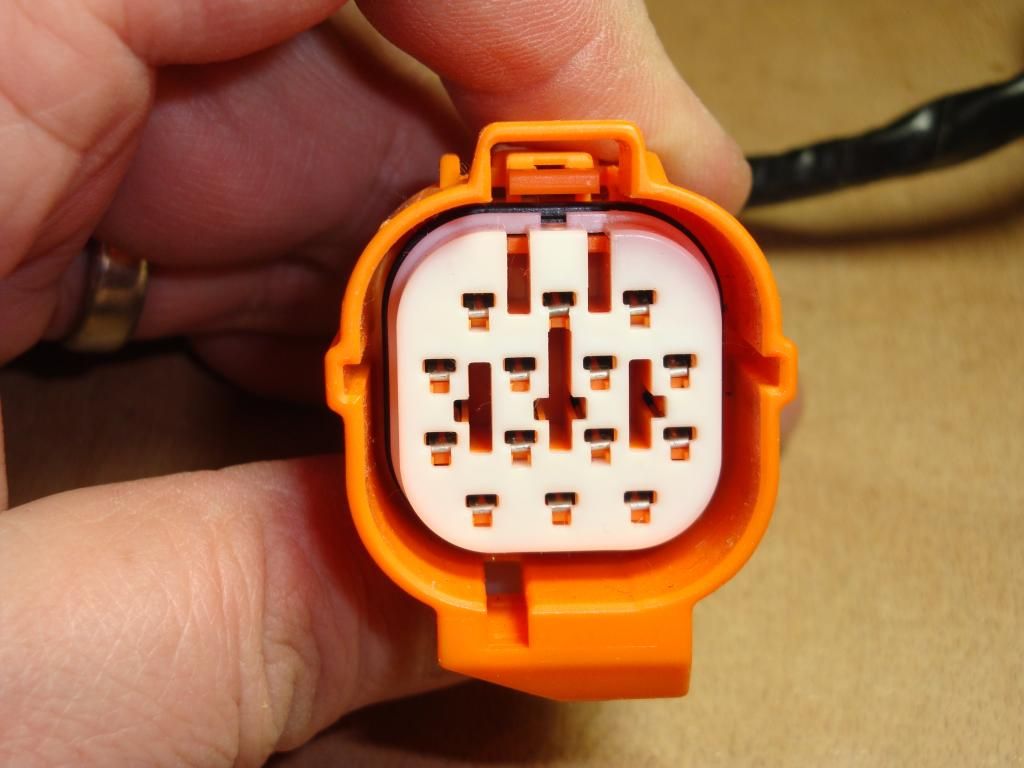
First, you need to remove the terminal retainer.
Use a couple of jeweller’s screwdrivers to push the terminal retainer forwards.
Take care not to tear the body seal (the Black bit behind the terminal retainer)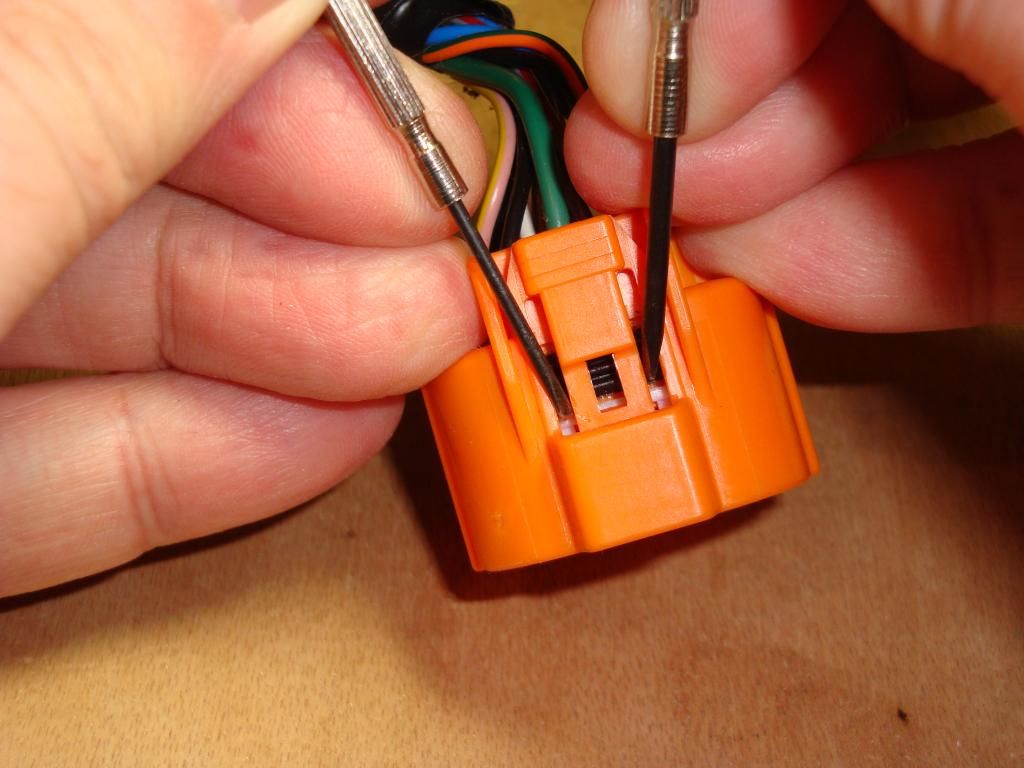
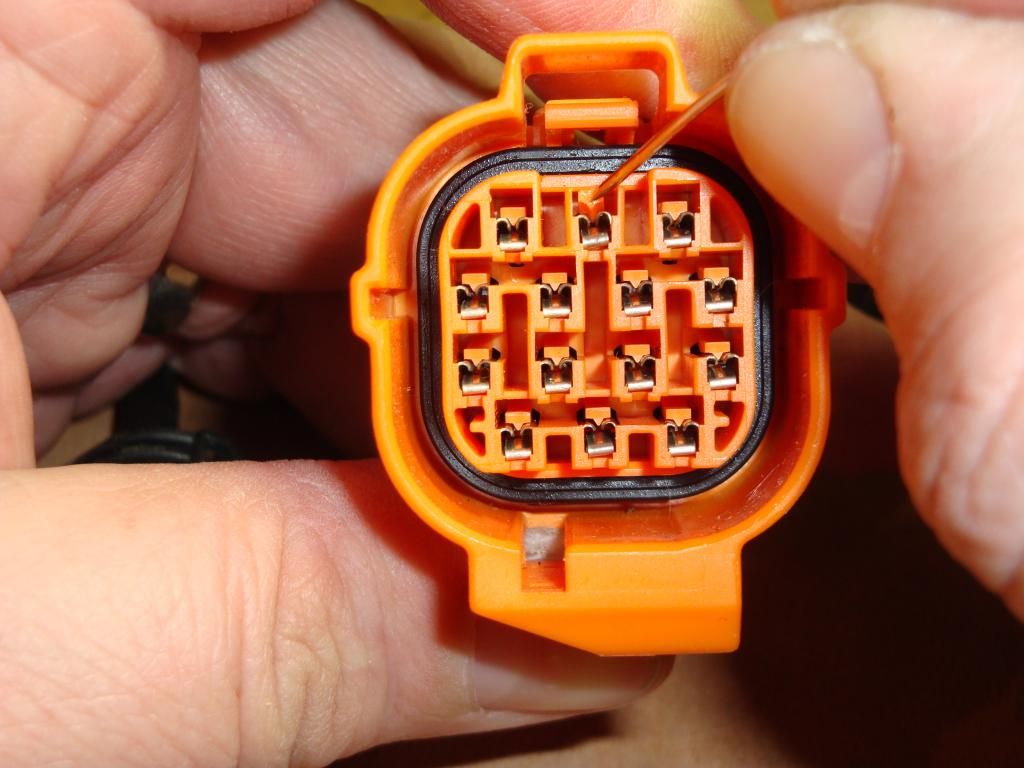
Terminal retainer pushed forward –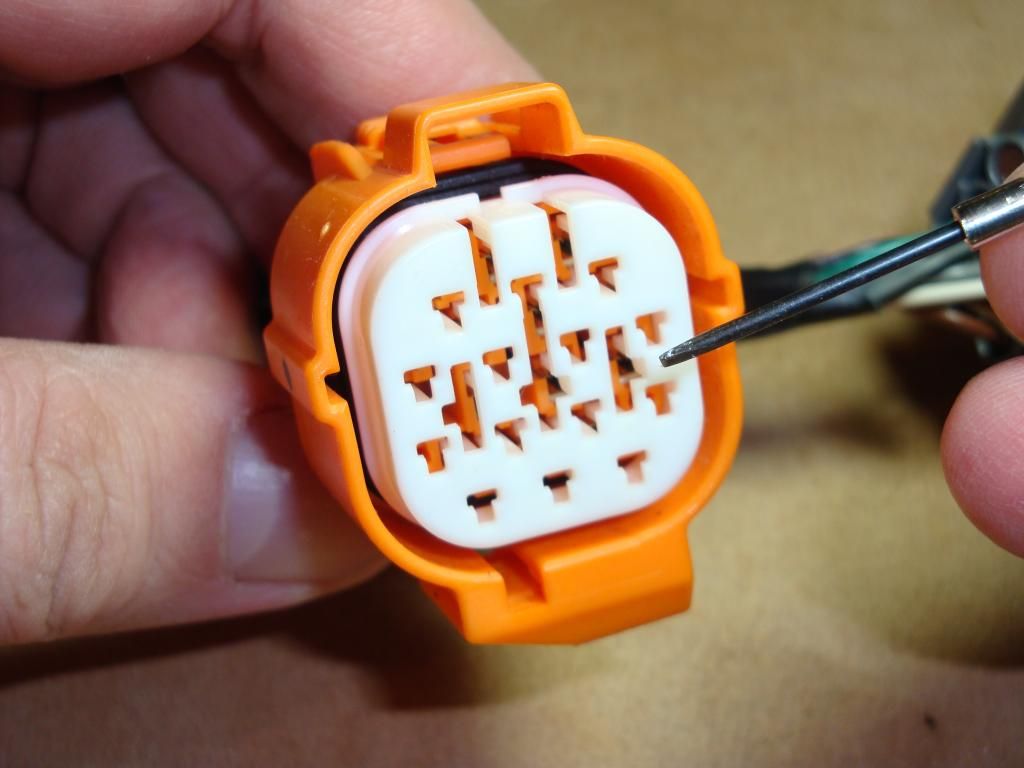
Terminal retainer removed –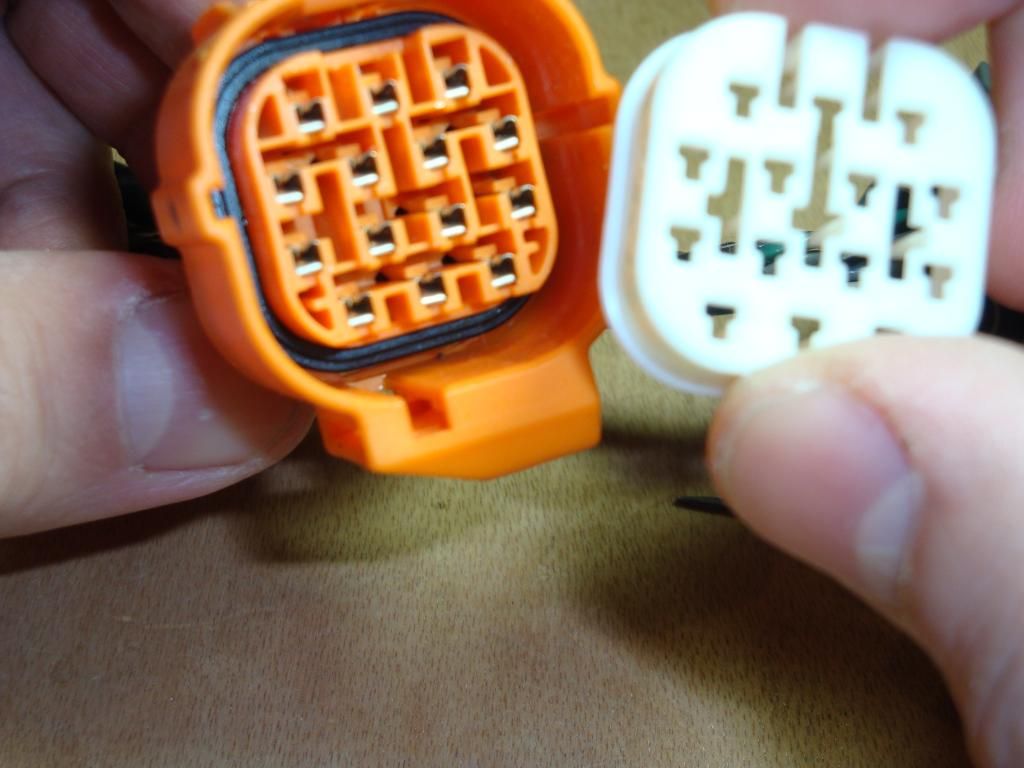
Pointing to the terminal lock in the top middle cavity –
Terminal lock lifted with a safety pin –
On this series of connectors, you don’t need to lift the terminal lock separately to release the terminal.
The terminal lock holds the terminal down onto a peg that retains it.
So, you can use a jeweller’s screwdriver to push the terminal up against the terminal lock and off of its peg, then push it backwards out of the connector housing –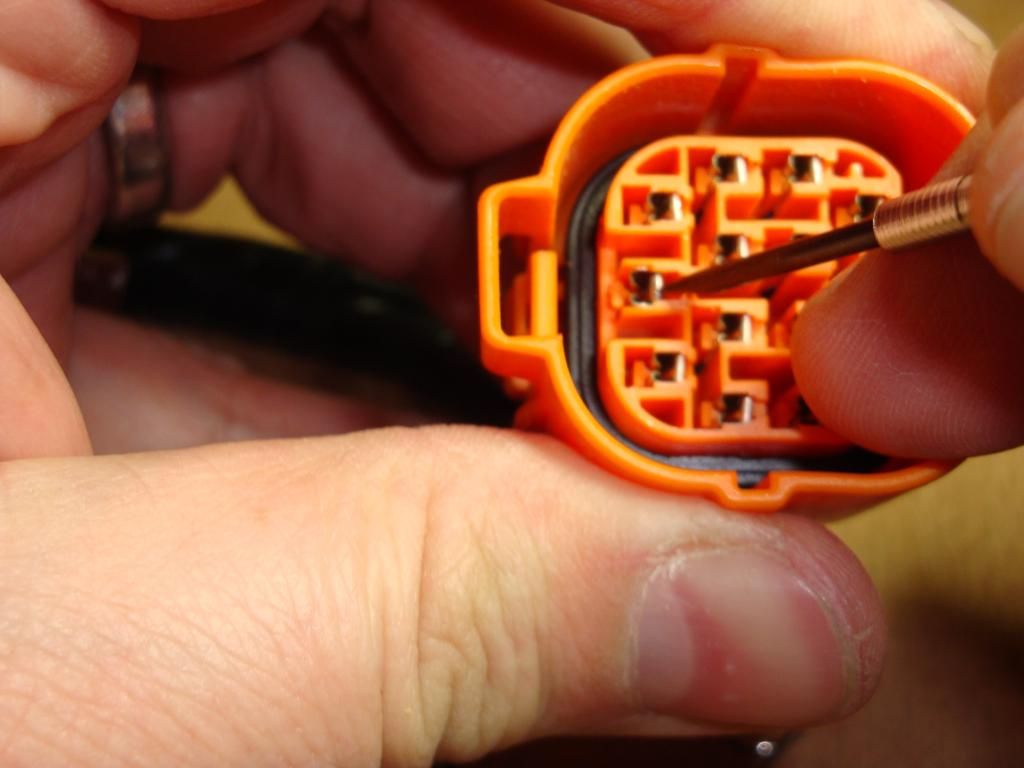
Terminal and wire seal removed –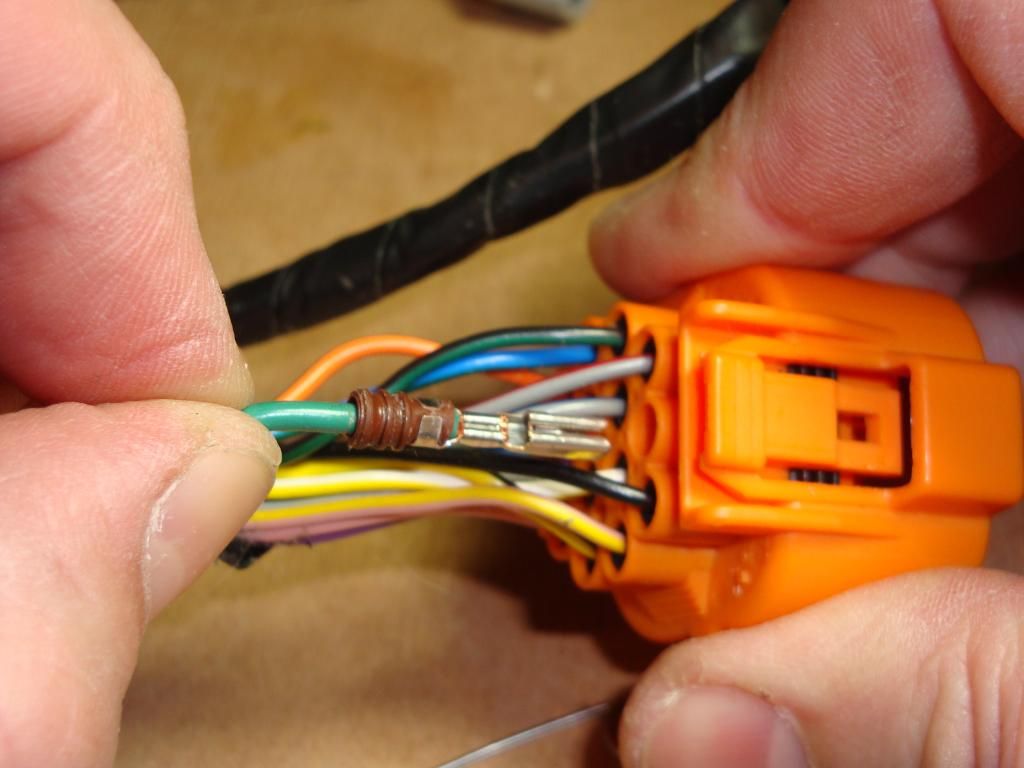
Pointing to the peg in the bottom of the empty cavity, that the terminal is held down onto –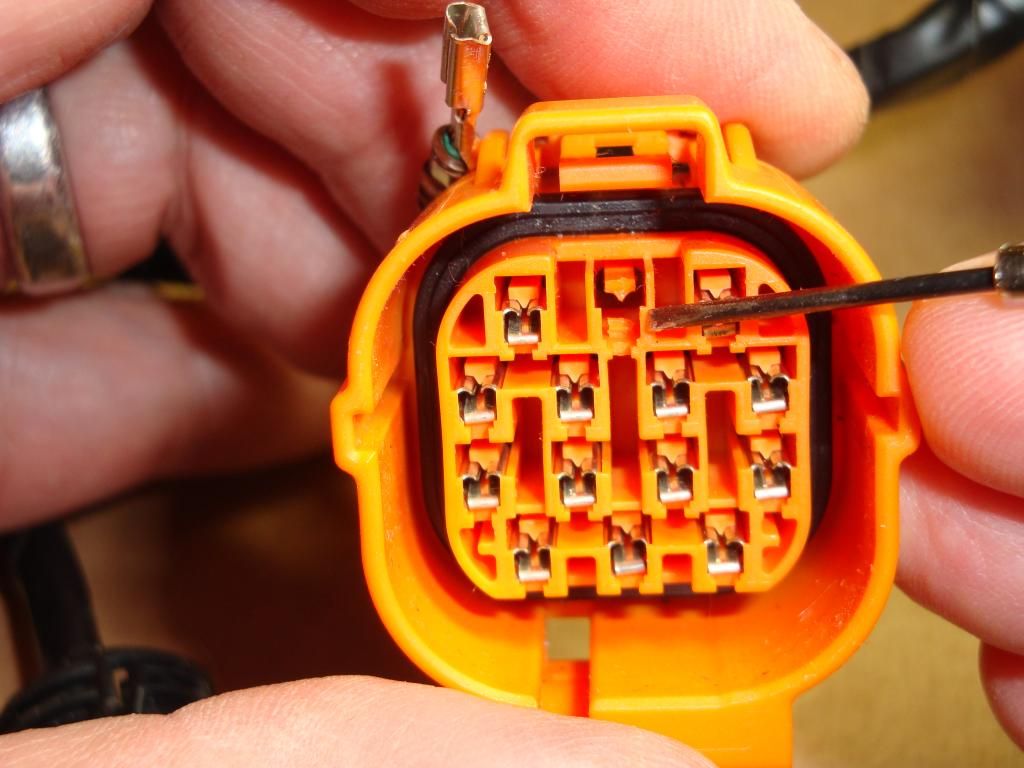
. -
Have a look at my post, here - http://forums.lr4x4.com/index.php?showtopic=88285&p=760762
There's details of the connectors for both the switch and Wipac motors.
.
-
Are you referring to the 10-way and 14-way light grey sealed connectors that plug the wing harnesses into the main bulkhead harness ?
If so, these are Sumitomo HW Sealed Series connectors, and the terminals that you've linked to at Polevolt (in your eBay message to me) are the correct male and female terminals to fit the HW Sealed Series connectors.
However, Polevolt only have the terminals, they don't list the wire seals.
I can supply both male and female terminals, along with the wire seals.
.
-
I suppose they can't be expected to know everything...
In my experience, unless they have a White hat, they usually know b*gger-all about the legalities (or otherwise) of vehicles.
.
-
Colin's latest hydroforming project

.
-
The Idle Air Stepper Motor connector is a 4-way female Delphi sealed MetriPack 150.2 'pull-to-seat' device connector.
It can be bought from Simtek -
http://www.simtekuk.co.uk/product.php/4_way_delphi_pull-to-seat_sensor_connector/?k=:::2644147
It's also used on Ducati motorcycles -
http://www.ebay.co.uk/itm/301134899449
g~~_35.JPG)
The TPS connector, as everyone has already said, is a 3-way female JPT connector.
.
-
Is it possibly to buy the female version of the connector for ecu? From all the places I've read it's very difficult to find and expensive so planned on using a durite super seal connector.
As for moving it to the bulkhead, I don't have one as it has a removal bar fitted. I was planning to put it on the rear wheel each near my webasto heater. Is that still possible with the standard loom ?
Cheers
Tom
The female connectors are on the vehicle's harness, the male connectors are on the ECU box.
There are no wire to wire male connectors made in this series, only the PCB mounted male connectors.
If you look at the ready-made ECU extension harnesses, you'll see that the male connectors are, in fact, the PCB male connectors, which have had the wires soldered to their PCB pins, which have then been encased in plastic enclosures -

When you work out the cost of the connectors and terminals + the cable + the sleeving + the enclosures for the male connectors + labour
The prices that suppliers charge, starts to look understandable.
I've seen write-ups on forums and blogs on the web, where people have claimed to have cut the vehicle's wiring harness, and inserted additional lengths of cable in each circuit (soldered and heatshrink covered), thus extending the length, without problems (don't forget that the crankshaft position sensor's wiring is screened).
If you want to make your own extension harness, both the Red and Black male and female connectors can be bought from Simtek -
http://www.simtekuk.co.uk/product.php/red_econoseal_36_way/?k=:::1562574
http://www.simtekuk.co.uk/product.php/36_way_red_econoseal_female_cable_socket_cfp/?k=:::5901247
http://www.simtekuk.co.uk/product.php/econoseal_36_way_wire-to-board_tab_header/?k=:::1562594
http://www.simtekuk.co.uk/product.php/red_econoseal_36_way_wire_to_board/?k=:::5704469
.
-
I can't help you with a part number for an OBD II male plug - but, one of the ready-made extension leads would do for this part and the cable.
The OBD II female socket used on TD5 Defenders is TE (AMP) part number 348822-2 - which is not easily available in the UK, and would have to be ordered from a US supplier.
However, it is available from Land Rover, as part number YPC107920
http://www.brit-car.co.uk/product.php/199149/5497/connector___cable

The female terminals are Land Rover part number YPL10108 - but, these are not available to order.
However, they can be bought under their TE (AMP) part number 776001-1 from RS, as RS part number 712-2056
http://uk.rs-online.com/web/p/pcb-connector-contacts/7122056/

.
-
Unless you can source a 2nd-hand one at a good price, you won't want to buy a new gearbox harness - they're around £280

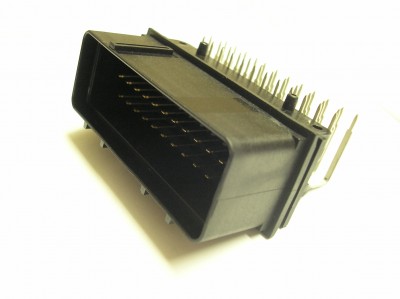
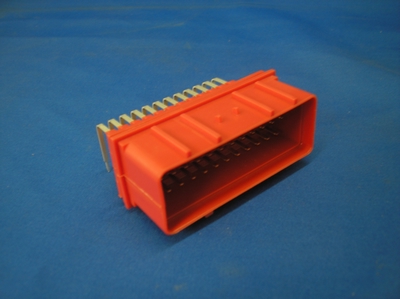
The first two (White) connectors are AMP Multilock 6-way & 10-way female.
I have those connectors, with or without terminals.
The connector on the selector is a 12-way AMP MQS connector (I have those too), it's difficult to see from the picture if it or its wiring are damaged.
PM me
-
I've spent the day slowly unpicking the
dreadfulquality additional wiring put in by special vehicles.After removing the rev raiser for the winch and all the other stuff that's surplus i need to remove some of the inserts in the black ECU plug to reconnect the throttle.
How do i release an insert and withdraw it from the plug?
First, you need to remove the secondary terminal lock from the front of the connector.
It's the White plastic bit shown in the picture below, which just un-clips -

With that out of the way, the individual terminals are released by lifting the terminal retaining tab above the terminal, whilst pulling GENTLY on the terminal's cable.
There is a special tool for this, but a jeweller's screwdriver or safety pin works just as well.
You can see the terminal retaining tab on this 6-way Econoseal connector (which is from the same connector series as the Red and Black ECU connectors) -

.
-
Google found this flickr gallery of someone's visit to the museum - http://www.flickr.com/photos/ell-r-brown/sets/72157621921666871
Which contains this picture of the drill -

Fullsize version (2736 x 3648), here - http://farm4.staticflickr.com/3446/3823885074_b23d3445b7_o.jpg
.
-
Better deal than that you can have your pick of 60 mercedes bendy buses ex TFL £15000 , each 200,to 300,000 kms !!!
Apart from them being too long and unwieldy for London's streets, they had a habit of self-combusting


.
-
Can anyone identify this type of connector and the terminal to match?
One of the terminals had come off its wire and in the process of getting it out of the plug moulding I snapped it so need to source another.
They look kind of like ATX power connectors off PC motherboards, but I'm not sure it's the same type.
I'm pretty sure that it's a Molex Mini-Fit connector -


They can be bought from RS, Farnell, or on eBay.
.
-
The TD5 gauge bulb holders are part number - YAJ100390
http://www.rimmerbros.co.uk/Item--i-YAJ100390

.
-
Wiring is quite straight-forward, it's all in the RAVE wiring diagrams.
I have the 6-way connectors and terminals for the levelling switch -
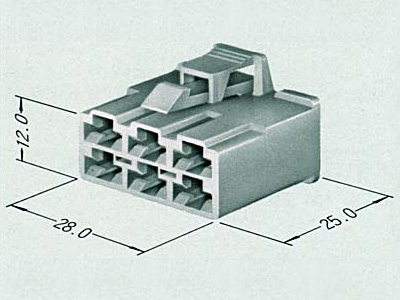
Or, you could just use 6.3mm Lucar terminals.
You don't need complete new wing harnesses - Land Rover make a 'Link Harness' for the levelling motors, this has the levelling motor connector and boot at one end, and a 3-way male Econoseal connector at the other end.
The part number for this link harness is – AMR5833
http://www.brit-car.co.uk/product.php/107451/0/wiring_link___headlamp_adj_motor
If you want just the levelling motor connectors, they're available through VW/Audi (VAG) parts, consisting of a 3-way connector, protective cover, and 3 x 2.8mm female terminals.
Their VAG part numbers are -
Connector housing - 311 906 231B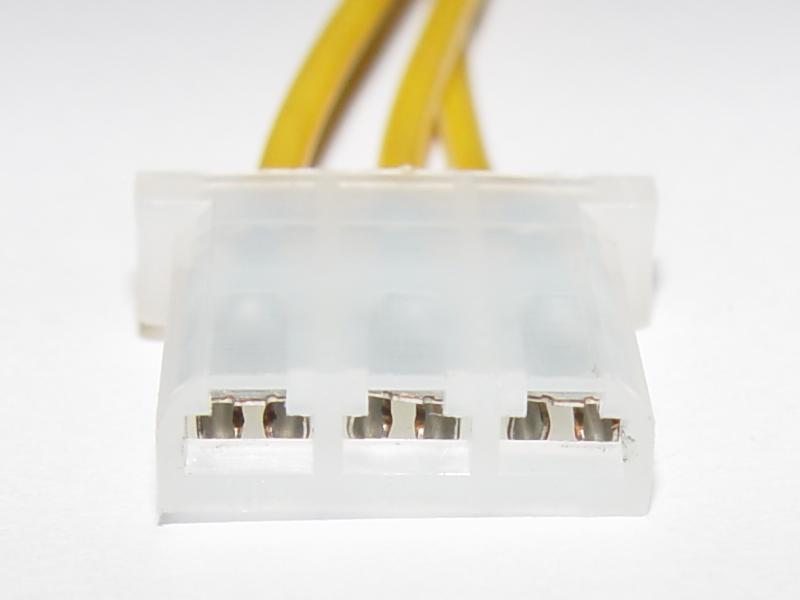
Protective cover - 281 919 141A
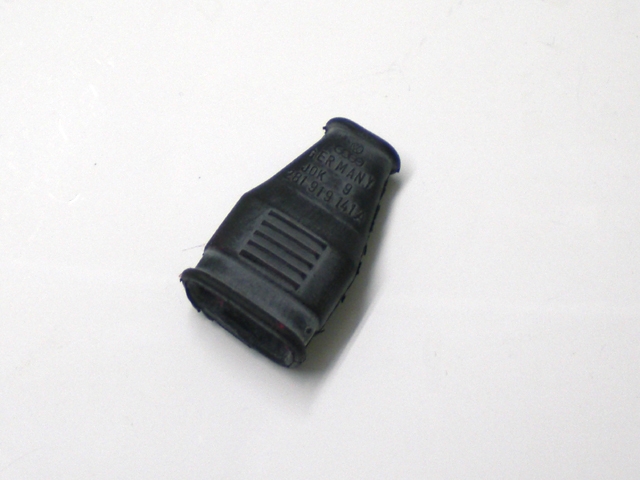
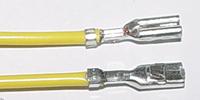
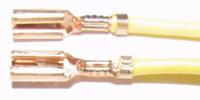
Terminals - 000 979 105 or 000 979 106 – the terminals are pre-crimped to 1.0mm2 cables (what VAG call "Repair Wires")
 .
. 
I couldn't find a VAG part number for uncrimped terminals; but, the dealer should be able to look them up.
.


Fitting electric windows to base spec Puma?
in Defender Forum (1983 - 2016)
Posted
The harnesses you've linked to also contain the wiring and connectors for central locking.
If you wanted them just for electric windows, they're part number - LR016314
http://www.brit-car.co.uk/product.php/158916/0/wiring_assy_pass_door__ew__cl_def
The Puma doesn't have a 'one size fits all' harness - so, if your vehicle didn't leave the factory with electric windows, there won't be the wiring or connectors in the main harness to connect any of the above door harnesses to. There also won't be the wiring for the windows switches.
I can supply the connectors to mate with both types of door harness.
If you wanted to make your own door harnesses, I have the connectors to fit the factory electric windows motor/regulator, as well as the factory convoluted door grommets - but, depending on the price that you can get LR016314 for, this may work out more expensive
I can also supply the White 6-way connectors to fit the electric windows switches, as well as fuse box and header terminals required to wire-up the switches.
I have some of the connectors listed in my eBay shop, here - http://stores.ebay.co.uk/Land-Rover-Connectors
But, if you want any of them from me, PM me here, as I can do them a bit cheaper direct, without eBay's percentage
.