


PaulMc
-
Posts
949 -
Joined
-
Last visited
-
Days Won
4
Content Type
Profiles
Forums
Events
Gallery
Blogs
Posts posted by PaulMc
-
-
Good advice from Jon

I wire them like this -

The above diagram doesn't show it but, of course, the '+12V' is from a fused supply

Also, the wire gauge shown is for 55W halogen lights, the gauge could be down-sized for LEDs, but not too small, as you don't want a voltage drop.
I use a continuous length of the larger gauge cable, with the conductor exposed and the smaller gauge 'spur' to each lamp crimped onto it it, using a splice crimp, which is then over-sleeved with adhesive-lined heatshrink, as this picture sequence illustrates -
 .
.  .
.  .
. 
 .
.  .
.  .
. 
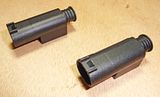
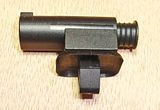
Using a male/female connector at the gutter, so that the lightbar can be removed, is a good idea.
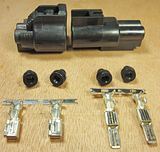
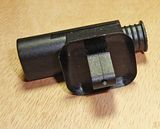
For your purposes, a 'standard' 070 (1.8mm) Econoseal connector is more than adequate - http://www.polevolt....Connectors.html
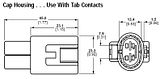
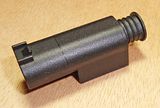
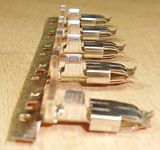
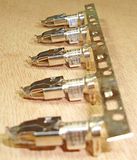
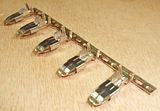
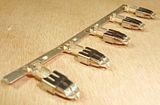
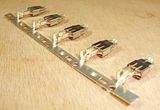
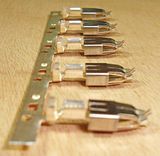
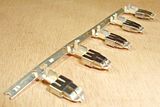
But, for halogen lights, I use the Econoseal 187 (4.8mm) Series, which will accomodate 3.0mm² cable, and has a nominal current rating of 25 Amps -
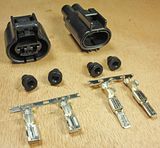 .
.  .
.  .
. 
.
-
 1
1
-
-
I recently upgraded the front seats on my defender 300tdi to heated puma ones and was wondering if anyone had any advice on how easy it is to wire them in? The cold weather is coming and i'd like a toasty......!!

Have a look at these threads -
http://forums.lr4x4....showtopic=69458
http://www.defender2.../topic7679.html
http://www.defender2...6207.html#96207
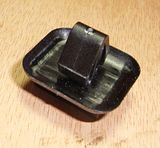
Further to the information in the above threads, I can now supply the proper connectors to mate with the heated seats, along with the body clip to mount the connector to the seatbox -
 .
.  .
. 
 .
. 
.
-
First up hello I'm new here and suffer with. 110 td5 year 2000
I've been having intermittent failure with all side head and dash lights
They all go out at the same time
After fitting a new switch it was no better
Had the dash part a little and one of the header joints is melted
Can I cut it off and just join together wires of the same colour that go into it ?
I think it's header number 0287 and sits behind the ligher socket where te loom drops down to te fuse box
Thanks all
You can just join together (solder and heat-shrink sleeve) all the wires for each circuit.
What year is your Defender?
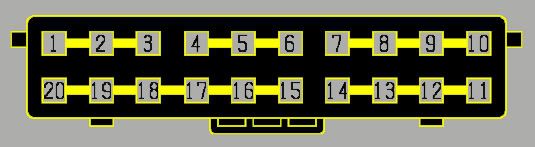
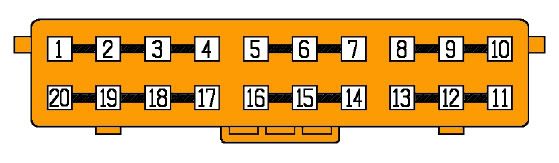
Be careful - because, on C0287 on 1999-2001 TD5s, not all the wires going into the sub-circuit on cavities 11 to 14 are the same colour (Purple and Purple/Brown).
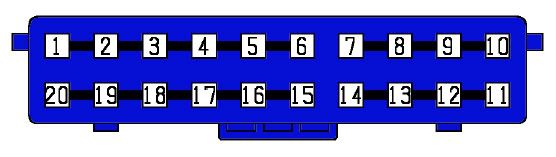
If you want to replace the burnt header, I can supply a replacement new Blue 20-way header and terminals -
I also have them in - Black, Green, Grey, Orange and Yellow - but, these all have different numbers and sizes of sub-circuits.
.
-
Replacement connectors can be fiited to the wiring loom.
I think that the Discovery-1 tail lights use a 2-way Econoseal connector (same as Defender 'NAS' lamps) but, to be sure, can you post a picture of the dodgy connector.
.
-
Thanks for the replies. drilling the holes is no problem, bit of Galvafroid on the holes !
Got no doors yet which is why I have no cables, but trying to get everything in place ready, so trying to picture how everything sits,
Mmmm yes we have cable that will suit this down to the ground, so might keep the connections in the bulkhead but will still need the grommet to get from door to A piller. I take it the door has a slide in section for the other end ?
Jason, yes please for some measurements if its not to much trouble
Regards
Les
Les,
The connections stay in the bulkhead, the convoluted grommet that goes between the bulkhead and the doors, is on the door harness.
This is the driver's door harness (LR016315) -

I've got a brand new LR016315 harness in a box under my desk, if you want bigger clearer pictures of the grommet and/or connectors.
.
-
You'll not find anyone selling those awful moulded rubber/bullet connectors separately because, as you said earlier, they're moulded around the bullet/cable in production..
If you want to retain that connector on your vehicle's loom and use a later Defender column switch then, as you've already said, you will need an adaptor loom.
The easiest way to do this would be to utilise the rubber/bullet connector from an old series/early Defender column switch, cut off of the switch with sufficient cable lengths to crimp on the later type of 4-way female connector, to mate with the newer type of switch.
I can supply the 4-way female connector and terminals.
.
-
Morning all !
When Scorpion racing where called Scorpion racing they made/sold som protection brackets for til lower rear corner of the outer tub.
These where placed from the rear crossmember and towards the wheel, belive you had to trim the panels to make them fit.
Now, does anybody sell these today ?
I have tried extreme 4X4 with no luck.
Cheers
Morten
Extreme still sell them -
http://www.extreme4x...MPER_STEPS.html

I believe that they're actually made by Safari-Equip -
http://www.safari-eq...ndex.php?page=5

.
-
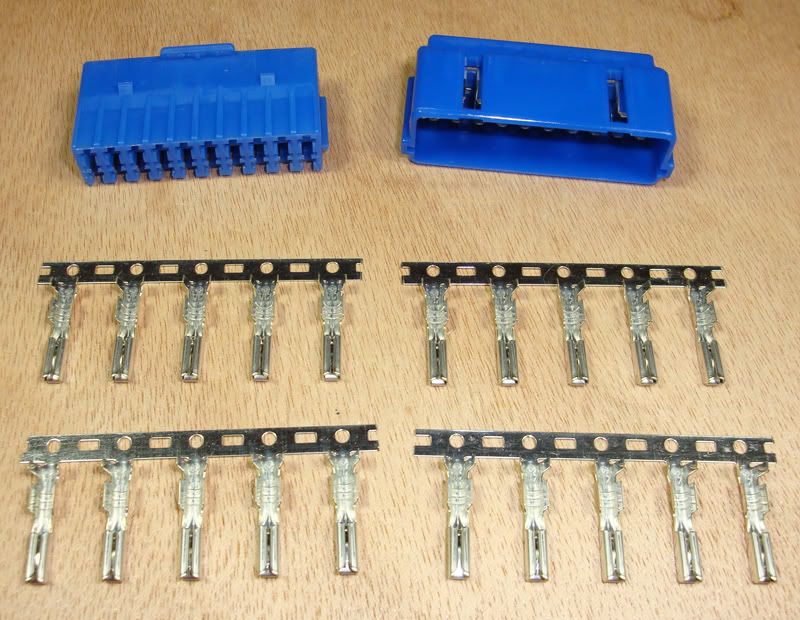
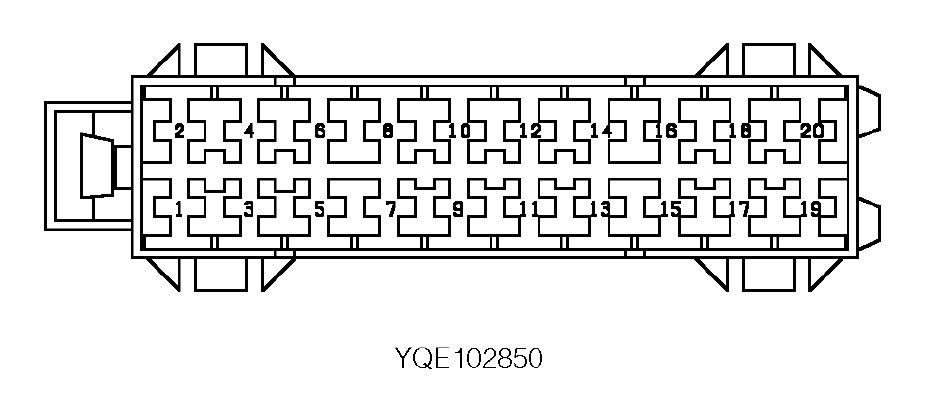
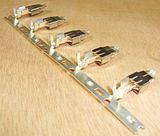
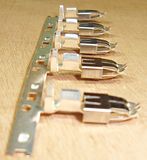
You could use a Header Connector to splice multiple wires down to one.
The 20-way Sumitomo headers (as used all over Land Rovers), can have several sub-circuits in them, depending on their colour -
BLACK
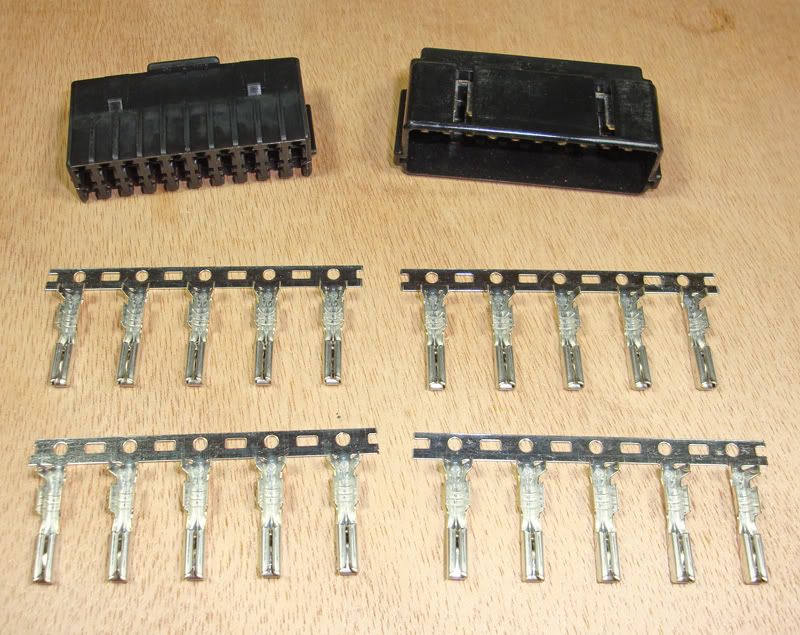
Sub-divided into five circuits -
BLUE
Sub-divided into four circuits -
GREEN
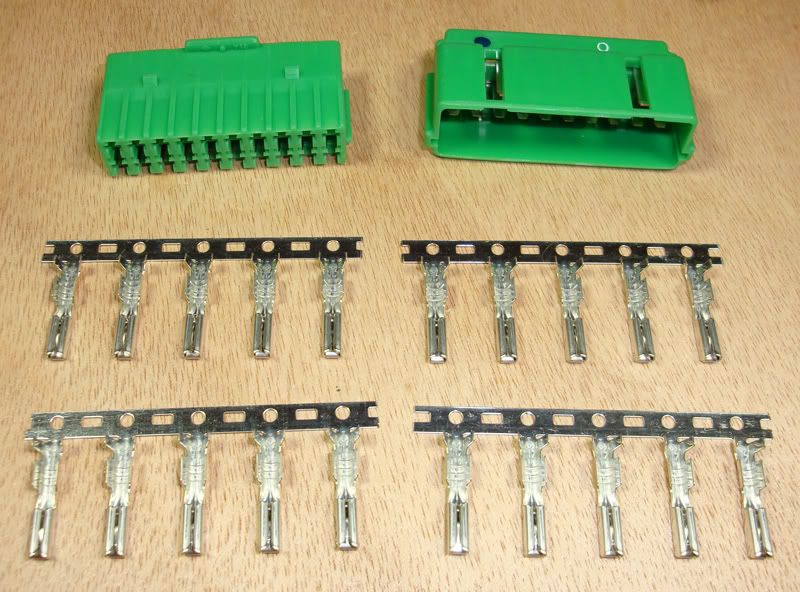
Sub-divided into four circuits -

GREY
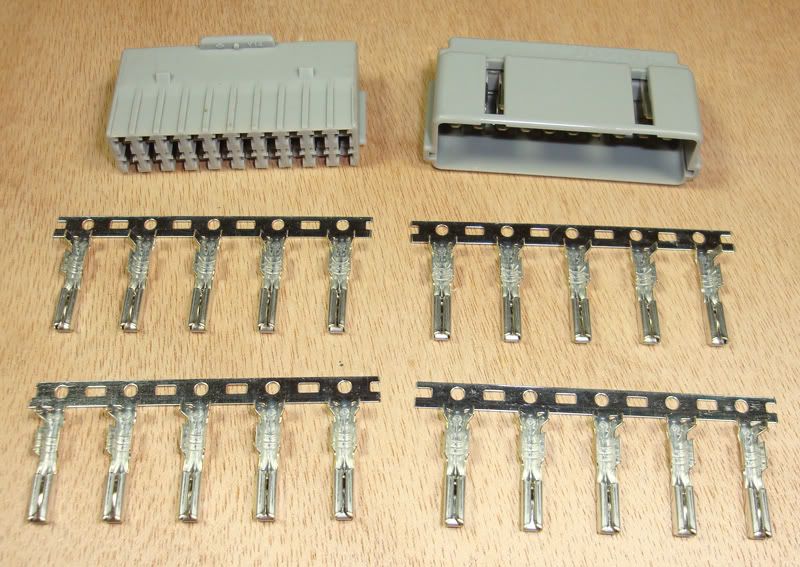
Sub-divided into three circuits -
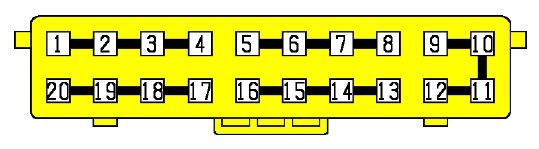
ORANGE
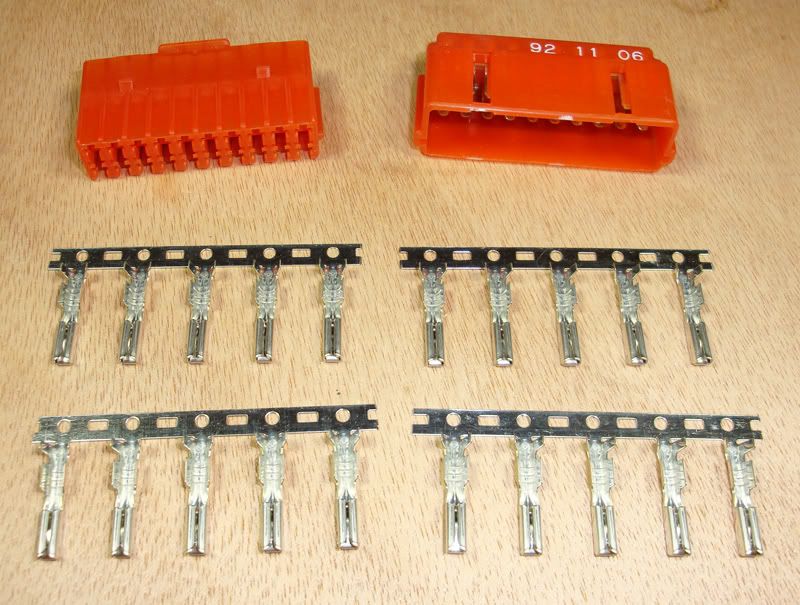
Sub-divided into six circuits -
YELLOW
Sub-divided into five circuits -
.
-
Thanks for this. I am away from my TD5 right now, so a couple of questions...
1. Will this switch fit and look right in the top left spot in place of the blank?
2. Since I don't have any extra switch caps, is there a neat way to remove the icon and relabel the switch or a source for the right cap or a blank one?
Thanks!
1. Yes it will - but, you'll have to trim-off the moulded keyway at the back of the switch body (top right in the picture above).
2. You can use the cap off of the switch blank, but you will need to drill a 2.5mm hole for the tell-tale warning light's 'lense'
Have a look at this - http://www.lro.com/f...=385823#p385823
The switch caps are made from translucent white plastic, which has been sprayed black or Ash Grey, with the symbol masked-out, so that when back-lit, the symbol illuminates.
If you're good with a Dremel, you can engrave your own symbol in the blank, like the home-made cruise control switch, here -
http://www.lro.com/f...hp?f=18&t=58151
Or you could use a stick-on symbol, like these from VWP, or MUDSTUFF -


The MUDSTUFF symbols are clear on black, so if you polished away a small area of the paint finish on the blank switch cap (under where the symbol is going to be stuck), the symbol will illuminate with the dash lights.
Although they haven't pictured the sheet, MUDSTUFF also do a White on Clear sheet, which could be used on a blank switch cap , without any polishing away of it's paint finish.
Of course, this wouldn't illuminate with the dash lights.
.
-
I am thinking of adding driving lights to my 2005 TD5, but the proper center console switches are ridiculously expensive. Is there any reason I couldn't use a rear fog lamp switch to trip the relay to the driving lights and put it in the blank spot opposite its twin and just mark them appropriately? Cheers, Matthew
The rear foglamp switch won't work.
It's a momentary (non-latching) switch, that switches to earth.
The rear fog lamps are switched by an ECU that detects this momentary path to earth and then switches on the rear fog lamps (only if the headlamps are also 'on').
The switch that you're looking for is the Defender Puma Heated Seat Switch - YUF500150LNF
This is a latching live-switching switch, which costs around a fiver

http://www.rimmerbro...-i-YUF500150LNF
£4.17 ex VAT (£5.00 inc VAT)
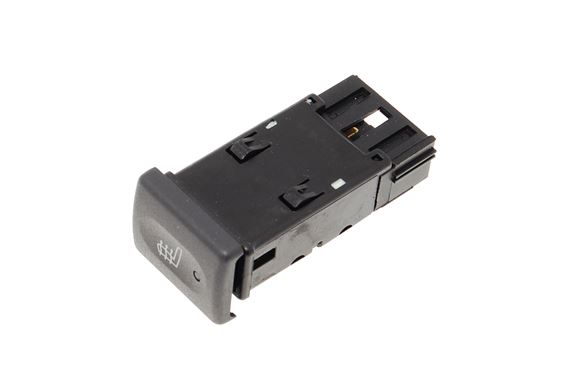
It uses the Black 5-way switch connector, which I sell on eBay -
http://www.ebay.co.u...nnectors/m.html
2g~~60_12.JPG)
It should be wired, as follows -
Pin 1 - Live in from fused supply
Pin 2 - Live from dash illumination
Pin 3 - Not used (but is internally connected to Pin 5 - Earth)
Pin 4 - Switched live out to accessory
Pin 5 - Earth
You can swap the 'Heated Seat' switch cap for one from another switch, including the rear fog lamps switch.
.
-
I found these on t'interweb a while ago, might be of interest -
 .
.  .
.  .
. 
 .
.  .
.  .
. 
 .
. 
Not Harvey Frost, but still interesting -
 .
. 
.
-
Does Vaseline work, I've always been hesitant in case it shorts something...!
I've used it without problems but, you got me wondering

So I tried the probes of my continuity tester in a pot of Vaseline and I didn't get a flicker from it.
.
-
I had a problem a week or so ago when the fuel pump stopped working 50km from home. Subsequent investigation found that the cause of the failure was corrosion of the fuel pump supply pin in the connector on the top of the pump. Any suggestions as to how I can prevent this happening again? Application of vaseline or grease? If grease what type?
Cheers,
Del
Use Dielectric Grease (or Vaseline, if you can't get Dielectric Grease), on the terminals, the body seal in the connector housing, and around the wire seals where the cables enter.
.
-
Thanks Paul. Mine is a 300tdi and running Mudstuff Dash and Carling switches. Looking at MS would the off/mom (for rear foglight) switch do it?
http://www.mudstuff...._Switches.shtml looks like the 'indicator' light on stays on whilst the separate relay is energised. Did I read that correct?
Will put a seperate switch in for the mirrors. Should I use another off/mom switch? and can I piggyback off the front screen timer?
Cheers,
G
Yes, it looks as though the Off/Mom Fog Light Switch is the one you want -
http://www.mudstuff....fog-switch.html
Off-Mom (Fog)
Momentary spring loaded 1-way rocker switch.
This switch replaces the standard momentary rear fog lamp switch fitted in late model Land Rover Defenders.
This switch differs from the regular off-mom switch in that it has an extra feed from the fog lamp relay in order to maintain 'On' illumination when the switch is released.
If you use a separate switch for the heated mirrors, then you can't piggy-back them off of the screen timer, as this will also power the heated screen.
If you want the heated mirrors on a separate timed circuit, you'll have to use a dedicated timer relay for them, as well as another switch (as above) and 30A relay (you wouldn't need a 70A relay for heated mirrors).
You could just connect the heated mirrors so that they were on at the same time as the heated screen.
.
-
any of you guys/girls got one of these or similar on your 90/110/130. ?
just bought this kit via ebay 150899854961 intending to fit the camera above the rear door & mirror either clipped over existing or to replace the existing mirror, can't do anymore until the kit arrives.
I fancy a reversing camera in my Discovery II, but I'm holding out for a 'Metropolis' overhead console to mount the screen into.
So, I will be keen to see how you get on with this one.
Like a lot of these kits on eBay, the description is in 'Chinglish'.
I particularly like the fact that it's "free from scratching and alcoholic erosion"

.
-
new 70amp relay fitted & the wiring adjustment made, switched on & tested, all working as it should even the timer 8 minutes operates correctly,
Thank you very much to all who assisted with this little project
it's only taken me nearly 8 years to complete

The final wiring diagram [as fitted to my 1989 110CSW] attached.
Well done Ralph
I'm sure PaulMc would advise the best switch type to use.
For the heated windscreen circuit above, any live-switching momentary switch (with a separately wired 'tell-tale') is suitable.
If you have a 2002 onwards Defender, there's a factory switch that will do the job - YUG000460LNF

It's not too dear either

For heated door mirrors, if you don't have the room for a separate switch, then you could wire them from the heated rear window circuit, as they do on Range Rovers and Discoverys.
.
-
An update to this thread:
I've managed to source a similar compatible Terminal to fit into the unused ways on the Defender TD5/Puma Fusebox connector block -
They're not identical to the terminals in the TD5/Puma Fusebox but, they're by the same manufacturer and they are a very close match - they fit into the fuse box with no problems.
I have them to suit three different cable sizes -
0.5 – 1.0mm2
1.5 – 2.5mm2
4.0 – 6.0mm2
 .
.  .
. 
 .
.  .
. 
 .
.  .
. 
They are £0.50 each (all sizes), or any 5 for £2.25 + Postage
I'm happy to post anywhere in the world -
P&P for the UK is £1.10
P&P for Europe is £2.95
P&P for the Rest of the World is £3.55
.
-
The later blade type fusebox is available from Land Rover as a replacement for the older glass fuse type -
- Fuseblock = PRC4826 - £4.52
- Connector to fit 0.5 - 1.0mm2 cable = STC4034 - £3.65
- Connector to fit 1.1 - 2.0mm2 cable = STC4035 - £4.98
- Connector to fit 2.5 - 3.0mm2 cable = STC4036 - £0.61
Prices are Retail inc. VAT from Feb. 2008 Microcat
Microcat doesn't specify the quantity of connectors supplied for the price shown.
Paul.
An update to this thread:
There's a seller on eBay, selling the Lucas-RISTS 20-Way Blade Fusebox & Terminals.
This is PRC4826 - with 40 x terminals, for only - £6.50
http://www.ebay.co.uk/itm/140844488407

.
- Fuseblock = PRC4826 - £4.52
-
Ralph,
The PG wire from terminal 85 of the 70A relay should go to terminal 8 on the timer relay.
So that, when the timer is in it's timed period and is energising the coil of the 70A relay, it's also lighting the switch's warning light.
Other than that, the diagram looks fine
.
-
Thanks Paul.
I tried ordering a pair from 'Easten Beaver', byt they seem to want $130 shipping on a pair of connectors! I'll mail them & see if they want to stick a pair in the mail instead!
Si
You've fallen foul of his $20 minimum order settings.
He explains it here -
http://www.easternbe...g/shipping.html
"Minimum Order of $20: It's not possible for me to set a minimum order value automatically, so I have adjusted the shipping cost for orders under $20 to ridiculous amounts."
.
-
i believe is a Sumitomo connector 6189-0130
It is
In addition to the housing 6189-0130, you also need terminals and wire seals, as well as the terminal retainer - 6918-0324
http://swsct.sws.co....r_s=61890130hws

.
-
Does anyone have the info in Rave as to where I can buy the correct connector - the dash part is four pin non waterproofed female.
This sounds like the relay connector?
Can you post a picture of it?
.
-
Any of you happen to know what the 3 pin connectors on the fan are? Presumably Tyco?
Si
I think the later (300Tdi on) models use 3-way TY Econoseal connectors. Earlier models use those annoying moulded-on-to-the-loom rubber ones.
As said above - the 300Tdi models use an Econoseal 3-way female connector
The TD5 models use a Sumitomo HW Series 3-way (inline) female connector -
.
-
Can anyone supply a part number for the centre console twin electric window switches. I have searched with google but can only find the new type of switch - this is for a 1997 Defender 90.
Thanks in advance
Barbara


They look like aftermarket switches.
From the terminal arrangement, they look like ones from SPAL - http://www.spal.it/s...stalli_2010.pdf
.


Roof bar light wiring advice needed
in Defender Forum (1983 - 2016)
Posted
Those particular splice crimps (good for a total CSA of 1.5 - 2.0mm2), I get from a trade supplier, in reels -
I can sell them to anyone who wants some, for 10p each.
You can improvise and make your own from the open-barrel of a non-insulated crimp terminal, this one is for 6.0mm2 cable -
Just snip-off the connector, leaving the conductor open barrel crimp.
Depending on what you're splicing, it can sometimes be useful to leave the insulation support on it -
This is the above improvised splice crimp, being used to spur 1.5mm2 cable from 3.0mm2 cable -
Stripped with crimp in place -
Crimping -
Crimped -
.