


PaulMc
-
Posts
949 -
Joined
-
Last visited
-
Days Won
4
Content Type
Profiles
Forums
Events
Gallery
Blogs
Posts posted by PaulMc
-
-
thanks paul, so I'm now gonna hv to buy some .05mm2 gauge cable. I'm surprised it isn't mentioned in retros guide, i though he had just crimped straight into the existing loom.
on the plus side drove in dark for first time with new clocks! wow!! amazing difference.
On older vehicles with wiring with the thick PVC insulation, it's very difficult to crimp these terminals properly.
big hands and small terminals don't help haha
I know what you mean - have a look at my post, here - http://forums.lr4x4.com/index.php?showtopic=14892&p=802060
right just had a look on VWP site and polevolt and neither stock the range of colour combos in0.5mm2. anyone know who might? or should i forget about colour coding as they will be very short runs
You won't find many suppliers who sell 0.5mm2 cable with trace colours, by the metre.
The only one that I'm aware of, is Colin at Kojaycat - http://kojaycat.co.uk/epages/950000457.sf/en_GB/?ObjectPath=/Shops/950000457/Products/%22TW0.5mm%20Cut%20Tracer%22/SubProducts/%22TW0.5mm%20Cut%20Tracer-0014%22
.
-
Gordon,
The 040 terminals in the 16-way and 20-way instrument warning lights connectors, won't take 1.0mm2 cable.
They're sized for 20 - 24 AWG, which works-out to 0.2 - 0.56mm2
The factory crimps on these terminals are narrow and high -
 .
.  .
. 
It's not possible to replicate the above, using the Hozan crimper.
However, the Hozan crimper will crimp these terminals, you just have to do it in stages.

Stage 1 - crimp the conductor, using 1.7L
Stage 2 - crimp the conductor, using 1.4
Stage 3 - crimp the insulation, using 2.4L
Stage 4 - crimp the insulation, using 2.0L
Stage 5 - crimp the insulation, using 1.7L
It sounds a bit of a 'faff' - but, you soon get the hang of it.
When I send you your connectors and teminals tomorrow, I'll include an 040 terminal crimped to a length of 0.5mm2 cable, that I've crimped using the stages above.
Paul.
-
Those parts CD's are copy protected with 'Hexalock' - you won't easily make a working copy of them.
Because of the way Hexalock works, they'll only run on earlier versions of Windows.
Hexalock also prevents a copy on your hard drive from running, unless the original CD is in the CD/DVD drive.
-
I was just trying to think of a modern day alternative to Australia ....
It's a shame that Gruinard Island has been de-contaminated

-
Good news! The very first item I tested was the fault. I tried to establish that the speedo sensor had an earth; it did not. I could not establish what has happened to its earth - anyone know where it earths, the cables disappear into the loom? I ran a new earth and the speedo now works again, and I can cruise in fifth. Hurrah.
Cheers
Chris
The speedo transducer's earth goes back to a splice joint in the engine harness (this splice joint is shared with several other devices on the engine harness), from there it runs back to the main harness via the engine harness/main harness connectors C0162/C0448
In the main harness, it runs down to a Blue 20-way header (C0287) in the locker under the driver's seat, and from there it runs back to the main earth header (C0550) which is mounted to a stud on the bulkhead in the engine compartment.
.
-
The main harness to chassis harness connectors on a 300Tdi Defender are AMP Econoseal female connectors.
The mating AMP Econoseal male connectors to fit to your existing chassis harness are readily available from Polevolt -
http://www.polevolt.co.uk/acatalog/Econoseal_Connectors.html
.
-
Are these any good?
http://www.wheelspacers.uk.com/index.php?cat=c354_nach-Gewinde.html&gw=6&kf=39
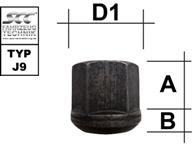 - total height: 24,0 mm
- height hexagon (A): 18,0 mm
- height spheric flange (B): 6,0 mm
- head diameter (D1): 28,0 mm.
-
Over the past couple of days I've been doing some servicing and pre MOT work on my faithful TD5 disco. Whilst working in the right hand side of the engine bay I came across a stray terminal hanging down from the chassis leg. I've had a good look through the engine bay and can't find a terminal that it connects to. Unfortunately I haven't got a rave I can check it with. The wire colours on the terminal area yellow/black, yellow/pink and orange/grey. Can anyone shed any light. Thanks
A 3-way connector with the wires - Yellow/Black, Yellow/Pink, and Orange/Slate - is for the ACE lower accelerometer -

.
-
Thank you PaulMc!
I've been a lurker here for years and the posts on this forum have been very helpful. I have read many posts from Les. I've been installing a 300tdi in my NAS 90 for a couple years now. I got it running last night. Now I'm just tidying up a few things. Your tip on the econoseals saved me a ton of time. Many thanks!
Peter
You're welcome

.
-
You could always ping PaulMc a PM. He is the bible on harnesses/connectors..

That one has me puzzled as well

I looked for it, when Mo posted that picture a couple of days ago, here - http://forums.lr4x4.com/index.php?showtopic=93209&p=809302
The Discovery-2 uses that Sumitomo 250 series 3-way connector as one of the connections between the main harness and the heater harness - but, I've never seen it on the Defender - and, it doesn't appear in any of the Wiring Diagrams or Electrical Libraries that I have.
From the picture, it looks as though it's part of the A/C unit's harness, rather than the vehicle's harness.
The only connection between the A/C unit's harness and the vehicle's harness, is the Sumitomo Brown 7-way HD250 connector - I'm wondering if the 3-way connector is the A/C harness connection to the unit's blower motor?
.
-
To release the terminals from the BMW sealed 4-way connector between the main harness and engine harness -
The connector housing has a sliding lock plate on it's front, once this is slid open, the terminals can be pushed out from the front to the rear (they can be quite resistant to moving) – don’t pull on the cable, as it will probably pull it out of the terminal.
Locked (lock-plate slid over to the left) –
Opened (lock-plate slid over to the right) –

If you do damage any of the terminals or wire seals on these connectors - then, I do have some replacements.
TD5/Puma fuse box terminal blocks
These pictures show the secondary terminal locks, which just push through the terminal block (it makes it easier, if you unclip the terminal block from the fuse board first) -


Secondary terminal lock removed -

This picture shows the holes on the front of the terminal block that you should push a couple of jeweller's screwdrivers, or the 2-pronged terminal release tool into to release the terminals (they can be quite tricky to release) -

This picture of a removed terminal, shows the tangs that must be depressed to release the terminal -

If you need to add or replace terminals in this type of fuse box - then, I have compatible terminals.
.
-
The link harness for central locking and courtesy light switches on the 2nd row doors, plugs into C2004 under the driver's seat.
It's a White 3-way female Multilock 070 connector -

.
-
Full info courtesy of PaulMC in this post...not quite as easy as it would appear. Easiest solution is probably a TD5 disco scrapper...
Matt
Further to my post in that thread, here are the BMW part numbers for the 4-way connector, terminals and wire seals -
BMW connectors
The 4-way connector housings are available from BMW dealers as –
4-way male housing – 61 13 8 367 075 (superceding – 61 13 8 367 071)
4-way female housing – 61 13 8 367 076 (superceding – 61 13 8 367 072)
I can only find part numbers for unsealed terminals, the sealed ones only seem to be available pre-crimped to short ‘repair cables’, and then, only for up to 2.5mm2 cable.
There is a 2.5 - 4.0mm2 female terminal listed, but no male terminal, that I could see –
Female terminal, sealed, 2.5 - 4.0mm2 – 61 13 8 352 926
Wire seal for above – 61 13 8 352 924
The BMW part numbers for the unsealed male and female terminals to suit 1.0 – 2.5mm2 cable and 2.5 – 4.0mm2 cable, are –
Male terminal, unsealed, 1.0 – 2.5mm2 – 61 13 1 376 193
Male terminal, unsealed, 2.5 – 4.0mm2 – 61 13 1 376 195
Female terminal, unsealed, 1.0 – 2.5mm2 – 61 13 1 376 204
Female terminal, unsealed, 2.5 – 4.0mm2 – 61 13 1 376 206
To connect to the TD5 in-tank pump/sender, you need a female connector housing and female terminals.
.
-
thats fab paul!!!!! is there a special crimping tool for those connectors??
There is Sumitomo tooling - but, it costs a small fortune

I use this (which also wasn't cheap) -


You can buy a cheaper tool on eBay.
Any of these will crimp these Sumitomo 090 terminals -
http://www.ebay.co.uk/itm/251268499824


http://www.ebay.co.uk/itm/261110204270


http://www.ebay.co.uk/itm/251174268242


I don't (yet!) have any of the above - but, I do have one of these -
http://www.ebay.co.uk/itm/191345846654


Not cheap, but very versatile.
These Hozan crimpers will crimp almost every type of terminal you'll find in the connectors used on late model Land Rovers.
I've used them to make perfect crimps on -
MQS sealed (TD5 horns, side repeaters)
MQS unsealed (TD5 clock, Tdci instrument connectors)
040" Multilock (TD5 instrument warning lights connectors)
070" Multilock (switch connectors)
090" Sumitomo unsealed (TD5 14-way instrument harness connector, hazard warning lights switch connector, 20-way circuit headers)
090" Sumitomo sealed (TD5 main/engine/chassis harness interconnects, Denso alternator connector)
070" Econoseal (NAS lamp connectors)
Junior Timer & Junior Power Timer - sealed and unsealed
As well as several other types of terminal.
The only down-side of the Hozan tool, is that it's only available from Japanese sellers.
They all ship to the UK - but, that's where it can get messy

You'll get mugged for Import VAT, which is charged at 20% on the cost of the item and the shipping charge

You'll also get charged a 'Handling Fee' by Royal Mail/Parcel Force, to cover them collecting duty on behalf of HMRC/UKBA
If you're lucky, your parcel will be 'handled' by Royal Mail, as they only charge £8.50 for their 'service'

If you're unlucky, it'll be 'handled' by Parcel Force, who charge £13.50 for their 'service'

.
-
a few daft questions,
how do you remove the pins from the grey end td5 dash loom? not cutting them as per retroanacondas guide as i bought correct grey connector from paulmc.
also is there a guide to crimping/soldering the new pins? not something ive done before and would like to do it properly
thanks
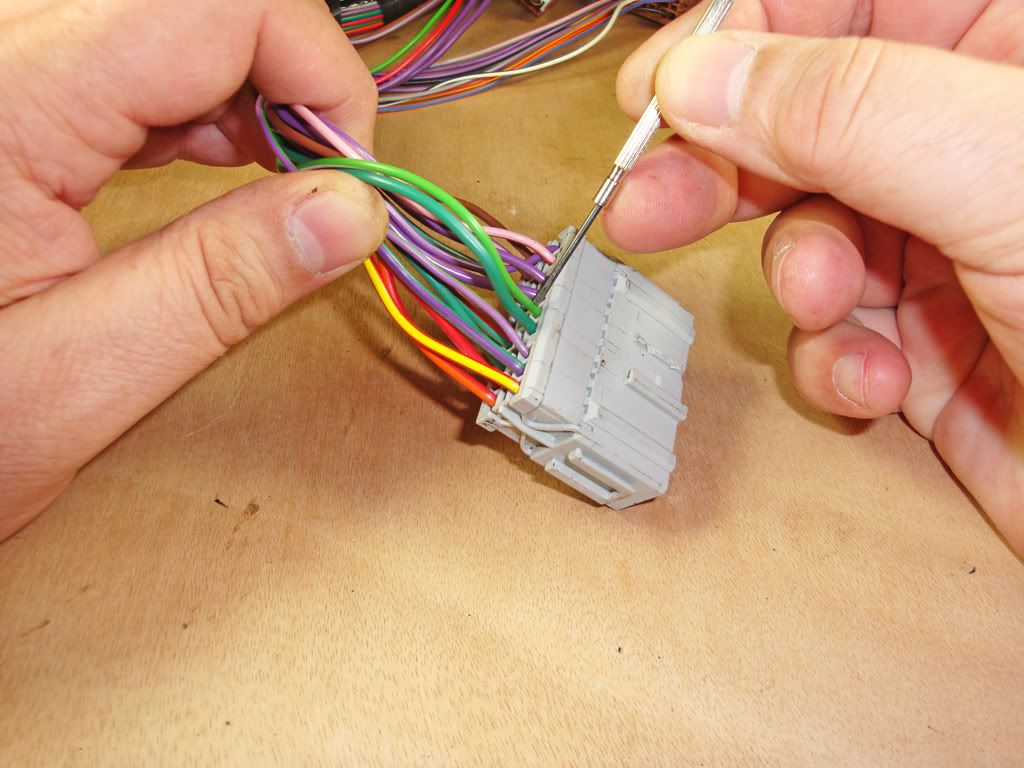
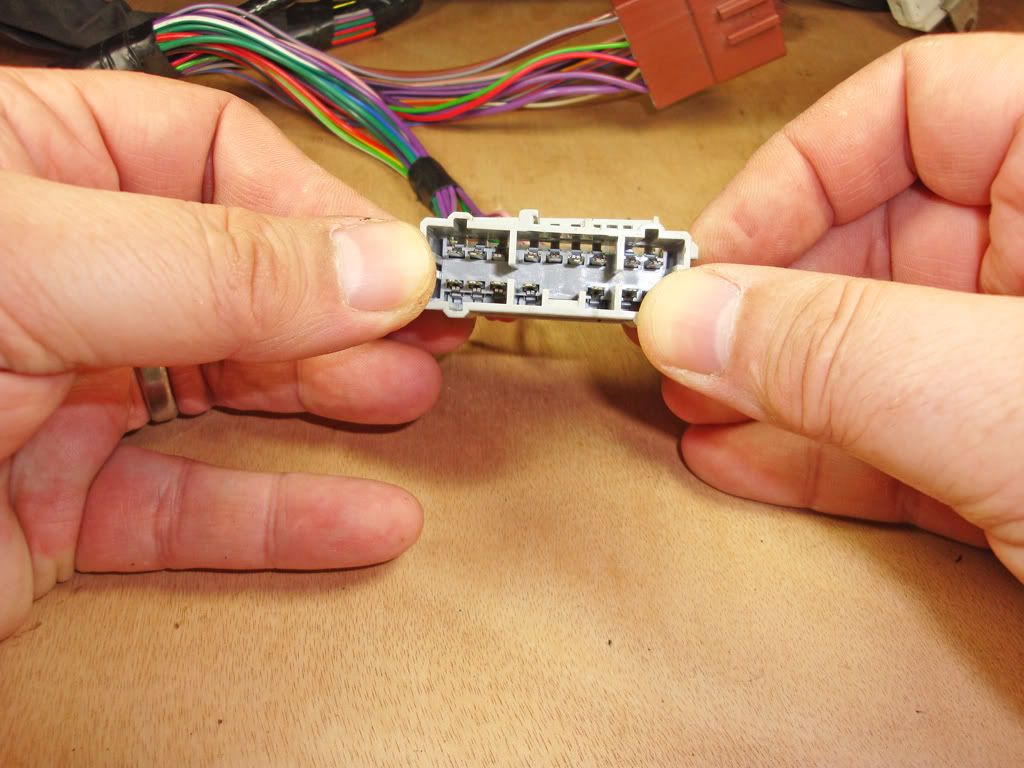
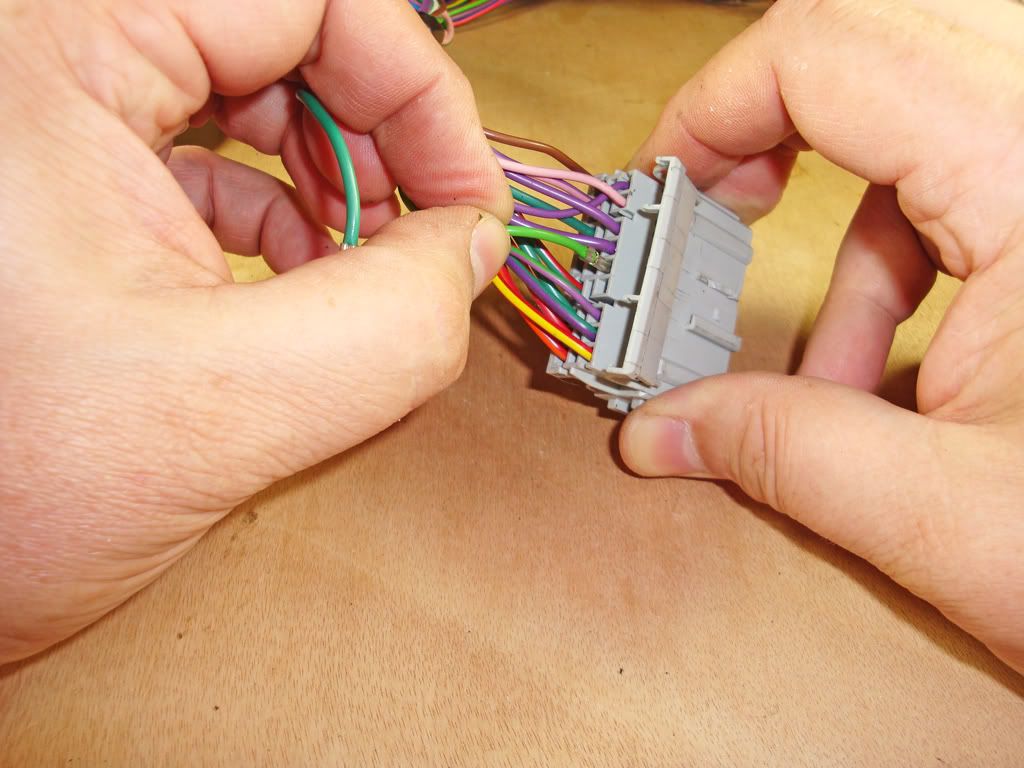
This is a similar male connector on a D2 body/roof harness.
The procedure is exactly the same for the 14-way male connector on the TD5 Defender's instrument harness.
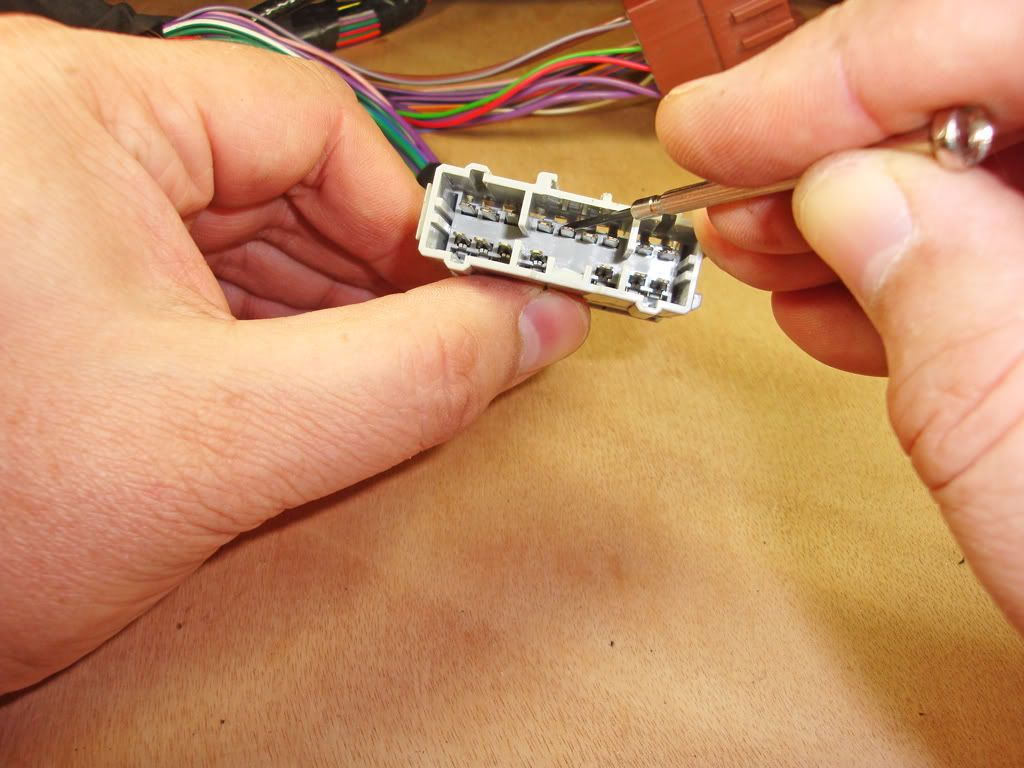
In this picture, I'm pointing with the jeweller's screwdriver to the LGW and GN wires (as these are the two that I'll be releasing) -
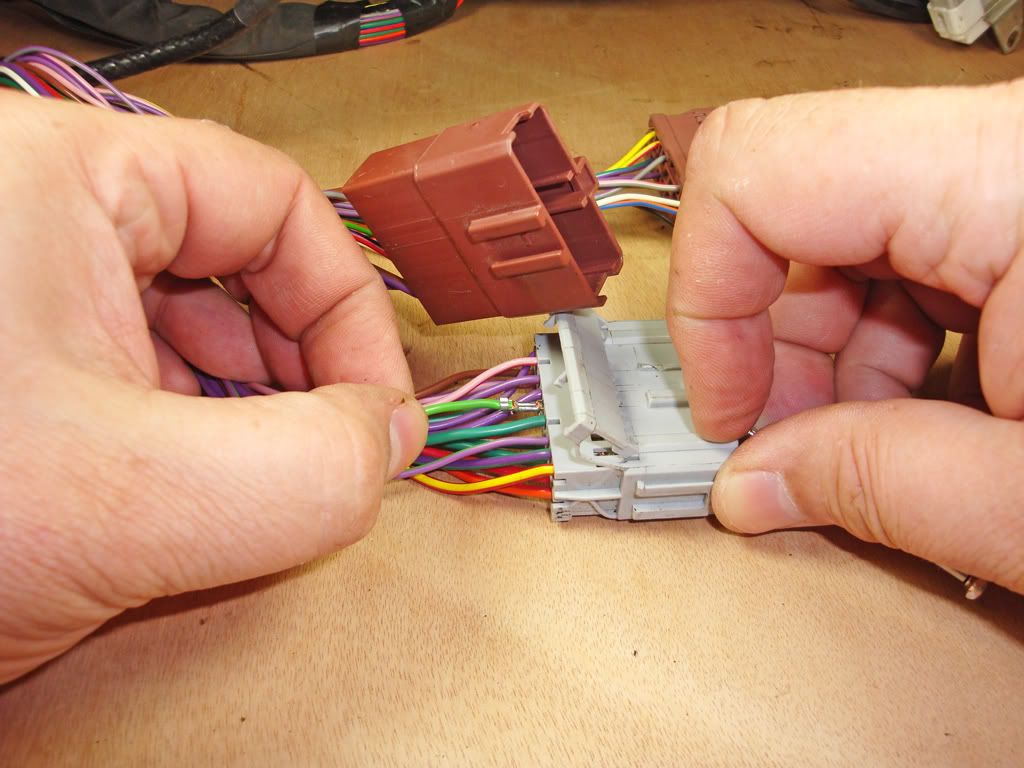
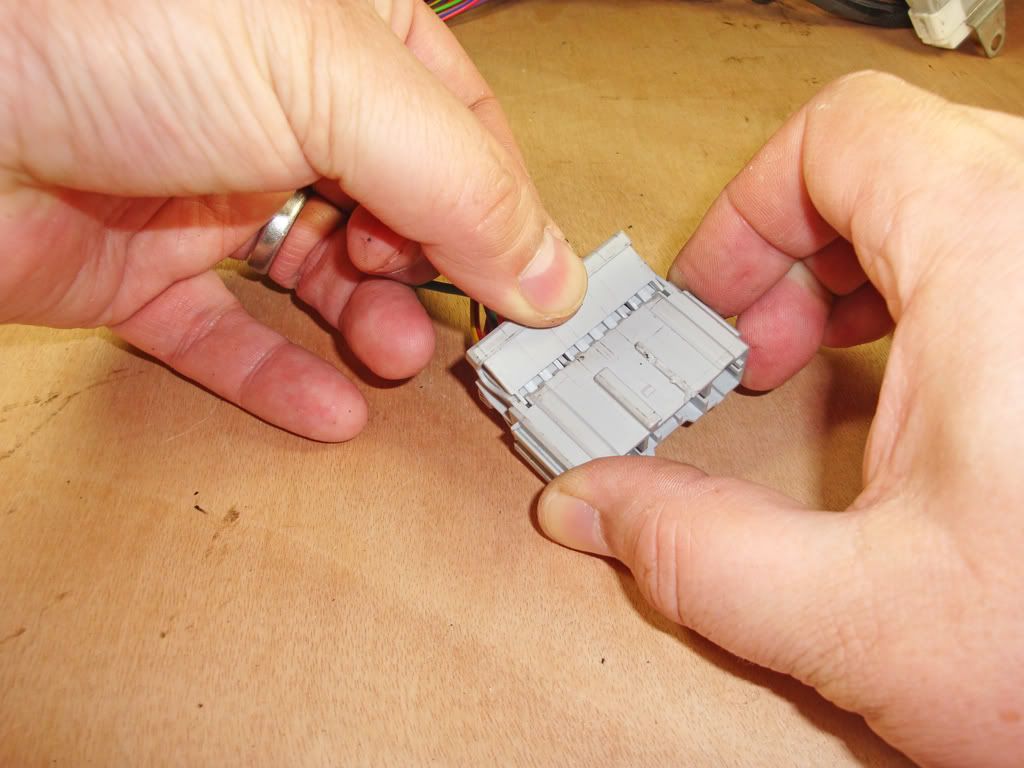
Pointing to the secondary terminal lock that needs to be opened before you can remove any terminals -

Carefully lever it up, from either side. Both sides now opened -
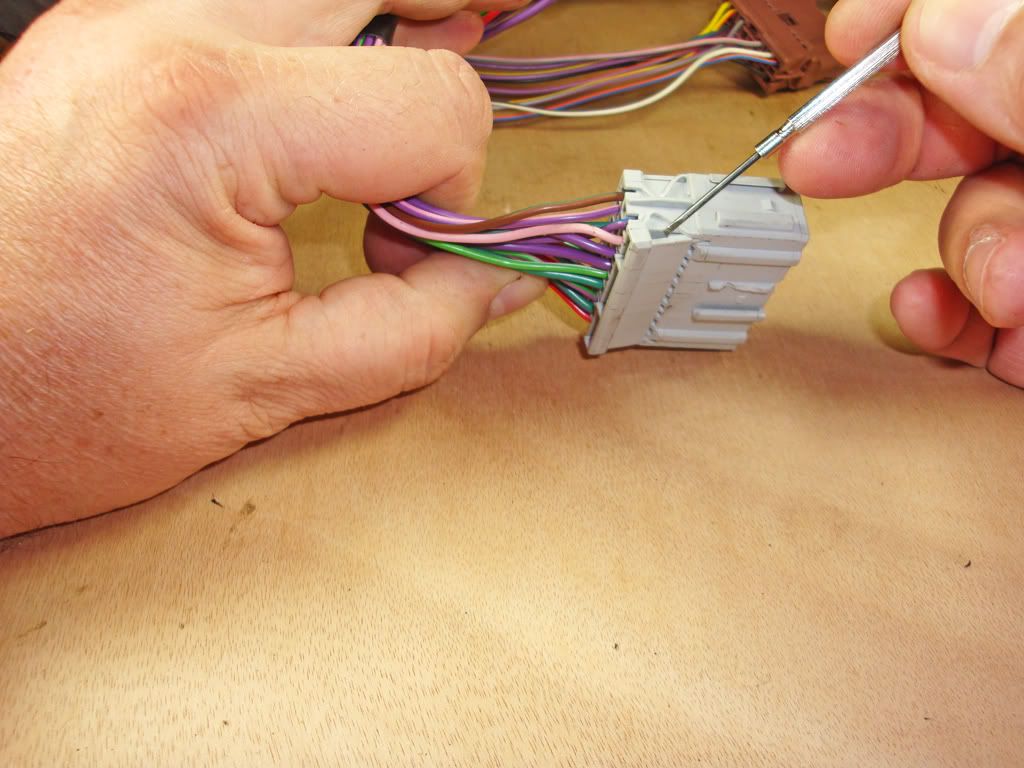
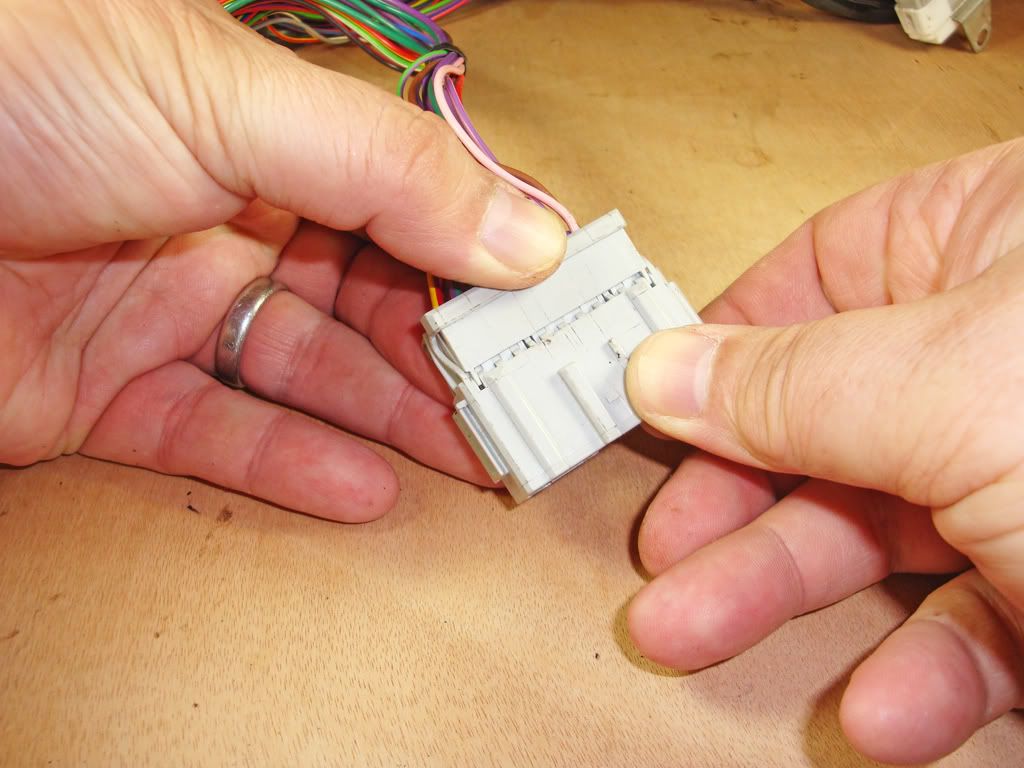
Once the rear has been levered-up, it will slide out of the way.
The 'fingers' on the front of the secondary terminal lock, slide in above each terminal in that row and stop the terminal retaining latch from lifting and releasing the terminal -
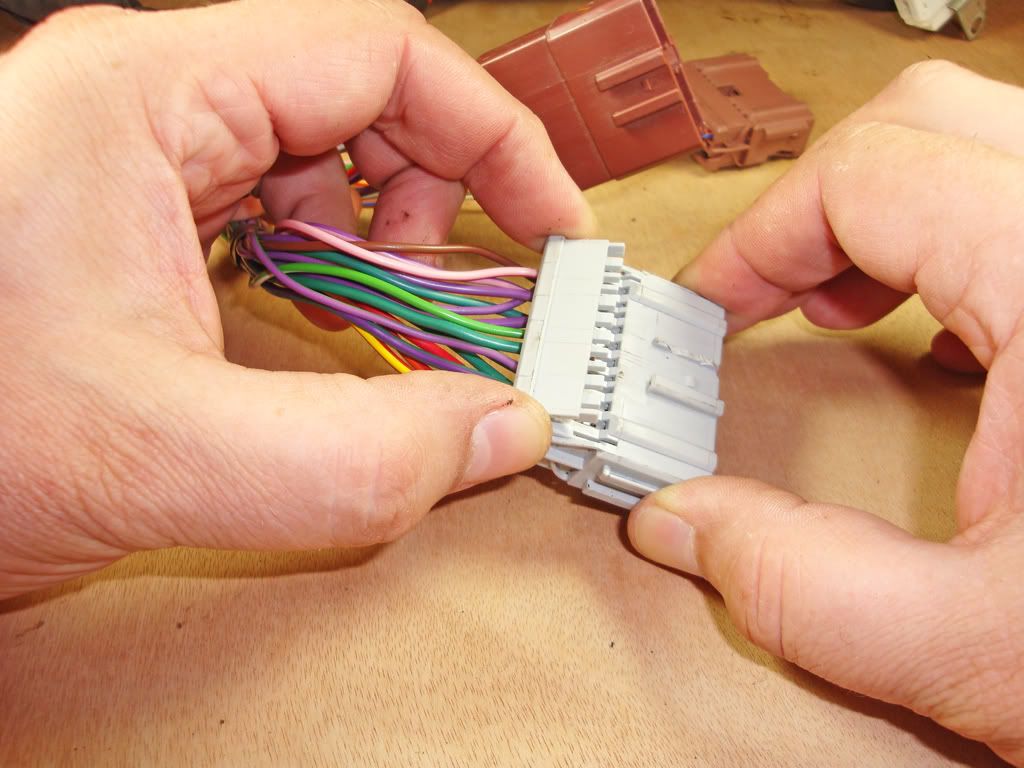
Front of the connector.
On the top row, because the secondary terminal lock has been opened, you can see through the connector over the terminal retaining latches above each terminal - the terminal retaining latches can be lifted to release a terminal.
On the bottom row, where the secondary terminal lock is closed, you can't see through the connector and would not be able to lift the terminal retaining latch to release a terminal.
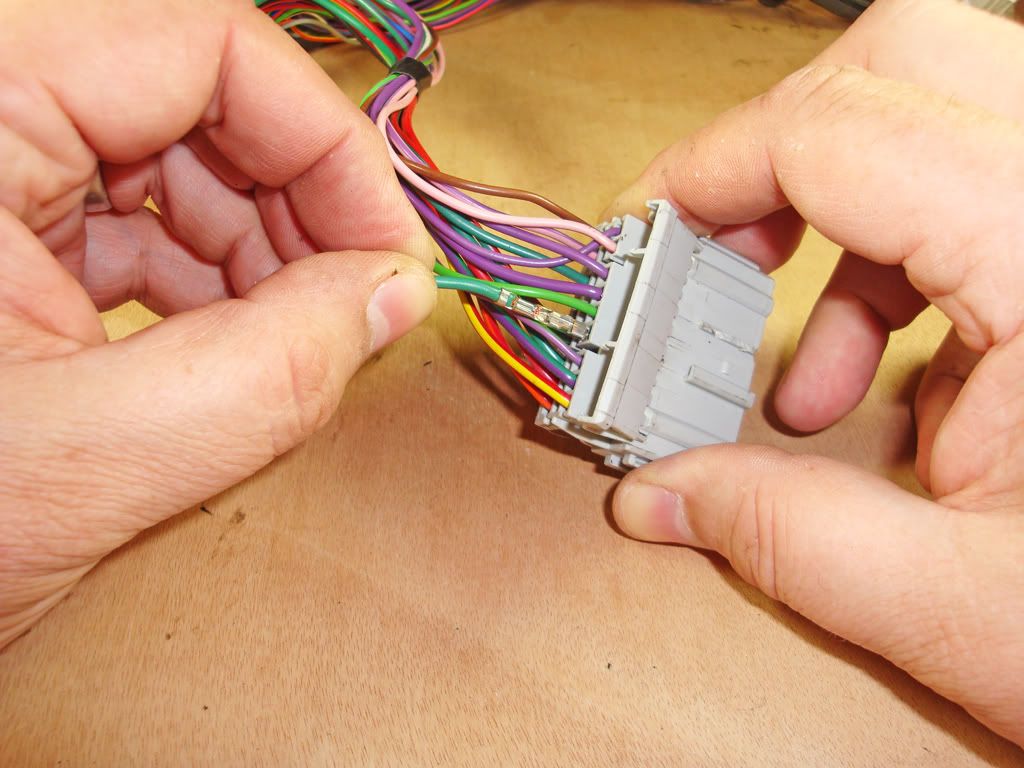
Pointing to the terminal retaining latch above the LGW wire's terminal.
A jeweller's screwdriver, or a safety pin can be used to lift the terminal retaining latch, whilst pulling gently on the wire you wish to release.
Make sure that you're lifting the tab above and pulling on the same terminal -
LGW wire's terminal released and being removed from the connector -
Male terminals removed -
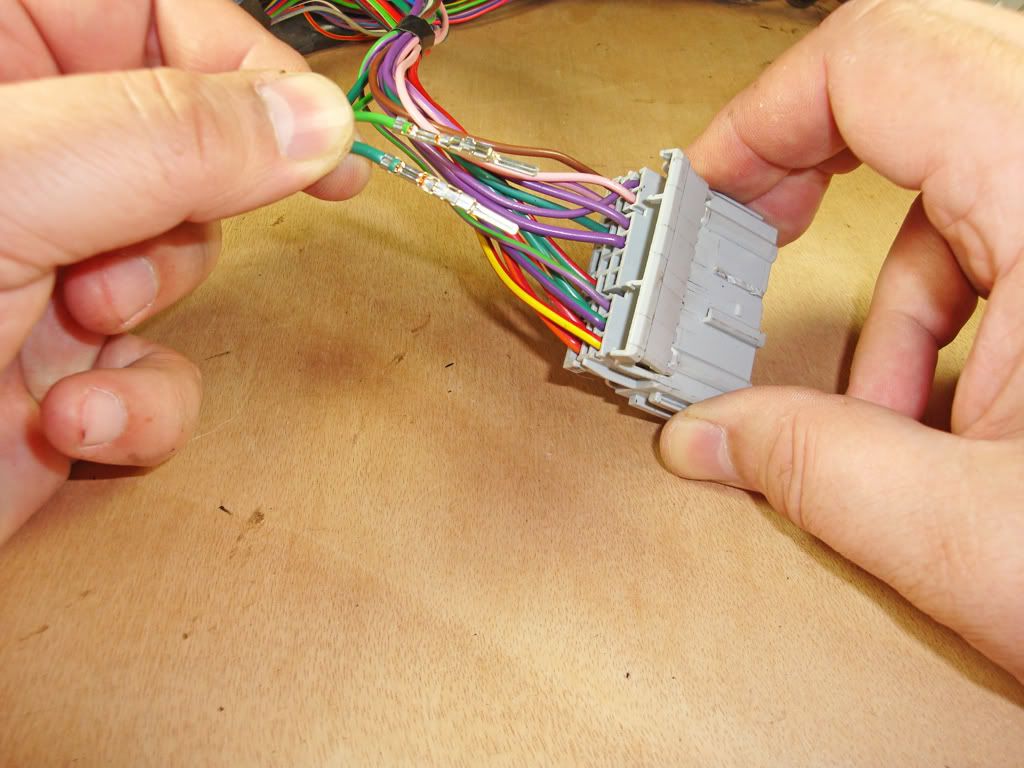
Male terminals inserted into the connector and secondary terminal lock closed -
The procedure is the same for the 14-way female connector that I sold you.
The female terminals should be crimped in the same way as the male terminals.
.
-
There was a batch of 650 (or so) V8 110s ordered in 1989/1990.
I believe that they were intended for use by 5 Airborne Brigade, as there was some issue with using Diesel vehicles in the intended role or theatre of operations.
I've got the Land Rover Military Defender V8 Supplementary Parts Catalogue for this batch of V8 110s - I'll go and find it, as I'm sure that it had details of the contract and variants, as well as the range of registration numbers.
.
-
 1
1
-
-
Havent got all the bits yet mikey. The Sumitomo 090 connectors are the tricky bit. Cant find them for love nor money. Miketomcat is selling me a drivers side td5 wing harness for me to customize. The other side will be coming off the bay. £20 or so for that.
There is an old thread im following that has a shopping list: http://forums.lr4x4.com/index.php?showtopic=65264&page=1
Post #6
Cheers
Phil,
I've posted in your 090 connector thread.
.
-
As title. Does anyone know where i can get these?
Thanks.
Phil,
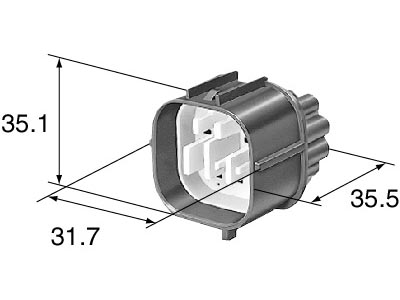
I've got the Sumitomo 090 connectors you're looking for -
10-way male -
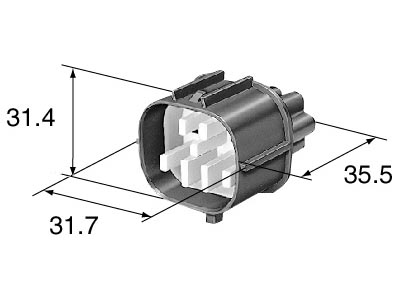
14 way male -
I've also got the MQS connectors for the side repeater indicators and horn(s), as well as Econoseals for the washer pump(s), sidelights and indicators, and decent quality AMP H4 headlamp connectors.
The only connector I don't have, and can't get, is the 4-way JPT connector for the alarm's BBUS.
.
-
Standard Military fitment -

Available from any Main Dealer or Genuine Parts seller.
Although, the prices will make your eyes water
.
-
hi, does anyone know if these switches are black or ash grey??
YUF500150LNF
&
YUG000530LNF
Thanks mick
Both of those switches are Ash Grey.
The suffix 'LNF' denotes Ash Grey.
Black switches have the suffix 'PUY' or 'PMA'
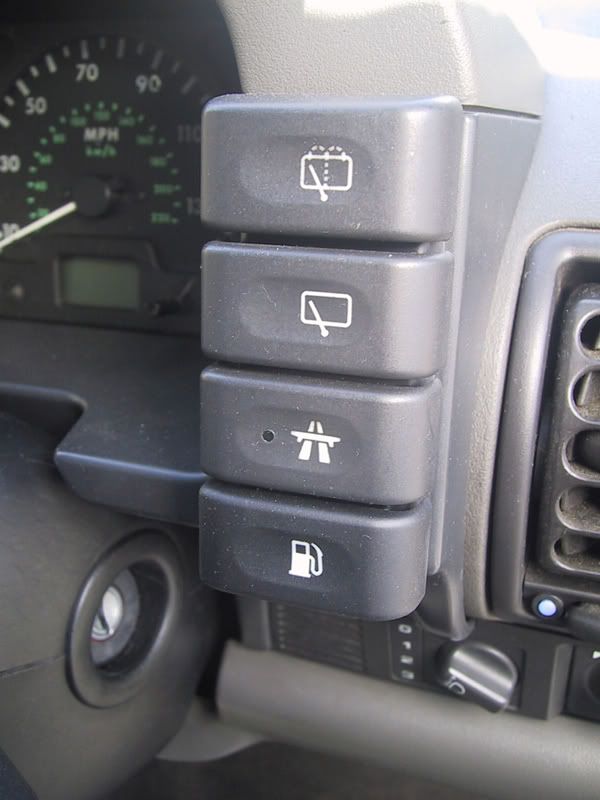
The difference between Ash Grey and Black is minimal - but, noticeable when they are side-by-side.
In this picture of my D2's binnacle switches, the top three are Ash Grey, the fuel flap switch at the bottom is Black -
.
-
OK - on the switch that you have, in addition to the 8-way connector on the back (only 7-ways used), you also have 2 x small spade terminals (1 on each side of the switch).
These are the live and earth (Black/Red and Black) for the flashing 'Hazard' illumination in the switch, as well as the instrument warning lamps 'Hazard' symbol.
The Black/Red wire for this, comes from pin-1 in the main hazard switch connector.
On 300Tdi and earlier, it loops back to one of the switch's side terminals.
On 1999 - 2001 TD5 vehicles, it also goes off to the instrument warning lights.
If your switch isn't illuminating - check that the side terminals are connected - pulling the switch forward tends to dis-connect them.
-
What hazard switch are you using?
-
Red/Orange on pin 4 is for the switch's night-time illumination.
Black on pin 5 is the switch's earth.
In Land Rover's wiring diagrams, switch illumination and earth aren't shown on the page for the switch's function.
They're shown on a separate page - "Interior Illumination" - which shows the illumination lives and earths for all of the switches, dash, clocks, controls, etc...
.
-
1
-
-
Worth giving autosparks a call.
As above...
http://www.autosparks.co.uk/product_info.php?products_id=1233

It's not a straight-forward on/off switch -


.


wibbly wobbly speedo
in Defender Forum (1983 - 2016)
Posted
Excellent
How did you solve your problem with intermittent connection on the instrument warning lights ?