


allegedly
-
Posts
89 -
Joined
-
Last visited
Content Type
Profiles
Forums
Events
Gallery
Blogs
Everything posted by allegedly
-
Had a similar problem accompanied by rough running at start up. Did all you've done as well as clean every sensor in sight and lubed up the turbo waste gate I think it was called,, except the springs as mines still on air. Fault codes indicating trouble with at least two injectors! An old boy in a local independent garage suggested a dose of red-x type diesel fuel additive and give it a good blast on a flat stretch of 'lonely' open road. Not looked back since!! Runs better than ever. However, just sorting out an immobiliser issue as we speak!! Good luck and you'll get sound advice on here from the lads who know. Cheers Rob
-
Hi guys, Update on this problem. As sierrafery recommended, I contacted Paul at Landrover Parts and am glad I did. Not only a supplier of reasonably priced, tested and guaranteed parts, he's a mine of information too and more than than willing to pass it on to diy-ers like me. Very prompt delivery too. So, new fusebox in passenger comp fitted, new RF receiver fitted and headlining replaced. Turned key to pos' 2 and left it for five mins then turned it on. After a bit of flashing lights, (including one I'd not seen before, the 0 shape with a diagonal line through it) the immobiliser turned off and she started! I did a walk round to test the lights etc and took her for a quick spin to put a bit of charge into the battery and test a few other things. Cruise control etc all fine. I've not got a new fob/key yet so I'm not going to test the remote locking just yet. No luck in the small town i live in, including a local locksmith who does auto keys, plus programming apparently for a very reasonable £65, so I'm going to get one of the 'blank' keys I've seen off fleabay and swap the PCB and key blade. Anyone got any experience of those? Not sure about just 'pushing' the key-blade into the plastic fob. I'll post on here how that turns out, just for info for the likes of me! So, easy fix in the end, just a bit of a pig to get out and in with the length of the wires on the plugs. I'm also going to monitor the condition of the battery more closely too from now on as I think that may have contributed a bit. As usual lads, great input and help on here and I hope my little posts help some other member. Cheers Rob
-
Thanks mate that's good info. By the way, where's the BCU located? I haven't had a look at that yet and as I've mentioned, it's a damp car!!
-
Roger that Sierra, Battery disconnected before any work carried out, I've learnt the hard way in the past. And yes, it's a facelift model. So I've got to specify one from or for a facelift, not just the part number? Is that correct? Thanks for the reminder about the 5 mins. I had read that but knowing me, I'd have forgotten by the time the part arrives. And just to mention it again, is there any particular supplier anyone can recommend for the parts? No probs with second hand parts if from reputable supplier. Cheers Rob
-
Registered on that site Sierra and there's one in a small village called Drumnadrochit just up the road about an hour away. I'll contact the guy and see what he says. Happy to pay if necessary or buy lunch or whatever. Got to get this done.
-
That's great Sierra and thanks. Little task for after dinner.....that'll please the 'boss'....!!!.
-
The passenger compartment fusebox is not as easy as I thought to get out. The number of plugs fixed in the rear panel make this awkward but with perseverance it comes out. Keeping a good record of what goes where is not a bad idea for convenience but the plugs only seem to fit where they're meant to. Opening was tricky with all the clips but I 'borrowed' cocktail sticks to hold the clips once eased open with an electrical screwdriver. It initially appeared to be okay but closer examination shows verdigris/corrosion at the bottom edge of the visible pcb around the lowest plug. Not sure if this is enough to cause any malfunction but looking at the 'tracks' I think it probably is and I will be replacing this unit. Close up of area.


-
The RF unit is between the two sun roofs in my 2002 TD5 ES Auto, to the left of the sunroof control unit. Undo the small clip and ease off the trim piece on the headlining. To improve access, I used a small screw driver to remove the sunroof control switch and then inserted a small posidrive screwdriver and undid the bracket holding the control 'plate' (or whatever it's called). This allowed the lining to drop away almost completely. Once out opened it up and there's no obvious corrosion except some discolouration around the fixing point/earth.


-
Hi Sierra Thanks for the input, always good and, yes, I agree. I've posted on here if anyone in the area has one but no response yet. Local very small Independent has a system but not sure which. Don't think it's a Nanocom though. I'm ordering a new fob blank off fleabay and a couple of micro switches too as one is damaged on the key. it still works (led flashes) when bridged with a small screwdriver but I'll solder a new switch in and put it/pcb and the 'blade' in a new fob. I've had the RF receiver out of the headlining and it shows no really obvious water ingress damage. The earthing part of it, like a washer that one of the bolts seats through has slight discolouring but not the verdigris I was expecting. As it's out I'm going to change it for a new unit so I know that'll be okay. The passenger compartment fuse box came out today as well. Not the simple job I'd expected. Jeez, the plugs are a pig to get out but once on the table I opened it up and there's a small area of corrosion at the base of the bottom plug, verdigris and discolouring/damage to the tracks on the pcb. I've put up a couple of pics for anyone in the know to give an opinion but I think it's best if I change it out. I've had no experience of using the diagnostic equipment so didn't know I could have it set to arm/disarm with key only. Does that mean I don't really need the fob transmitter? I tend to leave it unlocked the majority of the time and it's just the immobiliser being stuck on that's causing all this. So, in view of the above, can anyone recommend a supplier of the two items listed? I'll do the fleabay thing but a good recommend always increases confidence.
-
Thanks fellas, great input. I've been reading up on this and as they say, a little knowledge is a dangerous thing but put the way you've explained, makes sense. Especially knowing the water ingress history of my motor. Ally, thanks for the input re disconnecting the alarm sounder....the more i've read, the more I see it was the wrong move and you've confirmed it. At least now I know where it is and that it's fed from a separate battery so will go off regardless.... Getting the EKA means, I think, I can get the Landy down to a local independent lad I know with diagnostic gear. Just learning the questions to ask him and the info to give him now from your advice, so thanks again. Still not 100% sure about key-ing the door with the fob not working to silence the alarm if it goes off. Dave, I've left it unlocked for almost a couple of years to be honest and this is a new-ish problem to me/the car. But I think you're right and that's another investigation for tomorrow, head lining down at the rear sunroof and RF receiver out and examined. Interesting comment re the doors locking when you pull away (is that correct?) I say that as mine does not do this. Never has. Or have I mis-understood that point? Fred, yes the symptoms are surprisingly similar and the actions I had to take are almost the same but I'm thinking it's more to do with the water ingress now. The sensor above the mirror has been regularly wetted and I think this is also the case with the RF receiver on the inner roof. As usual, it's a learning curve with the next 'thing'!! My third Landy and I wonder sometimes why I do this......perhaps an extreme masochist in a previous life?!!! Want to try to record each option or answer as this is clearly not an uncommon fault and any info on it may be useful to someone....usually me!
-
Hi again Ian, Thanks mate, that sounds easily do-able and excellent description. I'll have it out tomorrow if it's not raining....(I live in Fort William so odds against) and check out the circuit board inside. Pleased about the price too. I rang the original dealer when I came off here before and got the EKA so when I've isolated the horn and, having read somewhere that I should do this too, finding out how to disconnect the alarm sounder. Not sure what that is or where but bit more research coming up. Cheers Rob
-
Quick update. I rang the dealer listed in the service manual as the supplier and got put through to a young lad called Andy in Parts at Vardys Aberdeen. He couldn't have been more helpful once I passed various details over. He provided me with the EKA code and passed questions i had to the senior technician so I was getting it from the 'horses-mouth' so to speak. So, another part of the puzzle filled in. Just got to work out why the key isn't talking to the car now. Not over the moon to be told the price of a replacement key or the price of getting it programmed to the car so looking at other options. Bit like the blind leading the not so bright!! Cheers Rob
-
Hi Ian, Thanks for the response. I'd checked the underdash fuse box previously but there's no obvious water damage/signs. To be honest, other than finding it actually damp or obvious signs of corrosion, I'm not certain what I should be looking for. How easy is it to remove and how? And once out, what signs should I be looking for? Not sure what the BCU is so I'm off now to do a bit of research. Incidentally, I've checked the manual that came with the car and while it has the radio code, it does not show the eka code. How can I get this? I have read you can contact a dealer (original supplier in service manual) and get it. Is this the case do you know? Cheers Rob
-
Hi Guys, I've read through everything I can find on this and I'm still a bit confused as to the cause/solution. My old D2 has been playing up for a while, intermittently failing to start at the turn of the key. As expected, the flashing red immobiliser light on the bottom part of the dash stops it's regular flashing when I insert the key into the ignition and turn to the first position. However, turning the key to start just results in the red light staying on constantly and no response from the engine. The fuel pump starts okay, windows and wipers work and there's no audio warnings or flashing lights that I've read of in other posts. The battery was/is good to the best of my knowledge. This has been happening for a while but after reading posts on here and else where, I tried removing the key and/or opening and closing the drivers door and that has generally 'sorted' it. Not now though. I've been away for a short while and since I've been back, it hasn't started at all. And now there's an additional problem. I renewed the key fob battery a short while ago and all was good for a while but now the fob has no effect on locking or unlocking the car. The little red led on the fob flashes but there's no response from the car. To be honest, I live in the wilds so it's rarely locked anyway. I've followed the steps to 'synch' the key to the car with no effect. I'm loath to try locking/unlocking the door with the key as the last time I did that, when I opened it with the key, the alarm went off and I had to quickly lock and unlock with the fob to stop it. But now with the fob being ineffective I don't want to try that. Like a typical landy, it leaks. Sunroofs I think so that will probably have some bearing on this. So, gents, any tips or advice on what to look at and where? The other thing is, does anyone live up near Fort William who owns a Nanocom or what have you who can maybe help? Lixtull are the nearest specialist but they're definitely not the cheapest either so any help gratefully received. Cheers Rob
-

D2 TD5 pas pump adaptor pipe O ring
allegedly replied to allegedly's topic in Requests for Part Numbers
Hi Western, thanks for the response. The diagram shows the O rings for the various hoses but not the one actually in the PAS pump adaptor pipe itself. I've added a diagram of the pump (up side down) showing the low pressure supply adaptor pipe and where it attaches to the pump body. The seal/O ring either sits in the groves you can just see around the edge of the hole in the body or around the female pipe itself. From your attached diagram, it goes to pipe 7 from the reservoir. I've indicated the place with an arrow and the letter A. The letter B shows a bracket that appears to fit over/under the diamond shaped flange of the pipe. Mine doesn't have this 'bracket' or whatever. I was wondering if this had any bearing on the problem too. Thanks Rob
-
Hello guys, Need a bit of help please. I've looked everywhere I can but can't find the part number to replace the O ring seal that goes on the top of the adaptor pipe fitted to the low pressure inlet pipe on the pas pump. I can't find the adaptor pipe either. Not even on fleabay. The pipe seems okay but the leak appears to be coming from the joint where the pipe enters the bottom of the pump body. Any help gratefully received. Please email me at guinnessdiver@aol.com or via here. Thanks in advance, Cheers Rob
-
Disco 2 rear airspring and height sensor replacement
allegedly replied to allegedly's topic in Discovery Forum
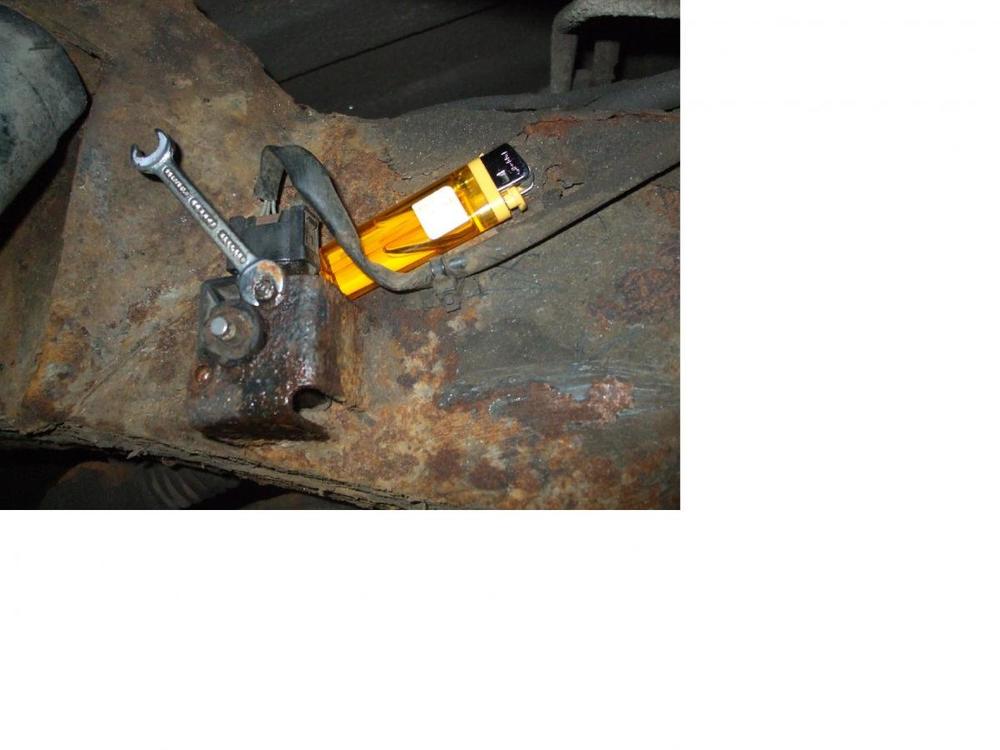
Sorry about the pics being so small, luckily, as you can see, they're repeated at the bottom! I did look for guidance on pic sizes but couldn't find it. Obviously looking in the wrong place. So, the sensor. As you can see from the pic it's located forward of the wheel and easily accessed. This one was perished/broken at the base so a clear need to replace. In theory simple......famous last words. http://forums.lr4x4.com/uploads/monthly_09_2012/post-8673-0-93019600-1347147924_thumb.jpg http://forums.lr4x4.com/uploads/monthly_09_2012/post-8673-0-99947200-1347147967_thumb.jpg My socket set was rubbish on the two hex headed screws and and the only spanner I had to fit was from a maintenance kit of some equipment I use in my job. Thank feck it fitted! Lots of WD and an adjustment of the old component, i.e. breaking it off, allowed me to access the heads. The pic with the lighter is to give scale. http://forums.lr4x4.com/uploads/monthly_09_2012/post-8673-0-08279100-1347148232_thumb.jpg The electrical connector is very brittle so take care. I broke one side off. The next pic shows where you should gently press with a small screw driver, contact size maybe and ease it up and off. http://forums.lr4x4.com/uploads/monthly_09_2012/post-8673-0-61907700-1347148353_thumb.jpg Swapping it out is straightforward once you have the fastenings removed. I wasn't sure about having the alloy sleeve onto the steel fixing point so I smeared it with copper slip as I couldn't find any grease at home. This will ease the corrosion problem I hope. Not sure of copper/alloy reaction though! I will be smearing the whole thing in grease I think to help protect the metal leg too. http://forums.lr4x4.com/uploads/monthly_09_2012/post-8673-0-89513300-1347149534_thumb.jpg I only changed one and I did it before I did the air springs so the car was not started at any point. I have not checked the height yet to see if there's a difference in height but to the mark one eyeball it looks level. I will measure it and if it's out by an appreciable amount I'll have to go to my nearest dealer, near a place called Killin and get it on a computer as I don't have one! I have finished off with a pic of the compressor. The pipe on the right as you look at it is the one I eased open to release the near side air spring pressure. http://forums.lr4x4.com/uploads/monthly_09_2012/post-8673-0-68738400-1347149618_thumb.jpg Sorry if this is a bit long winded and basic but it's what I had to do and hopefully will answer questions people with limited skills and knowledge, like me, may have. Thanks for an excellent site guys. Invaluable to diyers like me! Cheers Rob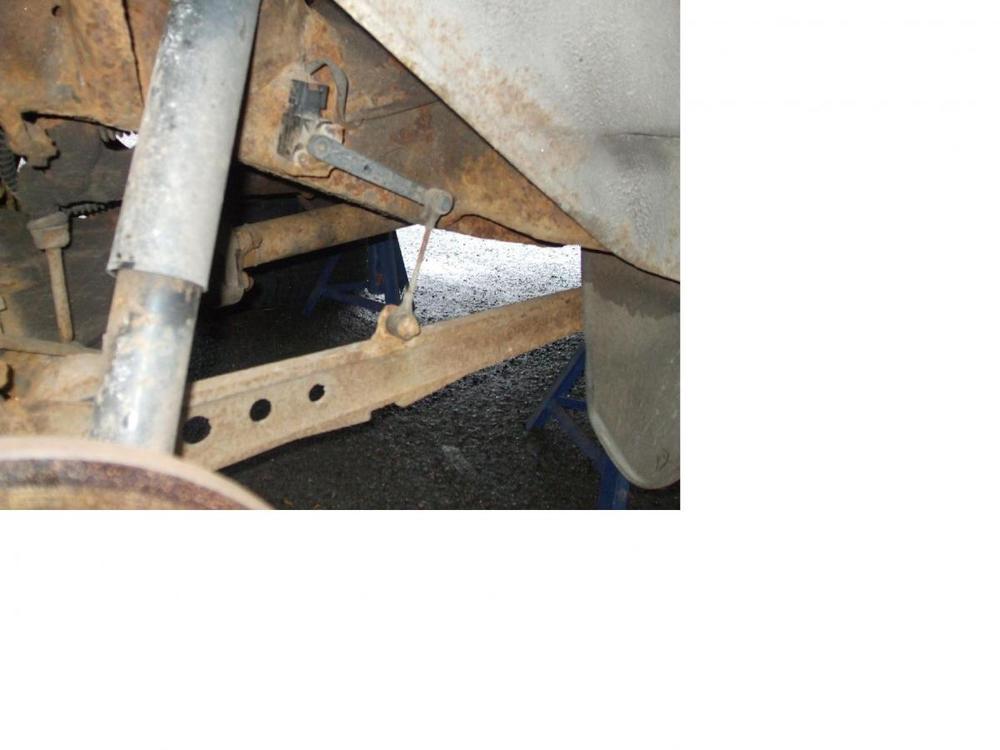


-
Hi all, Not posted in a while but having read everything I can find on this subject I thought I'd tackle it myself as it seems a fairly straightforward job for an average DIYer. The symptoms matched what I'd read on here several times, that is, it would sit down very low on the offside rear occasionally. The compressor or as I now know it, the SLS I believe, worked fine and it would pump back up as soon as I started her up and off I'd go. I live in the middle of nowhere in the wilds of Scotland and don't have a garage so, with our prevailing weather being rain, it was easy to put it off...and off...and off! However, over time, the 'down time' became more often than not and after a recent run to Aviemore it struggled to keep the bag up and when I finally stopped outside my door, there was a muffled pop and she went down terminally. on the offside rear. Yes, I know, bloody stupid to continue to drive on what was obviously a leaking airspring but isn't hindsight wonderful. Learn from my mistake. I was just lucky. So I ordered a pair of Contitech air springs from Ribble Valley having been put off Dunlop from comments on here and they arrived, unfortunately minus the ordered clips. Not a good start but I emailed them that night and fair do's, the owner phoned me the next day and they were in the post, including a replacement ride height sensor that needed replacing due to perishing of the rubber end mount. Next evening, after work, in a fine Scottish evening of light drizzle, I chocked up the front wheels, put handbrake on, big thermos cup of tea, various tools selected for any eventuality and prepared to lie on the wet tarmac for a couple of hours while my neighbours settled down to a warm night in front of the telly with a cosy woman next to them. The joys of Landy owner ship. Axle stands under the chassis which I'd lifted high and two trolley jacks under the axle and that's the wheels off. I then lowered the axle down to the extend the air springs fully. Offside rear had a small hole and the ride height sensor was perished at its bottom end. The near side was inflated so I removed the compressor cover using a flat bladed screwdriver. The compressor is sited behind the nearside sill, under the passenger seat floor. The near side air spring is fed by the pipe nearest the outer edge. I loosed it off, not all the way to reduce the risk of cross threading it and allowed the bag to drain down. I went to remove the two clips on the top and found that they were in fact two washers held in by what appeared to be silicone bathroom sealant. It just kept getting better. And now it was raining properly. Offside came off after removing the proper clips with a small flat hear screwdriver. They were too far gone to reuse, just bits of rust really. The base of the air springs have a 'key' that fits into the shaped slot on the axle and to remove it's simply a case of gripping it and rotating 90degrees. It then lifts up and the top section just pushes down and the two little 'pins' pull out of their two holes. So, both bags out and a fresh cuppa Now I used a sharp stanley knife to cut off the original air pipe connection. In the pic, you can see what looks like a rubber olive on the pipe. You have to cut this off too. So do it as close to it as possible as you'll need all the pipe you can get! The next pic shows the valve on top of the air spring. Lead the pipe over the top of the upper mount and push it in as far as it'll go. I had to try twice thats how I found out you have to cut off the olive thingy! Now place the base over the lower plate and line up the 'key' with the slot, these are my words by the way, I'm sure the techie types will provide the correct terms! Then rotate it 90 degrees and it'll lock in. Adjust the top part to line up the 'pins' with the holes then, after checking it's vertically straight and not obviously twisted, push up and slide the new clips on to the pins in the recessed slots.. Easy to do but I wore gloves to stop my cold wet lilly white fingers from hurting! Next I fitted the new ride height sensor but I'll describe that in a minute. If you're just doing the airsprings, the next thing to do is get some soapy water to check for leaks. I used my wifes flower mister or something. Works a treat. I remembered to tighten up the pipe on the compressor first but I left the cover off for now just in case. Open the drivers window and make sure all doors are closed. Leaning in through the window, I then started the engine and waited for the compressor to kick in to just start to inflate the bags so I could check for leaks. Nothing happened. So I checked the compressor. Now I'm no expert, as you can see but I was pretty sure it should have been making a noise of some sort! So, back to the manual and a fresh brew. It says it won't start if the gap is greater than 100mm. Took some bloody finding though. So, back out in the rain and up with the two trolley jacks. Yehaa! Engine on, compressor running and bags up and not leaking anywhere after a liberal soaking, including around the top valves. At this point it should be wheels on and back onto terra firma for a test drive but as I said, I was doing the sensor too. Please see next opus below. Rob


-
Hi mud, Same here, just bought an 02 td5 auto a few months ago and the offside rear has started to settle when parked. I did notice on a longish run that it seemed to be down whilst driving as the handling became very twitchy and it doesn't 'sit right' on the road. All country roads, no nice straight motor ways up here. Considered changing the rear bags but first stop will be the sensors now, thanks to nick. I'll be back! Cheers guys Rob
-
Hi all, Well, finally bit the bullet and stepped up from my trusty old tdi 300 and bought an '02 td5 2 and having driven rental autos in the past and quite liken them, tried an auto for the first time. On the flat and 'normal hills' it's a pleasure to drive, full black leather and cruise control, (apart from finding the obligatory wet foot wells but I'm working on that and pics to follow, I hope) but I live in the wilds of Scotland and my house is at the top of a fecker of a hill. The old beast being manual didn't rush it but coped okay. The new kid on the block is having major probs getting up without complaint. Most noticeable is the lack of acceleration, coupled with high revs and, when loaded up with four people, an unwillingness to change up coupled with a worrying knocking/rapid rattle. Being new to the auto, I've no idea what this is symptomatic of but it doesn't take a boffin to see it's not 'operating within accepted parameters'. When I pull up outside of the house, there's a smell of hot rubber/clutch overheating. I'm completing the drive up in 'D' and i wondered if I should be selecting 2 or 3 on the selector or another mode or something I'm unaware of. I've read on here about the possible aid/cure being to renew filters and an oil change but also that this can mess up an auto box as it 'disturbs sediment within the 'box that makes the situation worse'. I'm lucky to hit thirty coming up and that seems to be the max but that's not far from what I'd comfortably get from the manual box speed. However, the rpm the auto box goes up to is much higher than the manual ever went to at that speed on that gradient. If it's simply a case of the auto doesn't like these kinds of incline, she's on the market and a similarly priced td5 manual is on my xmas list but I'll miss the ease of operation. Any tips or guidance from our members in the know would be gratefully received. PS. The old 300 is on the market, spares or repair and will be advertised on here and fleabay etc. Sorry to see her go though but don't have time to work through the 'to do' list. Rob
-
Lest we forget
-
Thanks for the reply Teabag, nice simple instructions on that site. I'm going to google it too and look into the MOT standards. As uaual, the guys come through. Cheers Rob
-
Hi guys. Simple topic here. I was going to pm a fellow member who'd posted about retro fitting adjustable headlights when I realised I might not be the only one who doesn't know the correct procedure for this. If I was to park up facing a wall to adjust the lights; a. How far from the wall should the front be? b. Drawing an imaginary line from each headlight, should the 'spot' be directly infront or offset at all? c. How high should the 'spot' be above floor level? I don't generally tow but I'd guess this might affect the position. Would you carry out this procedure with the lights on dipped or high beam? Sorry if these questions seem a bit 'noddy' to our more knowledgeable bretheren but I don't know and I'd like to get it right first time as opposed to 'fannying' around and getting dazzled by people coming the other way thinking i'm on full beam!!
-
Thanks fellas. Bit the bullet and got afternoon off to drive to Lix Toll in Killin, (over an hour but thats the price of living in the middle of nowhere!) and picked up the new water pump, gasket, the recommended P gasket and a new serp belt to boot. Went out after dinner to do it and found I've lost my water pump spanner to remove the fan etc and no one I know has one so have to hope the local car bits shop has one tomorrow. None of my other spanners get anywhere near it. Oh well, its daylight here until at least eleven ish so I thought I'd slacken off a few bits while I'm in here. Hoses and all the bolts I could reach and the fan cowling. What next? I know, the plastic thermostat bleed screw, as recommended by diesel jim for refilling the collant. And, as Les in his Tech post, also said ,they often shear. Oh the fun. I just looked at it and it sheared off. I can't tell you the pleasure I had getting the remains out and trying not to **** up the ally thread on the housing. Took off the thermostat and stufffed a rag in to stop the debris ending up in the system so thought I'd check the therms operation. Takes forever to open and then opens up about 3 mm. Is that right? Seems a bit small a gap to me but I'm happy to stand corrected. So, after driving to get the parts I've now got to go online to source a plastic plug that'll cost a quid and pay five to get it sent! The joys of Landy ownership......... Rob
-
He he. Thanks for the replies fellas and the grin! I've sent a pm cipx2. After a chat (!) with she who must be obeyed, I just got to get my bosses agreement to get tomorrow afternoon off to go to Lixtull down the road and get the parts after I ring to confirm they're in stock. If not, its the originals, on line, I reckon. Once I know who's the best bet. As she's my everyday drive, it's got to be done quick. I want to replace the serp belt too and realised: am I the only bloke who doesn't know the VIN on his Disco? P reg, '96 and the part numbers are a tad confusing if you don't know. Thanks for the input gents In the immortal words I'll be back


