


pete3000
-
Posts
1,309 -
Joined
-
Last visited
-
Days Won
5
Content Type
Profiles
Forums
Events
Gallery
Blogs
Posts posted by pete3000
-
-
Dayco belts, Bearmach for the tensioner/roller/gear. Corteco oil seals.
-
Well erm no, it certainly isn't on my 110. Assuming we are talking about the rear plastic 12? gallon tank on the 90 td5, you may get away with taking the front two bolts on the guard out and slackening the rear crossmember bolts to lower the guard, but it may be necessary to remove the guard and start again.
-
On 11/22/2020 at 10:25 PM, paime said:
Its been a while since my last update and I've managed to get a few things done. Work and family life has taken priority but nevertheless I finally have a rolling chassis. Built up quite a few elements and im now onto some more stripping of the old chassis. Im a bit worried about my spring alignment on the front as it seems like my axle is slightly off to one side. Will things settle down once the engine is on and the springs are compressed a bit more?

Tell me to shut up if you've spotted the bolt through the drop arm bracket is too long(stack of washers)/facing the wrong way, i can go and look what i used if it's useful, Think from memory it the same imperial bolt/nyloc nut as the a-frame balljoint bracket.
Pete
-
https://www.nationalluna.com/product/12v-auxiliary-battery-box
Something you could knock up for less than the £400 price. ?
-
 1
1
-
-
YRM do them for 25 notes per side +vat. I'd not bother with the 25mm screws though they are too long. They should be no14 x 19mm and m6 form G washers.
Pete
-
I'd echo what western says, lay the brake lines in to the rear especially, also fuel lines (110 more so) and breathers. The one big and heavy lump which is easiest done without the engine in is the power steering box drop arm and bolts, This should also allow you to lay the power steering pipes along the front of the chassis rail inner face. If you havent already fit the bumpstops and the fuel tank and sender.
Pete
-
I drilled my new galv chassis as the list of clips was growing, the one area i did manage to avoid was the front by the bumper by running the brake line to the bulkhead and over the top by the heater.
clips I fitted were brake pipe singles, and doubles 6mm hole, doubles along the o/s chassis rail to hole brake line and breather from rear axle. Twin diesel clips 7mm hole? along top of o/s rail to sedimentor.
2x twin battery pipe clips on n/s rail in front of seatbox. (only had to drill 1x hole as 1 already in front lhs outrigger.
-
 1
1
-
-
There is no brown and green on Western's diagram, only at the ecu delay area D113 which drops to earth when motor is parked? or unparked?
solid green should have 12v on when ign is on (for wipers to work), you can buzz the rest along the lines of the following.
apply a fused 12v to green only, then get a multimeter and measure
12v on Light Green Blue when wash is pressed
12v on RLG on speed 1
12v on ULG on fast speed
other 2 are on intermittent setting areaof switch.
Pete
-
 1
1
-
-
Noticed from your first pic, it looks like you have rock sliders fitted, just wondering if it would give more leeway to pull the bulkhead backwards/forward without them if they sit tight against the bottom of the bulkhead?
Snagger, i used my doors as a cheap set square, logic being if the front of the door to bulkhead gap is equal/parallel at top and bottom hinge (and the waistline is at the correct level then the rear of the door base should be in line with the base of the tub and the waistline of the tub should be at correct level. i.e aiming for parallel ish gaps around 8mm. Hence why i found myself taking two of the outrigger to bulkhead washers out each side. That's just the way i did it.
-
Yes that's roughly what i've done although i don't have a roof at the moment only a soft top. Leave the bumper and the grill panel off till last also then you stand a chance at being able to get to the fiddly bolts at the front of the wings.
A smidge of waxoyl on the stainless bolts i've been using on the non critical parts has stopped them snagging on the nuts, which gives you a second or third chance at swapping bits round or adjusting.
Pete
-
On 9/28/2020 at 4:49 AM, Snagger said:
Almost all the recon stuff is just repainted used boxes straight from the scrap yard. Only Adwest seemed to do a proper reconditions process.
Can't recomend these guys in Brum enough, i went to them in person for an LDV convoy box and a few years later for the defender Adwest box, both have been superb. I saw their setup and the range of stuff they do is impressive, proper old school engineering. No affiliation with them just a happy customer. They even burn't the drop arm off my convoy box while i waited as i had broken my puller trying.
Pete
-
1
-
-
You could explain the brakes to the garage/MOT station and book an appointment with them, then if you find the brakes are not up to the job after setting off you could return home and cancel the MOT? If you are upfront with them about the brakes they'll probably thank you for not presenting it as found.
Pete
-
I'm just rebuilding mine at the mo after a rebuild/chassis swap. I put the tub on first and then loosely bolted the seatbox up to aling the m6 nuts/bolts. Then moving to the bulkhead, the old chassis had 3x m10 washers inbetween the chassis and the bulkhead. I found when i tried the method below i had to take two of these out on each side.
I dropped (screwed) the doors on and aimed for a 8mm gap (m8 bolt) first at the front top and bottom then round the rear of the door to line the bulkhead to the tub. I had to pull the bulkhead backwards in line with ratchet straps around 10-15mm to get the doors to drop level with the base of the tub at the rear. I made sure the screen angle matched the front of door gap.
Then i was able to snug the bolts up on the bulkhead and footwell plates which needed 2 shims in each. Then i tightened the sill to the bulkhead and finally the seatbox end.
I put the wings on last and only had to pull the front up by 5mm by hand due to the sag in the panel.
As Snagger says the only fixed datum is the rear of the tub on the rear crossmember, the only other constant is the width of your doors for panel gap.
-
1
-
-
oe rubber bushes are good, but a absolute PITA to remove, that's why i'm a convert. The superpro went in easy and i know if i have to change them they will come out easy enough. I think the worst set of oe bushes to remove on my 110 were the rear A frame bushes which were triple sleeved. Not to mention the mess the rubber makes of everything you use on them.
Pete
P.S in you picture above they all have an outer sleeve that i can remember, they either need a press to remove in one or a deft hand with a hacksaw to cut two very close parallel cuts so you can use a chisel to tear a thin strip out. If you cut too far with the hacksaw you risk knackering the arms/rods.
-
My 110 300tdi i've always been happy with for last 14 years, i've got standard size wheels and a 1.410? transfer box. I stick to 65mph (on speedo) so most likely 60mph. Any more becomes a bit lively. It averages 22-25 mpg and is mechanically simple. I've kept my eye on the temp gauge and regularly serviced the fluid and cam belt.
I tow a sankey trailer at 55-60 and it has plenty of power and only ever considered a 3.9 v8 megasquirt if diesel is ever discontinued.
The td5 could be a consideration except the earliest versions. Other choices a 2.8 TGV or isuzu? I wouldn't want to stick a puma (transit engine) in though....
Pete
-
1
-
-
I took my wheels off, tried to manhandle the axles, gave up and put the wheels back on. Then found you can roll them around turn them over to paint and weld where necessary. Add an axle stand under the diff nose then chock the wheels and you're all set.
-
1
-
-
On 8/10/2020 at 6:00 PM, paime said:
This weekend's update: Got the truck up on stands and started to take off the panhard rods, radius arms etc. Every nut has been a challenge so far and the angle grinder has had a few outings! Does anyone know of bolt sets I could buy for all these bits and pieces? I think YRM do them but they're stainless steel and i would worry about strength.
I bought the paddocks bolt set (front and back) they are fine. Don't bother with the bush kits though.I bought the superpro bushes and have to say they were a breath of fresh air to fit. If they need to be changed then only the vice needs to be used to press them out.
Pete
-
I applied the T-wash with a hand spray bottle, which allows a good coverage without wasting it. 2.5 litres did the lot on my 110, including all the YRM bits. Couple of essential bits of PPE are goggles and nitrile gloves. T-wash is phosporic acid an irritant, and will damage your eyes. after the metal darkens and almost drys off i rinsed with a hosepipe.
A few days later painted with galv primer grey then week later 2 coats (2 litres) of rustoleum 7300 satin black rollered on. For the hard to reach bits, some aerosol rustoleum.
Pete
-
I've just done my 110 RC wiring loom pull through, i used Aldi galv fencing wire with a loop bent at the ends, wrap all the loose wire ends with PVC to the draw wire make a smooth profile, i started at the front and pulled to the back. Just be careful as you go over the rear axle shock mounts as the loom wont pass under the stiffening tubes, you have to go over the bottom two.
I ended up passing a short length of hooked galv wire back down the chassis to draw the loop over the shock mount tubes as it went under the first time. as someone above says it the loom sticks if this is the case.
Pete
-
Note the 2 bolt holes 1 is slotted for alignment?

new brackets below which fit from the rear pocket of the holes above, made from some 12mm x 2mm strip 65mm long, screws are M6 and should be 15mm long.
Some length needs trimming off, as these are all I had in stainless. Hole centres are 42.5mm

Old bracket for reference, other one is rotted out.
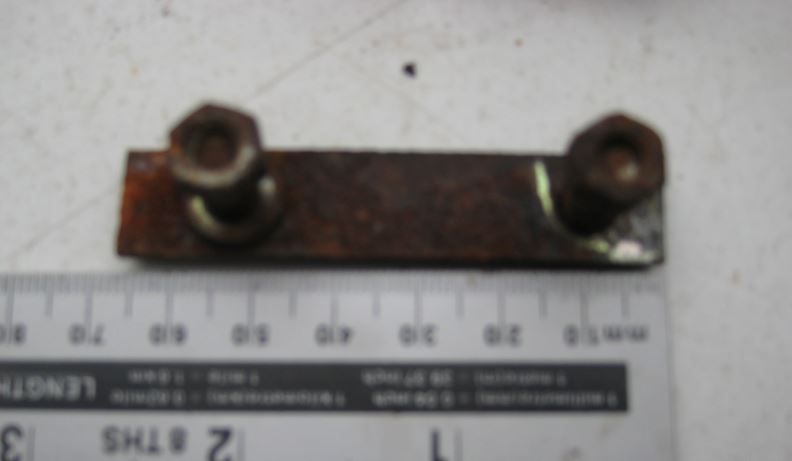

27mm wide and 92mm long hole centres are 42.5mm as above

M6 nut welded onto rear...Bigger holes are 9mm
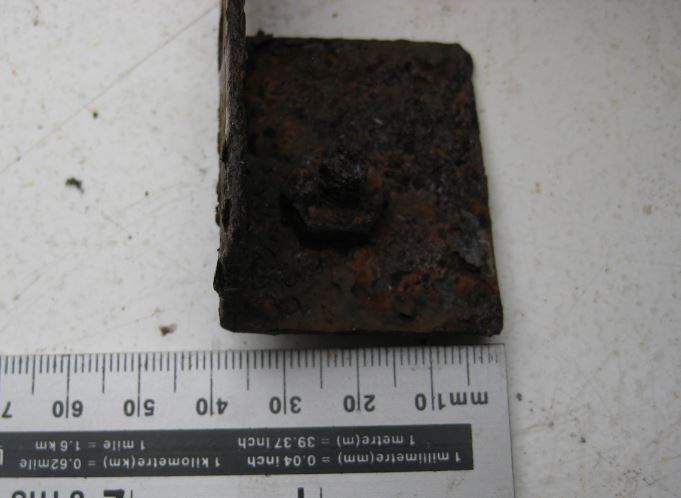
The bracket linked above would work unless like me you have made your own.
HTH
Pete
-
I've got mine apart at the moment, will try to take a photo and some dimensions.
-
i'm looking into the hawkeye vs lynx also. I made enquiries about the "family" capability of the lynx, it covers (as far as i can tell from asking) range rover from classic to L322 but not sport or evoque. The additional cable set at £150 is required for some P38 funcionality. Where as the hawkeye sems to have a cable for every function?
The lynx only covers updates for 12 months unless you buy the support yearly. But not a massive issue as long as the app keeps working without being updated?
At the moment the hawkeye is around £220 and the lynx around £320. Is the hawkeye vin locked or to one type of vehicle?
-
They should be the same size as the holes in the rear crossmember, i.e to insert the hi lift jack adaptor or originally the old landrover vertical post type jack.
-
A vote for getting whichever version you decide on fitted to the bracket.
I thought i'd just buy the standard but more spendy A frame joint and some new bolts/nuts. Well almost a day spent to get the old one out with 2 or three rounds of soaking, beating, cutting, heating and finally 12 ton pressing it eventually came out. I reckon i used half a mapp gas canister, 2 hammers broken and half a tin of penetrating oil. Not to mention when it finally went the jack almost jumped out of the press.
Getting the new one in still required the 2x m8 holes tapping out and the 12 ton press to push the new joint home using a range rover p38 hockey stick bush inserter/remover special tool thingy.
Hindsight eh!


Spongy Brakes..... the penny has dropped
in Defender Forum (1983 - 2016)
Posted
I've been struggling with poor brakes on my 1986 110 for years, even after changing the drum rear axle to discs and going vented at the front, just about every part was renewed (one part at a time) and replumbed. The efficiency on the tapley meter at the Annual MOT "was just meets minimum effort". This was with standing on the pedal to get any braking effort.
Well everything went back in again recently when the chassis was swapped. The 1986 style (new but 2 times changed) brake master cylinder and pedalbox was removed and looked decidely worse for wear. So I bought a salvage 300tdi servo/ pedal housing and reservoir. Fitted all back up with a new 300tdi 90/110 master cylinder.
First thing i noticed about this was the front circuit has 2 fittings (1 for each caliper), rear has 1 port as before. But the diameter of the piston housing is much smaller than the 110 2.5NA disc/drum master cylinder.
After bleeding the brakes today, I can actually feel the brakes working without standing on the pedal. I even managed to lock the wheels on the drive. 🙂
Thinking about this i should have spotted a while ago that the laws of fluid transfer mean a smaller piston area can exert much more force than a larger piston albeit at a lower fluid volume.
Anyway problem solved, if anyone else is having similar issues after converting to discs it could be a mismatched master cylinder?
Pete