


SH4RKY
-
Posts
40 -
Joined
-
Last visited
Content Type
Profiles
Forums
Events
Gallery
Blogs
Posts posted by SH4RKY
-
-
Thanks, ill try and get some quotes tomorrow for the above.
Adrian Flux came back with a 350 quid quote with mods etc which is 100 more than last year, but with the recent increases in prices etc i guess its not too bad.
That was with equity red star or something.
-
My renewal from lancaster has doubled since last year

Put in a requote with the various modifications, hopefully it will stay under 500. I was well chuffed with the 250 i paid last year too....
Just had a look at Footman James, fell at the first hurdle: car must be garaged at night.
Anyone got any other insurance brokers etc to try a quote from for a generally modified defender (wheel, suspension, interior etc).
-
Master was corroded/pitted, hence brake failure. New cylinder on order and will hopefully be fitted on saturday.
If rears still lock, ill have a look at the G Valve. Prefereably aim to refurb it if possible as replacements (unsure of part number so might be wrong) are damn expensive!
-
Brakes failed today.... Fun Fun Fun!
Believe it to be the master cylinder, but thats for another thread i guess.... ( no pressure on pedal, goes to the floor)
Update on the drum locking shenanigans:
Well when braking heavily the rears still lock. And it went from both locking back to just being the one again (drivers side). Next port of call i think is this G Valve. Didnt think i had one, but when the brakes failed today a more detailed look at the front end of the braking system (this time with the workshop manual in hand!) i discovered that yes i do actually have a G-valve.
Its the valve with a ball in it that 'rolls up the hill' to decrease the power going to the back under fierce braking. So, can these G Valves be taken apart and cleaned etc to get them working again, or is it a case of having to buy a new one.... Anyone have the part number to hand?? Or are they fairly reliable so am I barking up the wrong tree....
Oh... then again, I guess if the master has been failing and not providing enough power to the fronts then all the force could be going to the back....
Thoughts?
-
Awesome, thanks for the responses

When you say play... I can yank on the steering damper and force the joint forwards so it sits correctly. I assume being able to move it around like that is ok? Do you mean play in the sense of small movement between the joints like when a wheel/prop bearing goes etc??
-
Morning,
After a part check:
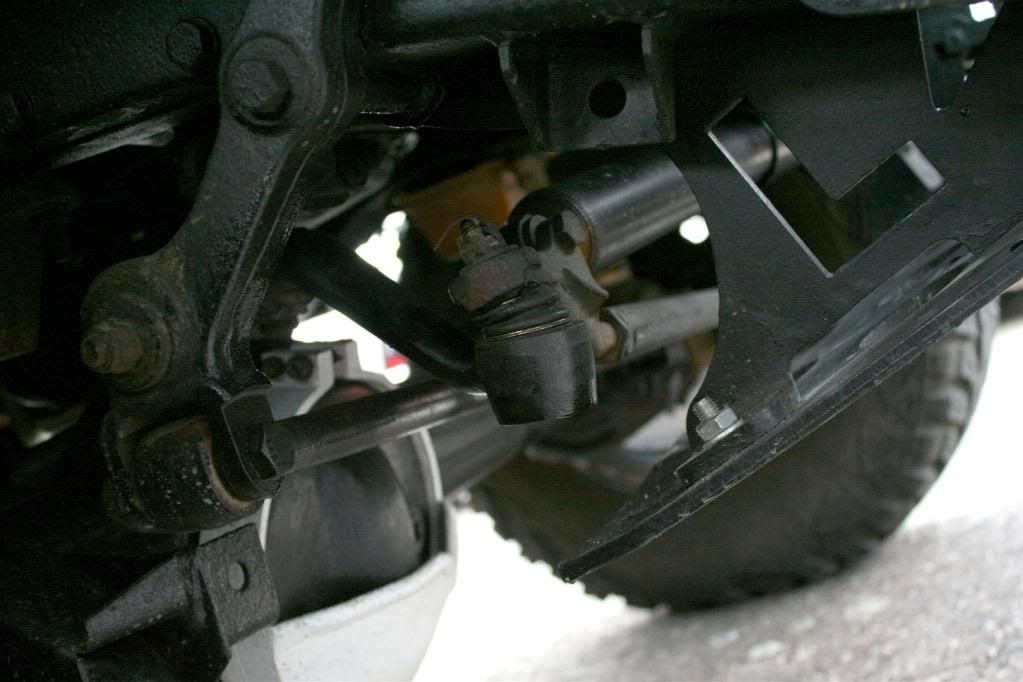
The bush / rubber gaiter thing in the middle of the picture has perished and will need replacing before MOT time... I havent had much luck in figuring what part it is... Does anyone have a part number or name of the top of their head?
Vehicle Details: 1985 Military 90 with 2" lift and big wheels.
As can be seen from the pic, the geometry seems to be a little wonky. This part was replaced by the previous owner a year ago so something must be wrong for it to go in such a short amount of time.
Im guessing it could be due to the suspension lift or bigger wheels. The damper always seems to force that joint backwards, or the arm holding the bush is at the wrong angle... anyone had this problem before or know of a fix / better part
Thanks
-
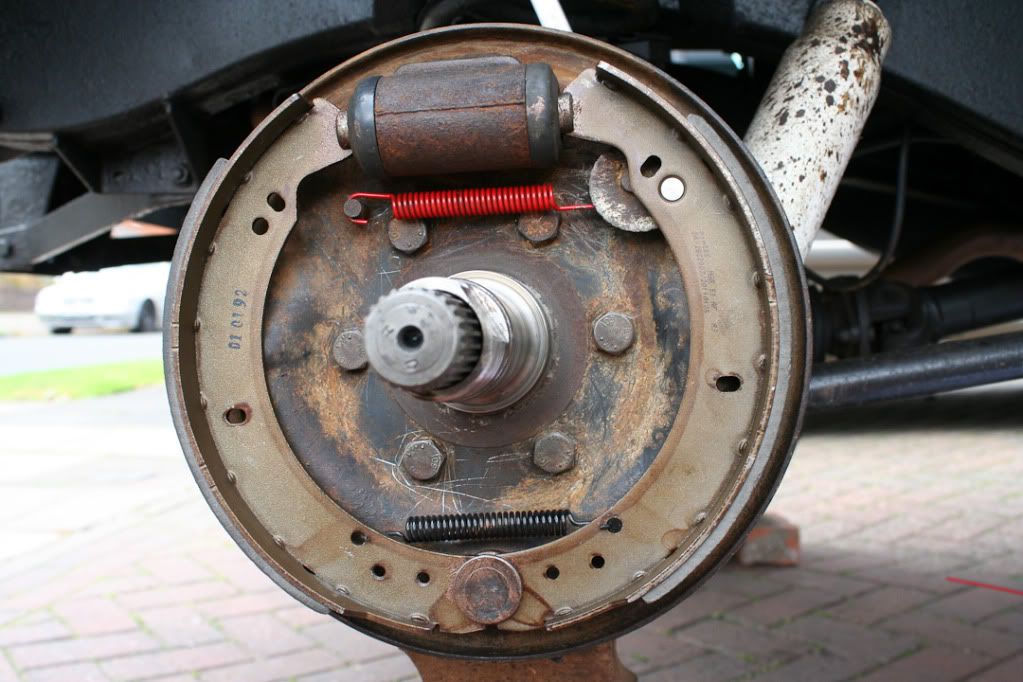
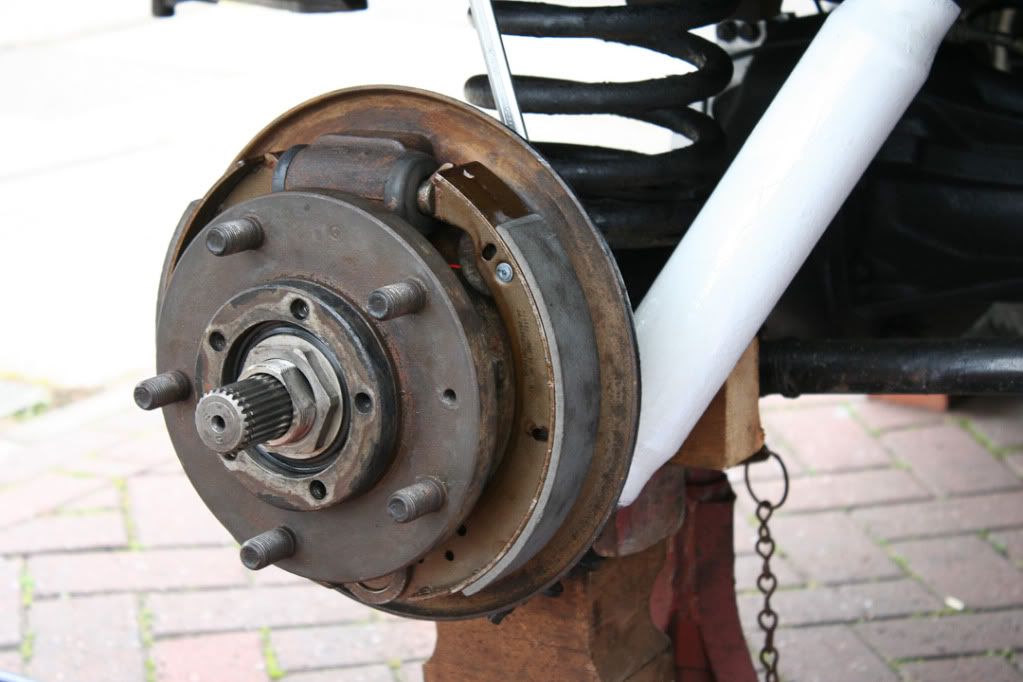
Refurbed the brakes today.
Removed old shoes and springs, general clean and tidy up. Checked that the pistons were moving freely. Fitted new mintex shoes and replacement springs. Disassembled the leaking hub and rebuilt using a new outer seal and replaced the gasket which had all but disintegrated. Hub cap was new so checked for defects and reused.
Before
After
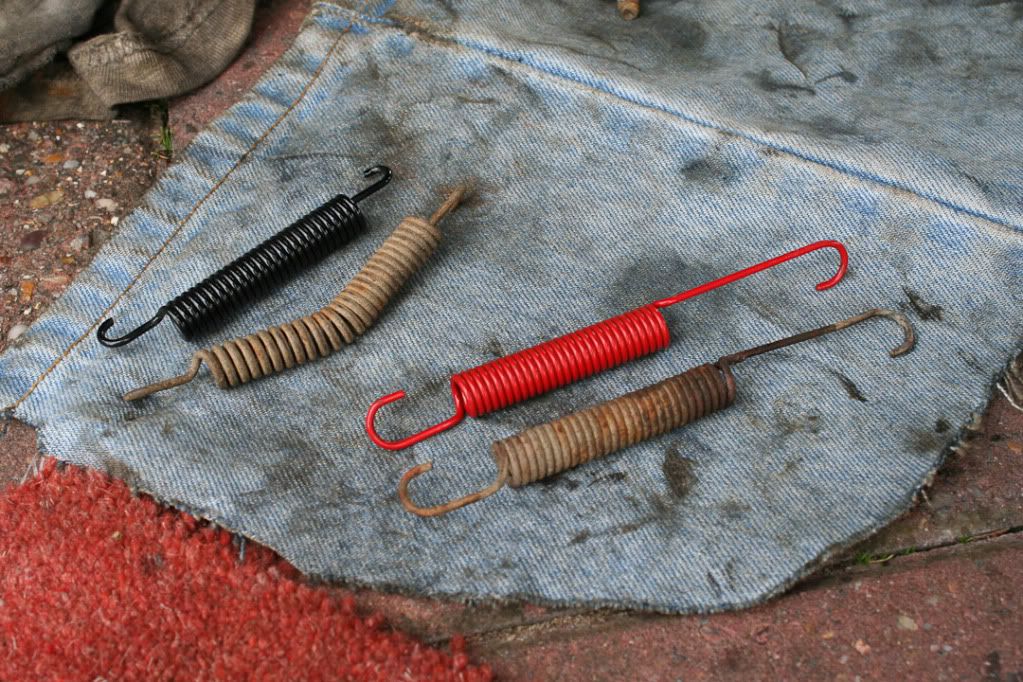
These were the springs from the side that was not locking up. No pressure was being applied by the bottom spring, so likely the brake was not braking efficiently:
So anyway; under heavy braking, as in emergency stop style, both rears will lock!! At least they are consistent now, haha. Checked the fronts to make sure they are ok, discs are practically new. loads of life on pads. no sign of sticking calipers. So fairly confident the fronts are working as they should.
With both rears locking and the fronts working (but not locking) im confused about what could be causing the problem.
Perhaps its the tyres? They are MT style so not the greatest on road grip, with the weight being thrown forwards are the rears being unloaded sufficiently to cause the skidding...?
Or am i missing a G(?) valve or something in the system that splits the breaking forces?
Ill let them bed in over the week and re adjust. Suggestions and ideas welcomed though
-
carp, one of the hubs is pissing out oil now. Any my heater has decided not to work... Just when I thought it was beginning to behave itself
-
Hmm... Does an axle swap require adjusting anything else in the braking system?? as in bias front to back or the vacuum thingy up front??
If the axle comes with the brakes attached for that much, then yeah it wouldnt be much more than just renewing drums!
-
Thanks for the replies. Ill probably replace the shoes and springs, maybe the drums and either reseal the pistons or buy new cylinders. Parts seem cheap enough so no harm in refreshing the brakes, considering how important they are!
Measured the drum, they are 10".
I'll check the fronts out too, make sure all the pistons are working. Again, might just clean, reseal and replace pads considering the fairly low cost of parts...
-
workshop book shows long finger of top spring on backplate post & short finger on brake shoe, bottom spring on brake shoes, see Section 70, page 8
Yeah, that was the image that was confusing me. all the photos suggested mine are fine, but that image is a little hard to figure out!
Other side was much the same. the bottom spring is stretched and much looser, so that will need replacing. Less wear on the shoes though.
cleaned and reassembled everything, adjusted the brakes with the same amount of adjustment and the wheel still locks up. hmph... the cylinders looked a little different, so perhaps a touch more adjusting will slacken off the locking wheel?
Had a quick look on paddocks and couldnt see replacment springs, are these freely available or part of a kit or something??
Wondering if the fronts are lacking in some regard... Ill have to check.
-
After looking at the evidence, i dont think a spring is required at the top. the ones that have the springs are the 110s.
Not sure about that bottom retaining plate though. it holds the rear shoe in place, without it the shoe would come out. the manual clearly shows it but unfortunately it doesnt say which side the image is! haha
Going to have a look at the other side, as its been suggested that the opposite side to the problem can lock.
-
Military 90. 1986. As far as I know, its the original rear axel and brakes etc.
The problem I have is that the Drivers side Rear wheel locks under braking. Under hard braking the passenger side will actually drag the drivers side round as the rear drivers looses traction. It will skid under moderate braking.
Following the various guides, workshop manual and info in this thread: http://forums.lr4x4.com/index.php?showtopic=60307&st=20&gopid=592479entry592479
I have taken the hub off to look for problems. Everything looks ok. No oil, shoes look fine, no odd wear patterns, hub is clean, cylinder is moving etc etc.
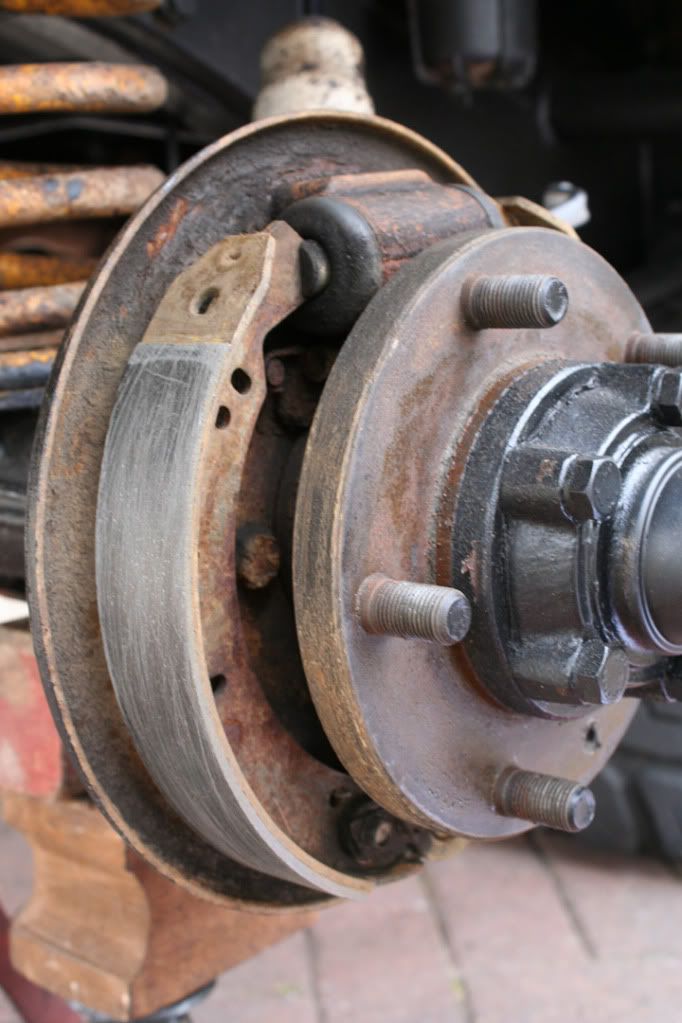
The only thing that seems to be different is that the retaining ring at the bottom is on the rear shoe rather than the front and im a little confused as to my spring locations.
Does this look right?
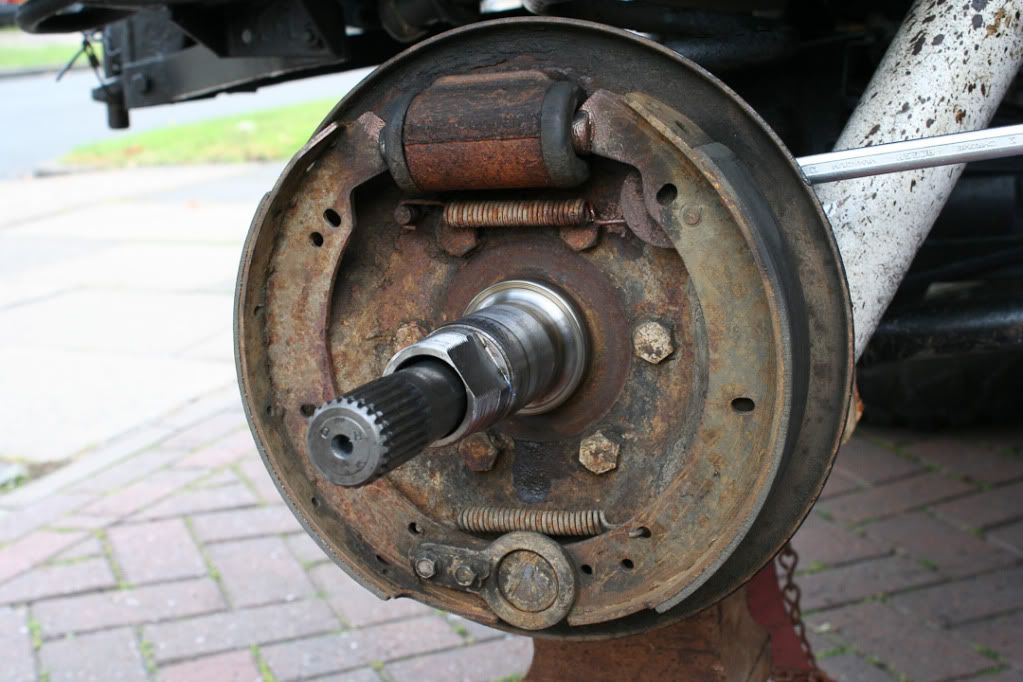
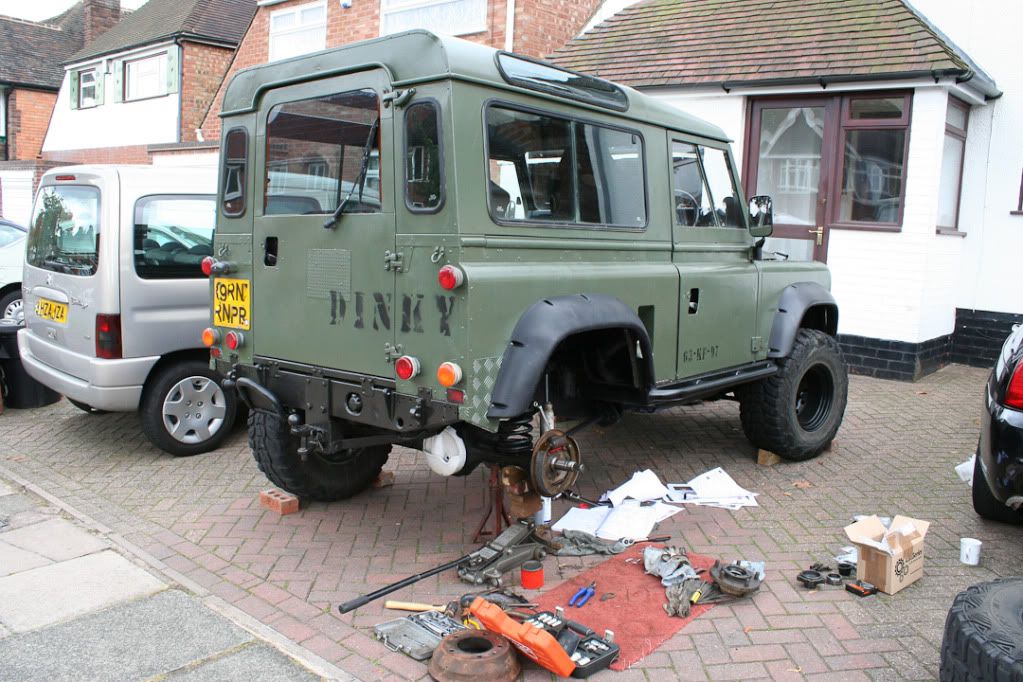
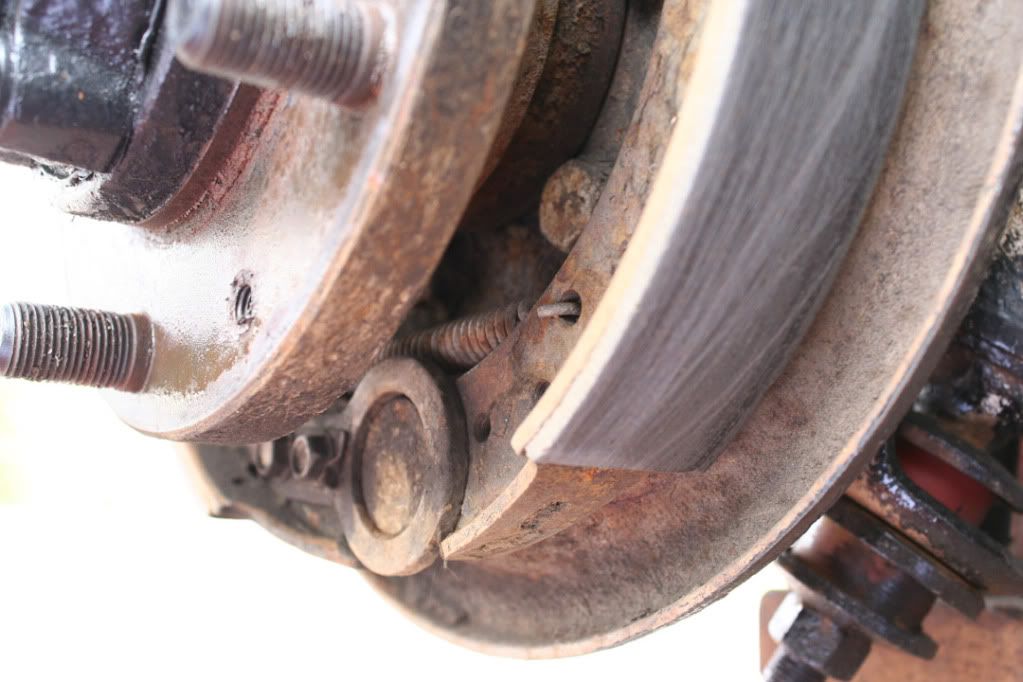
Front view of rear brake:
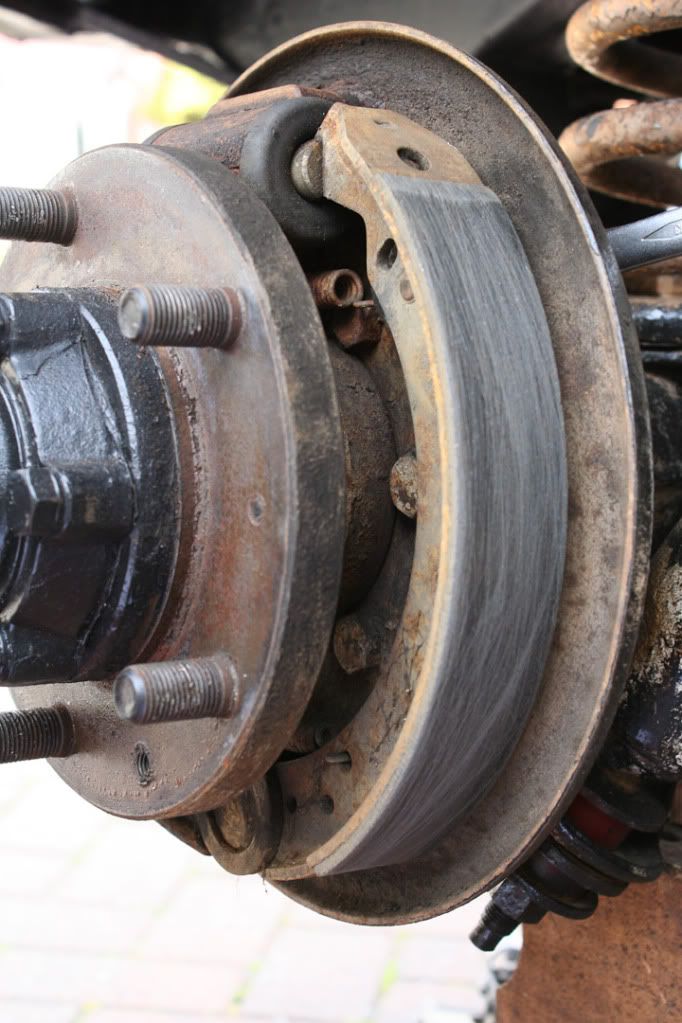
Front top sping, attached to the adjuster on the back of the hub:
Front bottom spring and retaining ring:
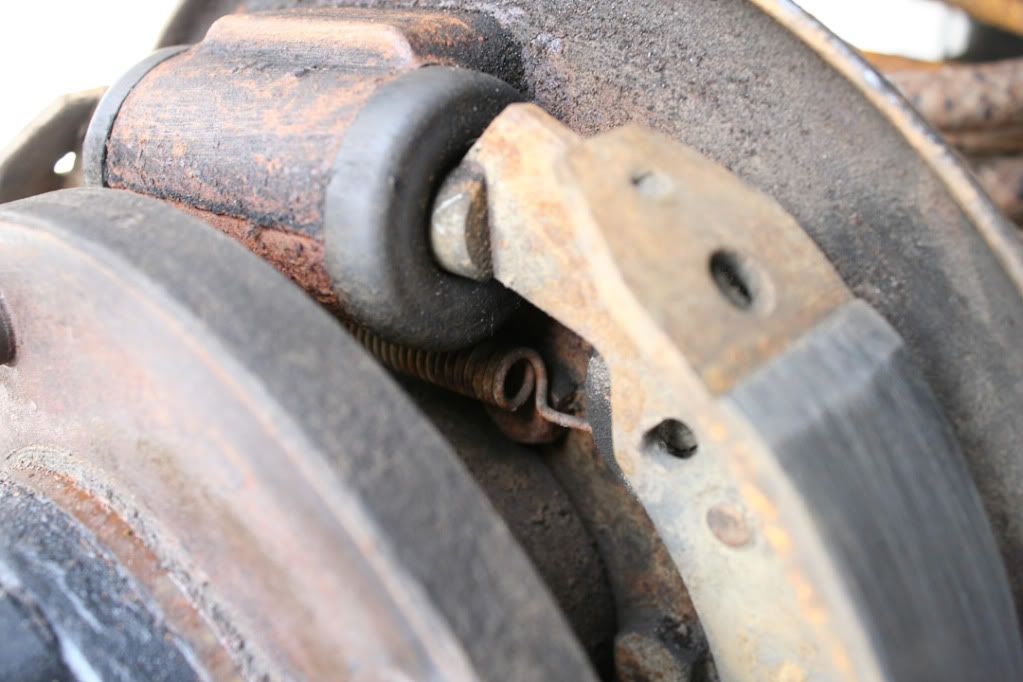
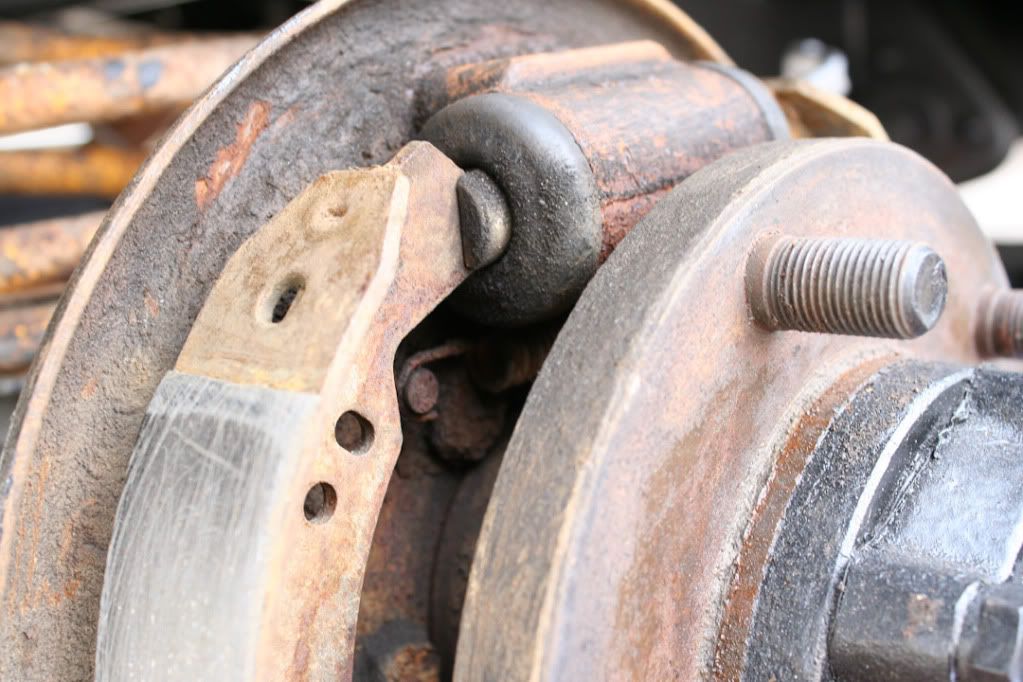
Rear view of the rear brake:
Rear view of the top spring. Is this the problem? The spring isn’t attached to the rear shoe at the top, its attached to the back of the hub. Shouldn’t the shoes be attached by springs top and bottom to pull them together??
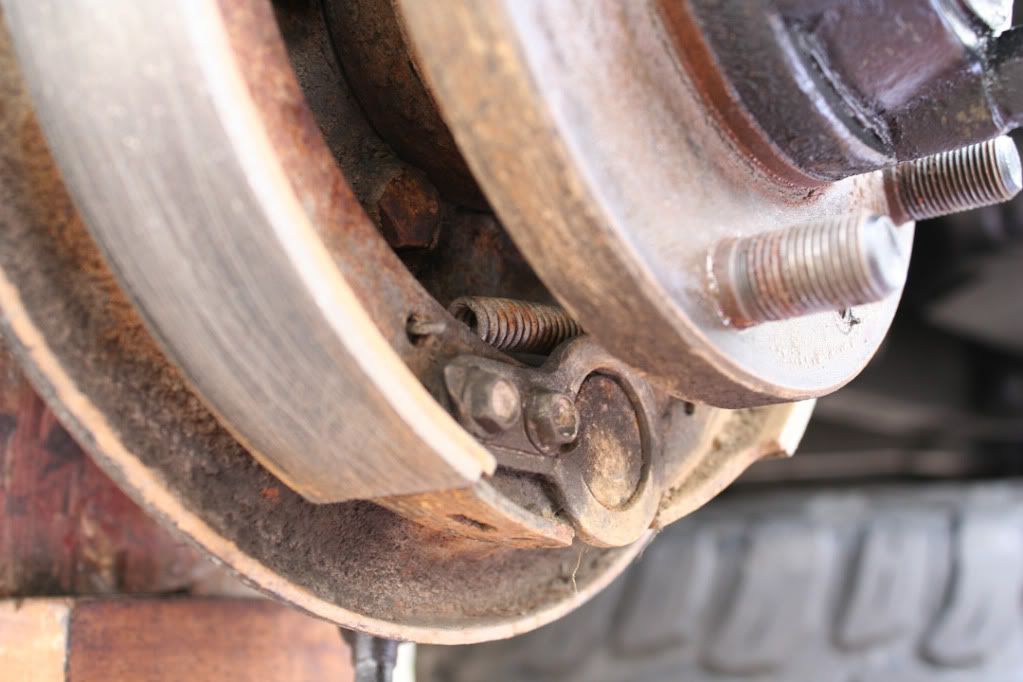
Rear view of the bottom spring:
Help! I need to check the other side, but with a limit on jacks etc I can only do one side at a time so want to make sure this side is ok before reassembling!
-
I fitted a mountney and took it straight off too, couldn;t live with the wheel that much nearter me, i ened up fitting one of these... http://www.ebay.co.uk/itm/mini-thirty-steering-wheel-/300579678520?pt=UK_CarsParts_Vehicles_CarParts_SM&hash=item45fbf1e938 bearing in mind that my truck is a 96 300....... they bolt straight on, there's a guy on ebay selling them as land rover wheels, but they're not.... they come off old mini's...!!! all he does is fit a different badge in the middle... these wheels are slimmer, and look more stock too.....
Best to check the fittings before you buy one though.... just to be safe!
Yeah i hear you can fit metro wheels too. Although i believe they are 48 splines... so i may be out of luck on that one
-
haha.... drive to work was fun!
As it wasnt seating properly i did the bolt up quite tight... so now the new boss is rubbing the plastic so much it took 2 hands to turn the damn wheel... haha.
Slight oversight on my behalf there
-
As you have already discovered the roll-pins in the kit fit into the holes on the back of the boss and operate the self canceling collar.
Your boss is very thick, I have used two on my 1986 ex-MOD 90 and neither were as thick as that. One was a Mountney 'Classic' boss and the later one (which is still fitted) is a Mountney '6-hole pattern' (the aftermarket wheel industry standard). I also have a 'Snap-Off' adapter fitted and even with that my wheel is only the same distance away from the stalks as yours.
I used to run a 15-inch Mountney and then a 14-inch but for several years now I have been using a 12-inch Raid wheel and it suits me perfectly. The other advantage is that it fits neatly into my back-pack for when the vehicle is parked up.
well this boss claims to be a mountney... as i say it hits the plastic before fully seating and as you can see from the plastic its pretty scuffed up by the standard wheel, im wondering if either the column is short or the plastic surround is incorrectly fitted... probably the latter
Fitted the wheel now and will give it a go. Feels quite nice with the arm out the window, hand rests on it perfectly. we shall see how it feels when driving round.
This boss looks VERY different: http://www.merlinmotorsport.co.uk/p9049/Momo-Steering-Boss-for-LAND-ROVER-DEFENDER-No-Airbag-36-Splines/product_info.html wonder if its shorter.
-
Thanks for the replies. Seems like everything is normal then.
I'll bolt the wheel on tomorrow and run it for the rest of the week to see how it feels.
I was looking at one of those rather nice momo ones. Most are 14", the brown leather one i have is 15". Quite fancied the quark http://www.demon-tweeks.co.uk/Performance/Steering_Wheels_Accessories/Steering_Wheels/Momo_Quark_Steering_Wheel/323/987, mainly becuase of the flatter bottom, with some non standard seats it can be tricky sliding in and out under the current massive 17" beast. haha
Then again, that thing is 100 quid and this brown one i have is free!
-
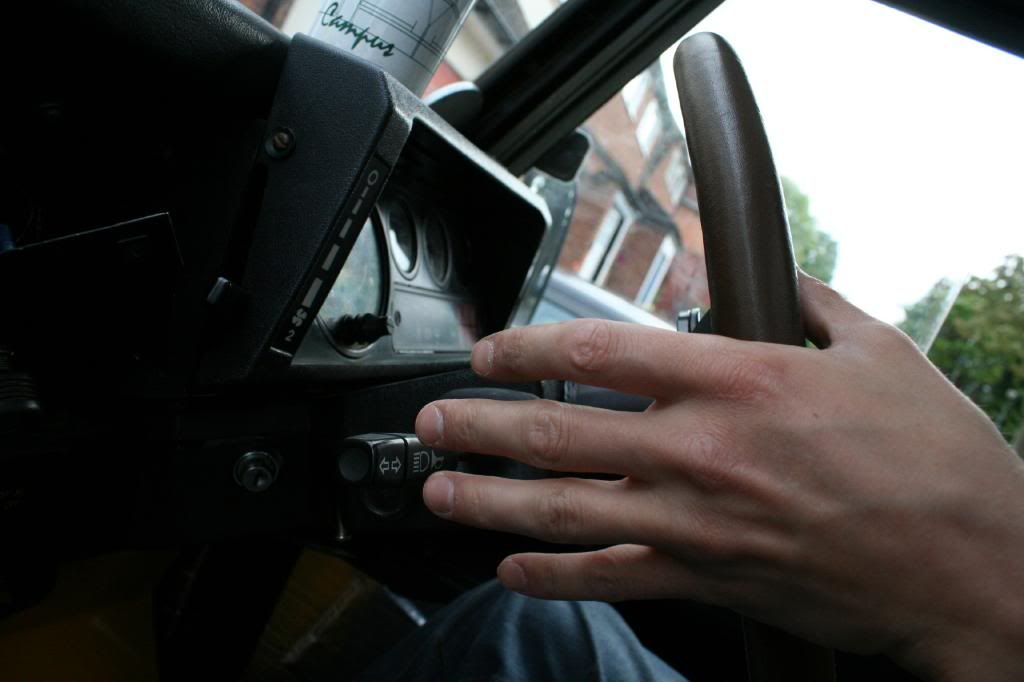
I had a spare wheel kicking about in the garage so I bought a steering wheel boss from ebay: http://cgi.ebay.co.uk/ws/eBayISAPI.dll?ViewItem&item=280702633144&ssPageName=STRK:MEWAX:IT and thought i would give the smaller wheel a go...
Few questions as i'm not 100% sure if everything is normal...
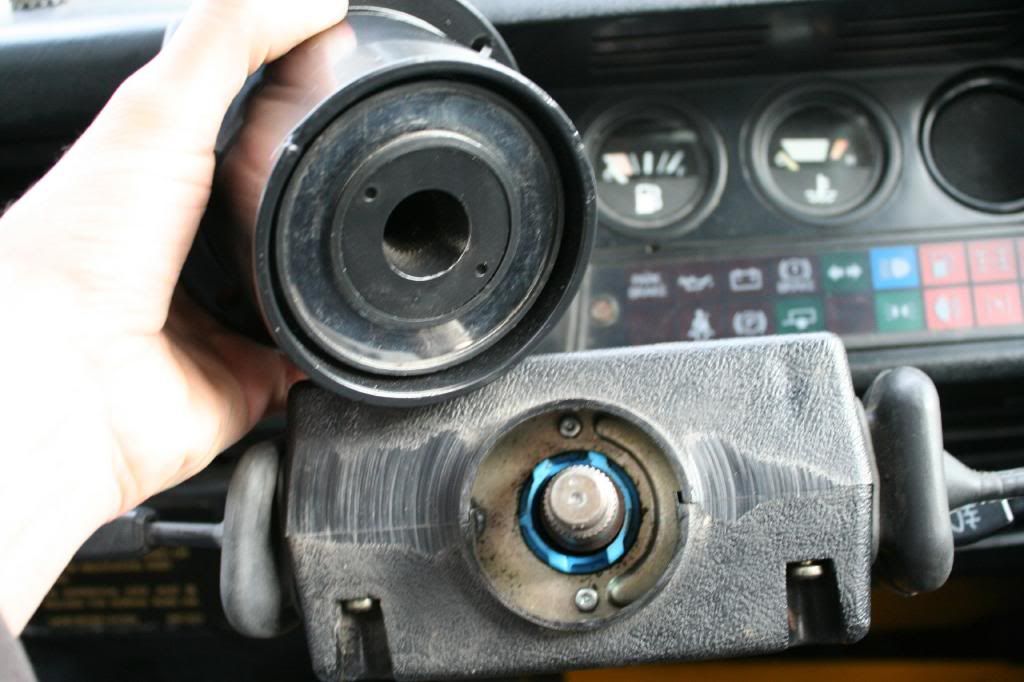
My steering column with the wheel removed. 36 spline. '86 military defender.
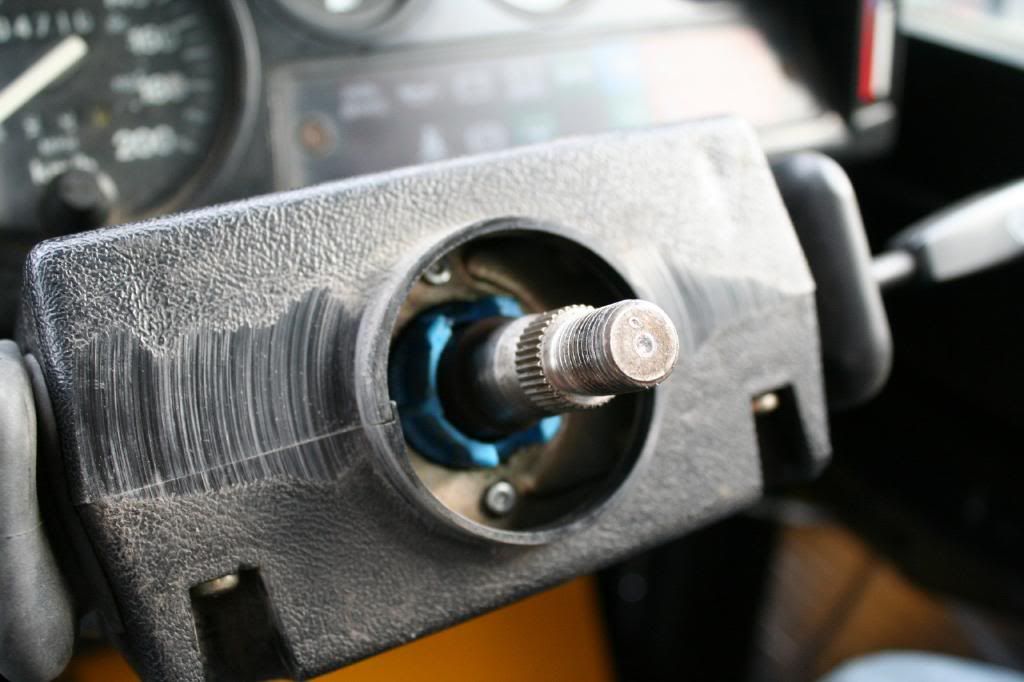
The old wheel with the fitting to cancel the indicators (blue bit)

New boss, without the self cancelling indicator bit. Unless i tweak this new boss a little, the self cancelling indicators wont work, is this just a compromise with fitting a different wheel, or are there bosses out there that will retain that feature?
(actually, looking at that photo and going to check the boss again, i noticed int he bag of screws there are little rods that fit in the two holes on the back... i guess they act as the indicator cancelling bit)
Wheel in place, but not fitted.
Actually thats another question... does the wheel sit on top of the boss... or underneath?
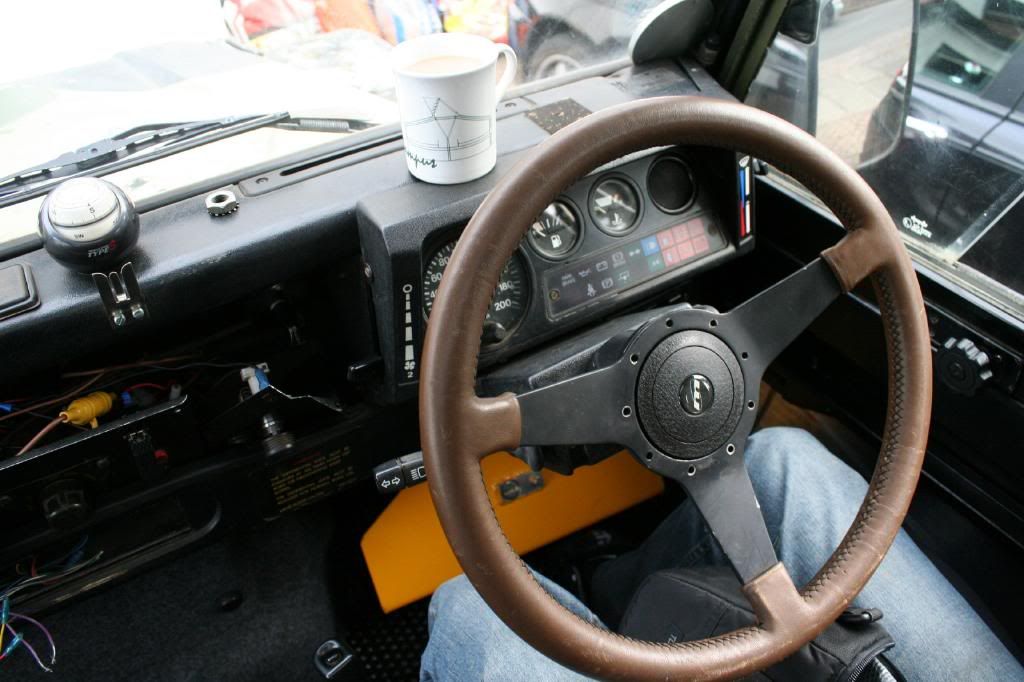
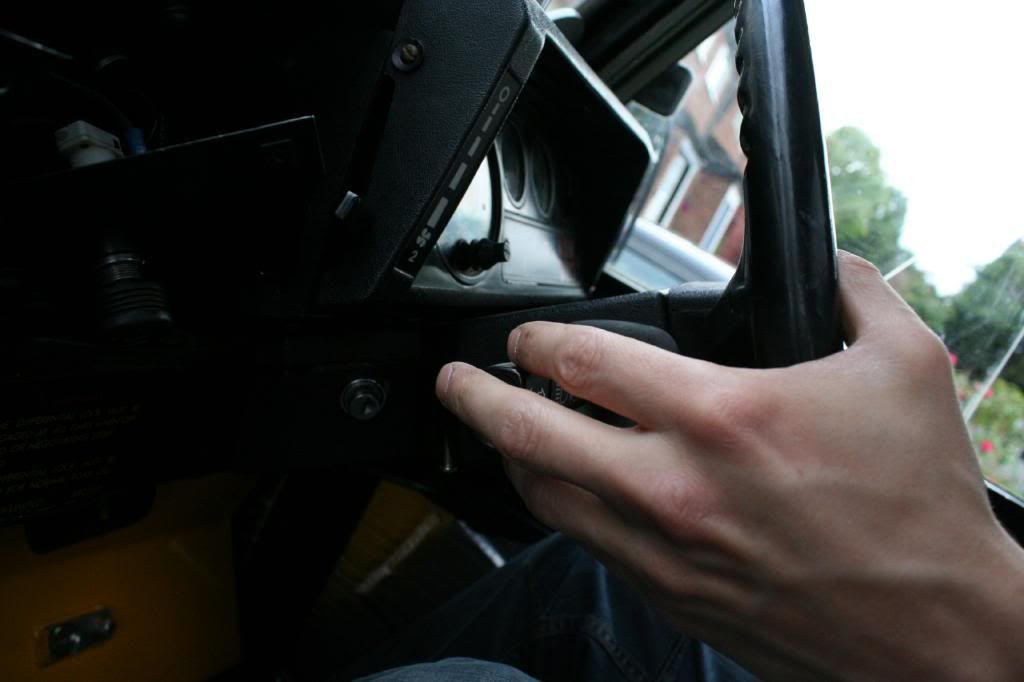
The new boss seems to press up against the plastic of the steering column before its fully mounted. It seems to sit on the spline, but im not sure if its fully seating on the tapered bit. Is this normal? There is plenty of the steering column left to get the bolt in place.
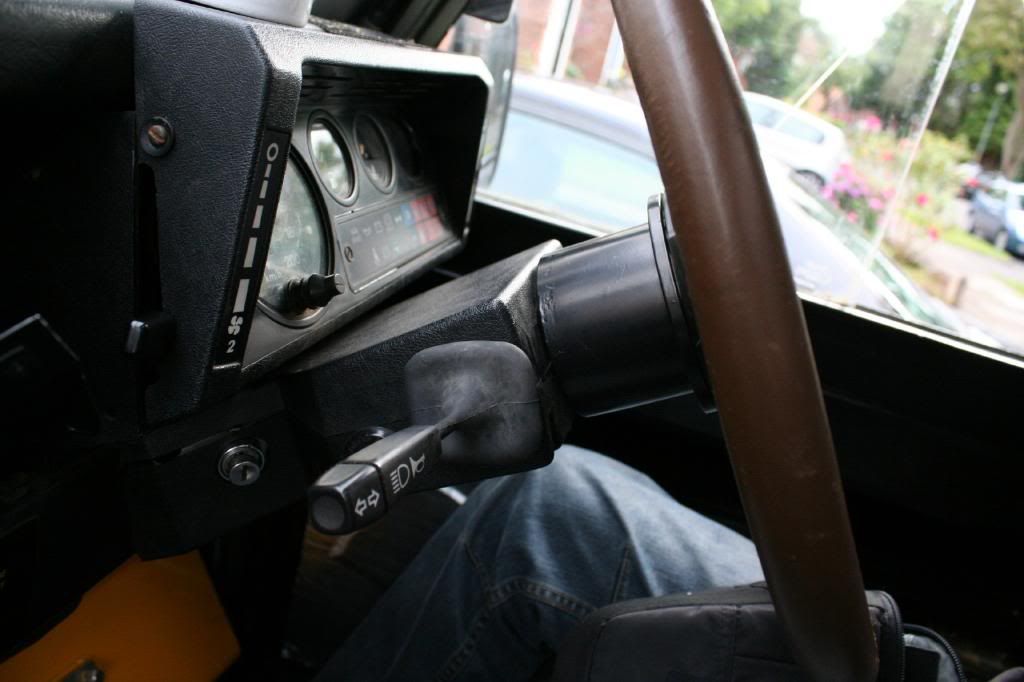
The other issue is that the boss seems to bring the wheel quite a lot further forward than the standard unit... so much so i cant actually reach the indicator stalk anymore. Again, is this normal? Is it just an accepted compromise that comes with fitting a smaller wheel?
new
old
I guess the stalks could be altered a little to bring them closer (are they metal... could just bend them?). But yeah, i think i need to fit it and test it out to see if the new position agrees with me.
Or can you actually get a shorter boss? im not really sure why this thing is so deep, really doesnt need to be....
Thoughts?
-
The glazing channel is generally held in with self tappers which can be a pig to remove and then the glass comes out with the channel - replacement is the reverse but IIRC you will have to cut a slot for the window lock - its a fiddle to get a drill in there for the new self tappers. The self tappers need screwing well in so that the glass rests on the felt rather than the head of the screws -Its a fiddle but do-able.....
Need to do the same. I have a pile of felt from wollies, plus some metal felt channels from paddocks... just havent got round to swapping them yet. But plan of action was to take the top of the door off and disassemble the window frames. well, thats not much of a plan, so any photos and hints and tips when you do yours would be most welcome!
-
Maybe you need to re-adjust... It shows that one brake is more tight than the other. When I get this problem, I just pop open the rear drums, give them a good air cleaning (wear a good breathing mask) and then just slightly roughen the brake shoes and the inside of the drum with some very coarse sanding paper. I close them re-adjust the brake by tightening until the wheel blocks and then slack the same portion of a turn both sides.
Thanks for the info. Will check and clean both sides. By air cleaning, do you mean you just blast it with an air hose or clean it without water?
-
Thought I would resurrect an old thread rather than starting a new one;
My 86 drum braked 90 (Chassis: AA261384) is doing a similar to the OP. But only the one rear wheel is locking...
For clarification, if mine has a G valve and it was faulty, would this cause both rear wheels to lock up, rather than just the one, right?
If so I’m thinking it’s probably one of the other issues mentioned above by FridgeFreezer; My hub cap has been leaking oil on the side that locks, so I guess there is a good chance some oil has got into the brake.
Will take the wheel off and have a look.
-
although... I would have to paint it on... and to be honest, just painting the chassis was enough of a pain. A tub of waxoyl and a sprayer maybe the better choice really
-
It does sound like a good alternatine doesn't it?

I think that being water based it could give you problems. Is it hydroscopic when dry or totaly impervious to water?
It won't stop rust like waxoil. Just seal it in.
How does it react to oils when dry?
I didnt think waxoyl stopped rust either? just seals the metal stopping water preventing rust?
Good questions about the oil and water. I'm not sure to be honest, Ill test it out on something and see what happens.
Oh... found this too about one of its uses:
Tanking and Damp proofing Structures below Ground Level: Internal treatment with FEB AQUASEAL HYPRUFE D.P.M can be an effective means of preventing the ingress of dampness but it is unlikely to resist exposure to free water or water pressure.
unlikely to resist free water doesnt sound great... but thats underground, on the under side of vehicle in relatively fast drying conditions perhaps its not relevant.
-
I have 5 Litres of AquaSeal Damp Proof Liquid Membrane thats sitting about unused... and a fairly unprotected underside of a Defender...
Is there any reason why I shouldn't or couldn't use this stuff as a sort of cheap-o waxoyl replacement??
The blurp says:
A rubber / bitumen liquid emulsion with excellent adhesion which dries to a tough black seamless, flexible waterproof and vapour proof membrane. It's a modified bitumen emulsion with excellent adhesion to most surfaces. Once dry forms a continuous, elastomeric and extremely durable waterproof membrane.
Features and Benefits:
Waterproof: Provides a seamless and extremely durable waterproof coating.
Brush Application: Solvent free and non-flammable. Being water based it is less harmful to the environment and tools can be cleaned with water whilst wet.
Elastomeric: The modified bitumen gives unequalled elastomeric properties, which can easily accommodate all normal building movements to retain a watertight seal.
U.V.Resistant
One Coat Application: One coat is normally sufficient to provide a durable waterproofing treatment to most surfaces.
No Primer Required: The excellent adhesive properties enables application to many surfaces without the use of a primer coat.
The rubbery, flexible tough descriptions sound ideal for an underside of a vehicle... no?

90 Drum Locking
in Defender Forum (1983 - 2016)
Posted
Not yet. It still locks. I never got round to looking at the Gvalve, but its on my 'to-do' list.
Although, according to the handbook (at least my interpretation of the book, please correct me if im wrong here), the G valve is a pretty simple thing, it uses the force from the decreasing momentum of a braking vehicle to move a ball bearing 'up a slope' to limit the amount of fluid going to the rear brakes.... If it requires the vehicle to be moving, can it be tested on a machine???
But yeah, as i say, G valve is on my to do, probably when the weather gets a touch warmer