


Daragh
-
Posts
58 -
Joined
-
Last visited
-
Rover V8 exhaust manifold compatibility / interchangeability
Daragh replied to Daragh's topic in International Forum
Thanks guys, I might try the 3.9 one that I found, it has it's exit straight down out of the center and then put another 'left hand one' on the right hand side to match them up seeing as they are reversible. Thanks FF for the P38 heads up, your misfortune is my fortune 😃. Thanks all. -
Good morning all, My current set up on my 3.5 means the down pipe is located mm from my clutch slave cylinder, which obviously leads to problems, so I want to change it. I have investigated to use of other tubular or center exit down pipe (3.9/4.2 I think) but cannot get conclusive information. I would prefer not to spend the dollars on the wrong part. So, does any body know if rover V8 exhaust manifolds are interchange able ie 3.5 to 4.6 classic, P38 and more modern models. I see on RPI that new shape RRs ones are excellent for conversions and kit cars. Second question, are they all reversible from driver to off side? I thought reversing them would allow my exit for downpipe to be forward and then I could loop piping back to meet up with existing arrangement. Thank you in advance.

-
Very High Idle 2200rpm - P38 V8 in LR90
Daragh replied to alex-the-lyon's topic in MS-Megasquirt/Jolt
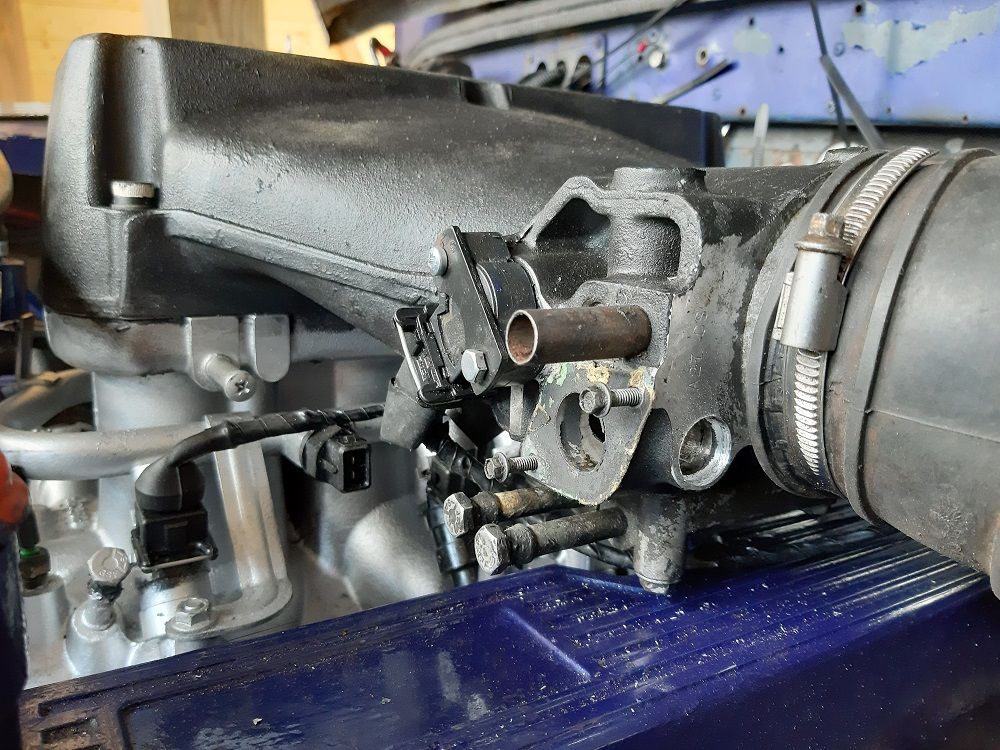
Hi guys, Its been a little while but I have an update. I don't feel I have the expertise of FF, but I will tell you what happened to me. After my last work the high revs were cured but became a low revs problem and I was unable to change with bypass screw. I investigated and found that by putting the bolt in where I did and sealing the hole identified in photo below, I stopped all air bypassing the butterfly. The upshot being the bypass screw could be taken out completely and it made no difference whatsoever. So I took it apart and investigated. I found that I needed to keep this passageway (above photo) clear as this is the only air inlet connecting before and after butterfly. What I have done now is remove this new bolt, clear this hole and instead fill the hole at right angles to this one, the one that goes through into the mouth of the plenum (see second photo below). I have tried to show a representation below because I forgot to take a picture when I had it apart. It now allows me to alter the revs up and down via the bypass screw and I have now been able to get the idle tuned correctly (I hope!!) to the lowest MAP and then be able to bring revs back down mechanical with bypass screw to 800 revs So this appears to be what has now worked for me, so I thought I should update post.


-
Hi Guys, I am thinking about doing the above and was doing a little research and found this thread. I actually have a hybrid and I am not 100% sure which series/90/defender body has been put on. From above it appears to make a difference if I want to remove the bulkhead. So, I was wondering if anyone could help me identify which one I have. Could someone advise what are the different widths for the different variations? I suppose it is dependent on your replies but which version is the best, the muduk or the tubular version? Thanks in advance. D

-
Very High Idle 2200rpm - P38 V8 in LR90
Daragh replied to alex-the-lyon's topic in MS-Megasquirt/Jolt
I'll investigate and post if I figure it out. Tks. -
Very High Idle 2200rpm - P38 V8 in LR90
Daragh replied to alex-the-lyon's topic in MS-Megasquirt/Jolt
Just to confirm it worked. Thank you guys sooooo much. I can now enjoy the fun bit of tuning and getting back on and off the road. A possible side effect may be that the idle screw may have been blocked at the same time. It is now making no change even when screwed fully shut or removed altogether. Don't know if anyone else has had this issue. I need to investigate it's air path and figure out if I have sealed it aswell! Anyway, that is a problem for another day. Thanks again. 🖒- 21 replies
-
- 1
-

-
- idle control
- tick over
- (and 1 more)
-
Very High Idle 2200rpm - P38 V8 in LR90
Daragh replied to alex-the-lyon's topic in MS-Megasquirt/Jolt
I attempted to undertake this today and thought I would put up some info for any others who might come across this problem. I did not have a tap large enough so I got a bolt which fit snugly in through the first hole and slid into problem hole. This took a bit more drilling out to get the same size drilled hole as the inside one. I slid bolt in through new drilled hole and then put sealant on it and slid it in on into the corresponding air hole opposit it inside, which is where the air was leaking. Hopefully this will give as close to air tight as I could. I cut the mechanism off the end of the stepper motor, then attached a metal plate with sealant where old stepper hole was and then used old stepper (now with flat bottom) to fix in place. I forgot about taking photos of each specific stage but the following will show the bolt in situ (with probably too much sealant making it look very messy) and then the finished photo showing the old stepper holding a metal plate, which you can just see the corner sticking out. So hopefully all sealed up now. I couldn't check as I have no oil or water in the engine as I am also working on oil pump plate. Anyway, I will follow up with results when it is up and running to close off but obviously this or something like it needs to be completed by anyone switching to PWM from plenum stepper configuration. Fingers crossed.

-
Very High Idle 2200rpm - P38 V8 in LR90
Daragh replied to alex-the-lyon's topic in MS-Megasquirt/Jolt
The hole is blocked off on mine, so I drilled it out. Your photo gave me the confidence! I shoved a rubber pipe in to see if it has sorted the problem and I think it might. So, I thought I would put some photos up to help someone else in the same situation. I now have to try and tap it, not sure if I have a big enough tap, or find some other solution. I will post again when successfully completed. Again, thank you for help.
-
Very High Idle 2200rpm - P38 V8 in LR90
Daragh replied to alex-the-lyon's topic in MS-Megasquirt/Jolt
I will get a chance to check later today. -
Very High Idle 2200rpm - P38 V8 in LR90
Daragh replied to alex-the-lyon's topic in MS-Megasquirt/Jolt
It was a flapper originaly but now PWM. But actually I just realised that I got another plenum/manifold from Nigle when I bought it so it is actually a 3.9 plenum. Either way I didn't notice hole there. -
Very High Idle 2200rpm - P38 V8 in LR90
Daragh replied to alex-the-lyon's topic in MS-Megasquirt/Jolt
Mine is 3.5 but will have a look and see tomorrow what I can come up with. Tks again. -
Tks FF. I think I found the solution 😀

-
Very High Idle 2200rpm - P38 V8 in LR90
Daragh replied to alex-the-lyon's topic in MS-Megasquirt/Jolt
Tks for the info. It is good to know what I have to do even if I don't know how to do it. FF, I will have to make sense of your photo and have a look at mine as I don't think that I have a hole where you appear to have slid in the cylinder in. But maybe it is there and I just have to drill it out. Cheers guys -
Very High Idle 2200rpm - P38 V8 in LR90
Daragh replied to alex-the-lyon's topic in MS-Megasquirt/Jolt
Tks hi lo, but I am not trying to get the stepper working as I have a PWM, I think I simply need to close off the old stepper to stop air leaking in to plenum causing high idle. However, you might confirm, as the stepper is no longer wired up, I presume it is not as simple as sticking 12 volts across the terminals to put it in the fully closed position. Tks -
Good morning PeteMck, I think I am having the same problem and need to seal my defunct stepper. Did you machine a piece with a conical end to match the stepper or was it just a cylinder shape in as far as possible. This may save me pulling the last few hairs out of my head in frustration if it solves it. Tks in advance for any advice.


