


Defender_300Tdi
-
Posts
85 -
Joined
-
Last visited
Content Type
Profiles
Forums
Events
Gallery
Blogs
Posts posted by Defender_300Tdi
-
-
Looks good Defender300Tdi
Yowsers – which article/site persuaded you to ‘de-Fatmat’? I’d already rejected Fatmat on cost grounds* and was going to use proper heatshield stuff on bulkhead and underside of seatbox/floor, and cheapskate option on the roof/sides (camping mat or sticky-back flashing tape).
*Or rather, cost in the UK – it’s less than ½ the price in the US but my boss is being extremely obstinate about foreign travel at the moment…Must try to apply to outfits like yours that send you off to foreign parts…
It wasn't just one site, it was many, many sites! Frankly I wish I had been more careful before I bought the stuff, but hey ho that's life sometimes. I now have around 40kg of proper, legitimate sound proofing material that wont peel off in 4 years, wont turn to a stick goo in any kind of heat (Defender will be driven to Africa at least once within the next 5 years) and final wont poison me! Frankly I think I got lucky discovering this now rather than having completed the re-build only to have to take the thing to bits again. At least it should be fairly easy at the stage its at. Just the time is that killer as usual.
-
James, thanks for the reply! Erm, 110 hasn't really made an massive leaps as I am now working in Australia, which is a little far from Devon....that hasn't stopped me buying all the stuff to finish it though! I am reliably told by my parents that I now have a bedroom with over 30 packages in it!
Had a bit of a mishap though, unfortunately I am going to have to remove all the "Fatmat" as while doing a bit more thorough research into soundproofing etc it appears that its actually roofing insulation and not what it claimed to be at all. Well that and the fact that it is very likely to fall off in a couple of years (seen pictures on other forums VERY messy) and a whole host of other things such as it can be poisonous as well!
I got in contact with a very helpful company in the States (Second Skin Audio) who have excellent reviews in all manner of forums and ended up buying a load of proper job sound proofing and heating insulating materials from them (I did email several UK companies asking for advice but got NOTHING), I tell you its pretty sad that I ended up taking my money to another country!
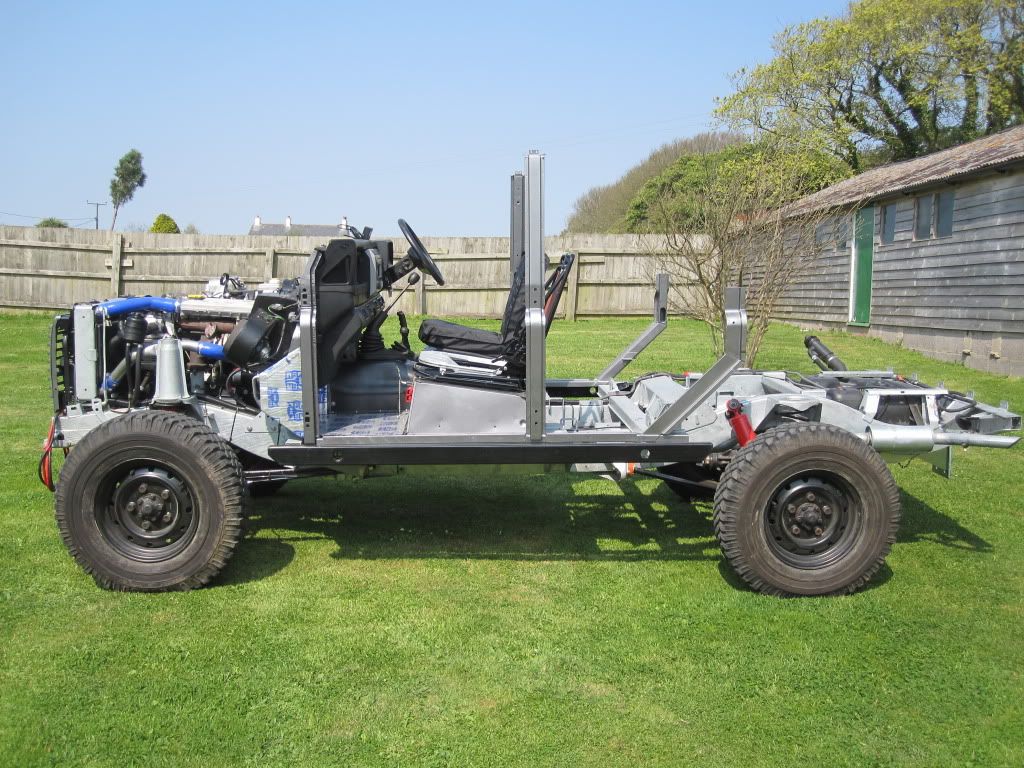
So, the plan is; get back to the UK early June, take it to bits again (and by bits I mean to a bare chassis), off the the Fatmat and on with the proper stuff, split the engine and gearbox to fit an uprated clutch and pressure plate and I think I might have just about convinced myself to paint the chassis with a product called Rustbuster Epoxy Mastic as I figure I have the opportunity to do it again and I dont like having a galv chassis on show (there is too many Defenders going missing in the UK right now).
Anyway, here is what it looked like before I left in April (B-posts galvanised and painted):
Cant remember if I posted these ones before:
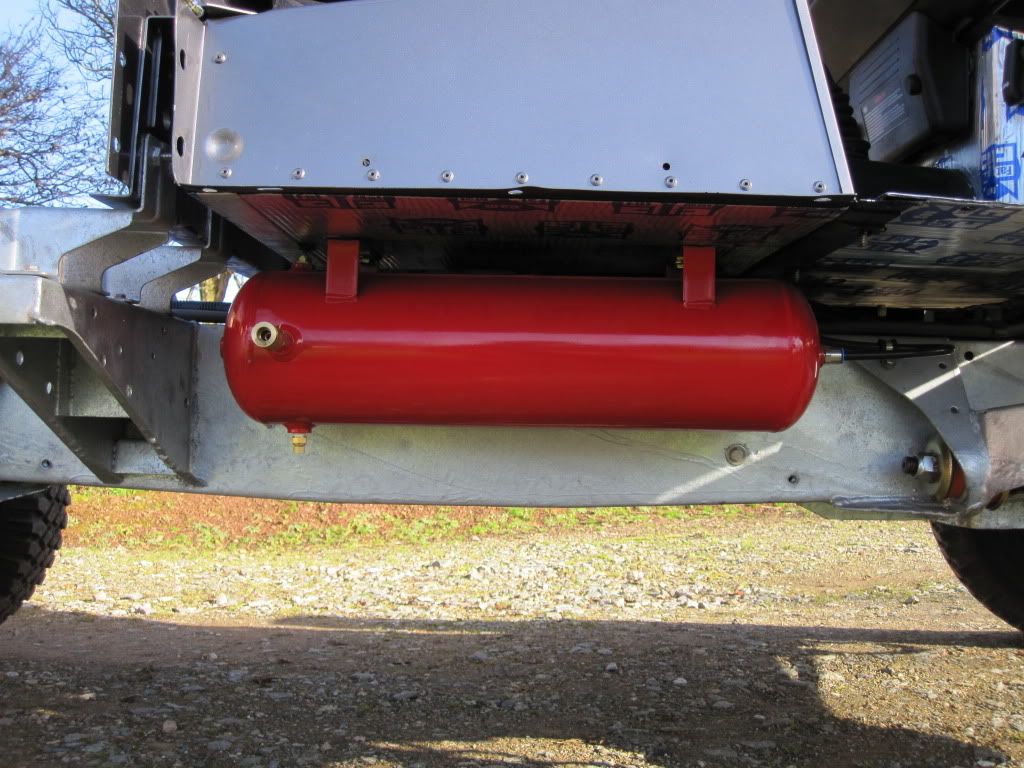
Southdown Tank Guard (I think this is a truly fantastic piece of kit)

On-board air receiver:
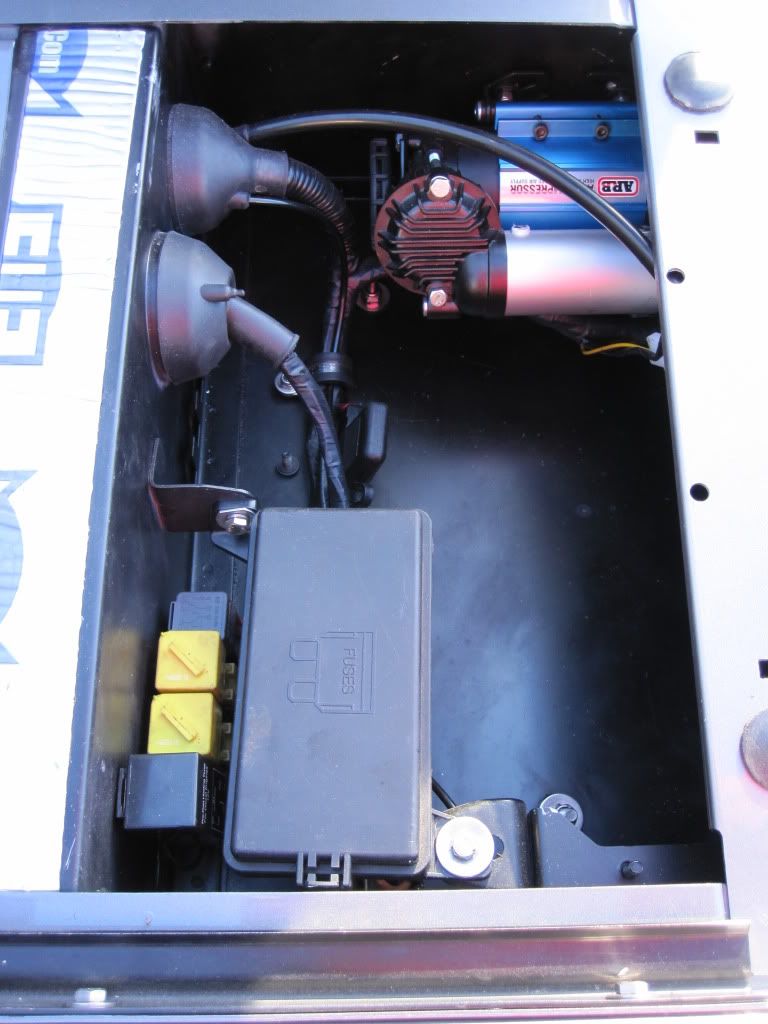
Back up air-source (ARB High output comp) and difflock driver, will be substituted by an Warn SPI unit.
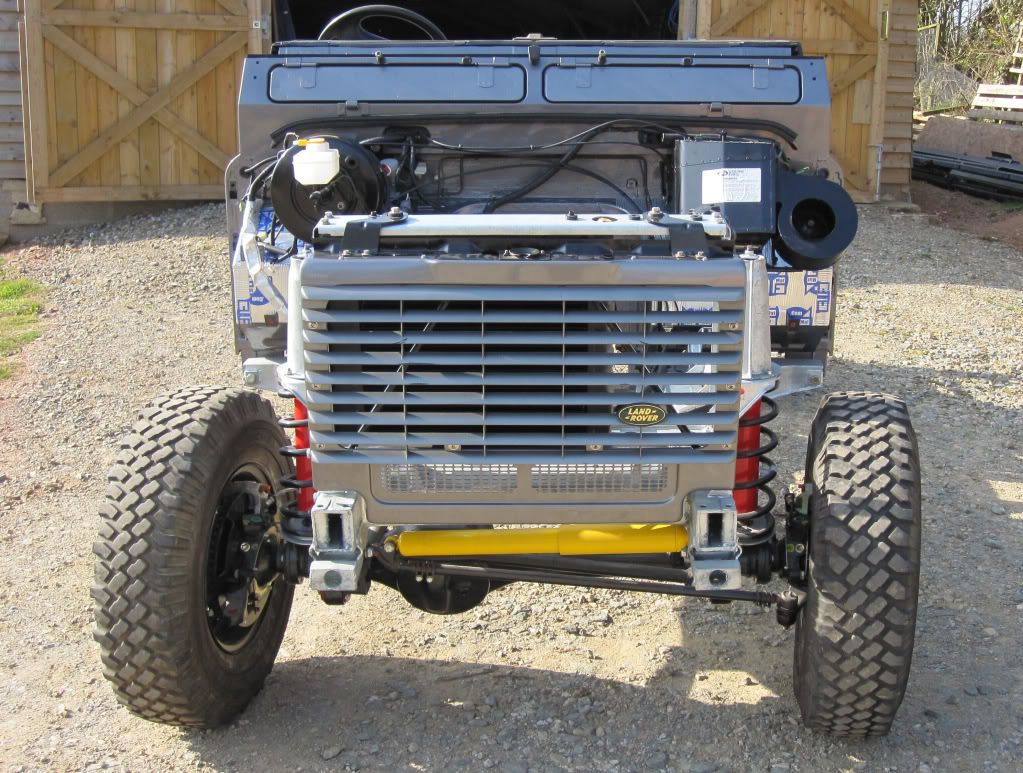
Think that's about it, oh it does have AC now as well! A kit came up on eblag for the right price and boom it was mine! Whats more if you look carefully I didn't even have to move the grill forward..
-
Hi all
I have a 300Tdi 110 fitting with a ROW spec loom (Basically a modified Td5 Loom). I would like to fit a standard towing socket and was wondering which one I need? As my loom is made up of the later type fittings that all just push together and I dont want to bodge it s would rather have a proper Land Rover Part.
Thanks in advance.
Robert
-
On that basis what are the part numbers for a 300Tdi HD Clutch and Pressure Plate? And who makes a good one?
-
Not sure why folk on here want to fit the old style doors and not the latest steel versions.
Having a new one of each sort on my car I can say the later one is as cheap a fabrication as you will ever find but... it is perfectly good at what it is designed for whereas the old style door is very much not.
So unless you are building something that needs to be correct in every detail just buy the latest steel doors and if well painted and waxoyld they will last for a lot longer than the old style.
Have you found a source of the latest style doors then? Because I dont fancy paying over 300-400 pounds each for just a frame and a skin. They are still fetching silly money if you can find them S/H.
-
My money is on:
- Galvanised frames.
- Paint the hell out of the frames (and fill with wax later).
- Attach skin of choice, with an insulator between.
- Paint again in its entirety.
For the insulator I was planning on using 0.3mm PVC pond liner, as it's thin and waterproof, preventing any contact at all between skin and frame. For this reason I was going to use ali skins, saves them rusting out on me in 10 years.
Exactly what I am doing, except I have got hold of a set of steel skins. Well actually I still need the O/S front, but that's a different story!
- Galvanised frames.
-
I would imagine some kind of anti corrosive joining compound maybe? To be honest I dont know that's why I am going for galvanised frames (which will be properly painted) then attach the electroplated steel skin and yet more paint! Then wax the inside! These things wont rust for a good while! (hopefully).
-
So in reading this have Land Rover changed the internal window winder mechanism holding frame thingy then? Is that why the older style internals dont fit anymore? I only ask because I have been offered a set of "new" style doors and was wondering what the differences were internally.
-
a good few years? theyll outlast the landy twice over by the sound of it haha
Well I have been building this 110 to do just that! Almost every steel part has been galvanised! Including: chassis, bulkhead, b-posts, removable chassis cross-member, fuel tank cradle, fuel tank mounts, radiator /intercooler surround, all the door frames (not the rear one as that’s the later steel electro plated type and all the cappings! I think that’s it of the top of my head!
-
Mikey,
Basically yes your right however I plan on doing a few things to try and get the maximum life out of my doors! All the frames are now galvanized, then they will all go to the paint shop to be prep and painted before the door skins go back on. Once back I'll put the door skin on but make sure I put plenty of RTV sealer or something similar in between the two surfaces. Then it's back to the paint shop to paint the skin. After which all I have to do is assemble them! Sounds like a hassle but should give me doors that aren't going to rot for a good few years.
-
Does anyone know of a supplier? I have managed to source the N/S Front and both the 2nd row skins of eblag, but I am still after an O/S Skin to go on my nice galvanised frame....these must be steel not ali!
Regards
Rob
-
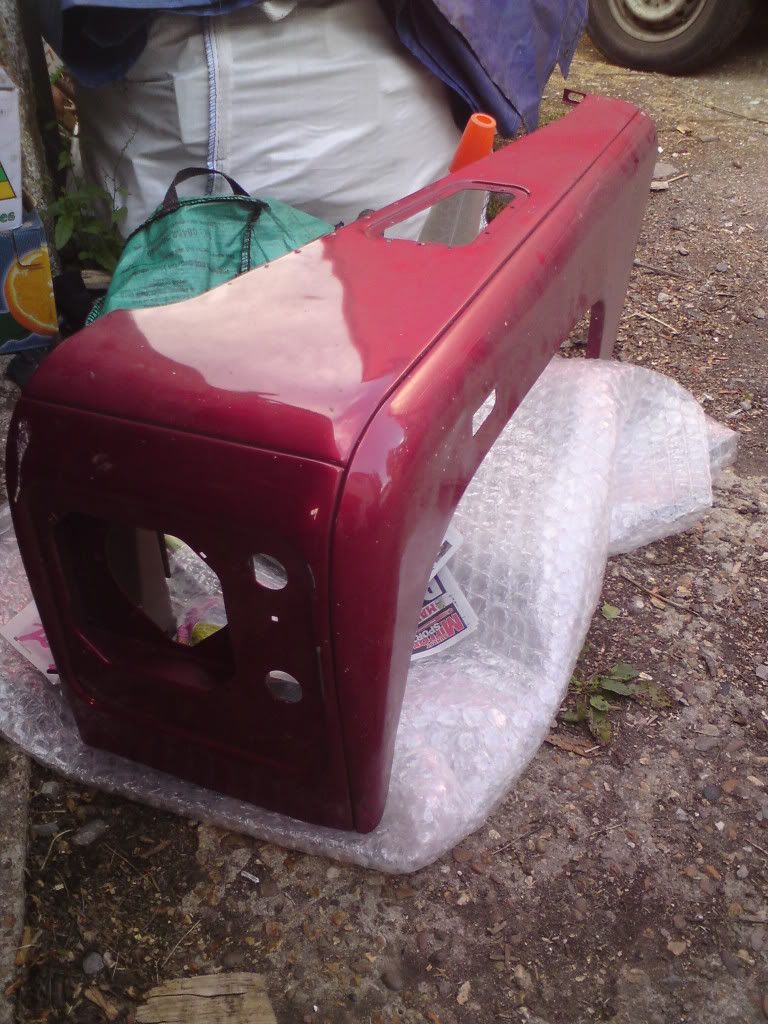
Ralph your a star, one thing, are these the part numbers with the cutouts for the later type indicators?
This is my current passenger wing and I need the cutout to match...
Regards
Rob
-
Well as the title says, I am trying to track down a supplier who doesnt charge stupid money (like the £191.00 I have been already been quoted) for a R/H Td5 front outer wing skin....I am just being daft or does everyone seem to supply ABS plastic ones these days?!
Thanks in advance
Rob
-
Check this .pdf file, that for the Elite kit, still a bit of a puzzle but hopefully it will be of any help to you!
24A0203A Fitting Instructions 300Tdi.pdf
Cheers
Marco
Thank you very much Marco! I really appreciate it!
Regards
Robert
-
I do have plenty but will need to publish it into post/article. Fitting a kit to a 300Tdi should be an easy job. Charging the system should however be done at professional A/C company. Make sure you keep all pipes closed off until fitting them to avoid condensation. Most important the dryer unit, that one is pre charged and opening it up long before fitting it will ruin it. If you have 2nd hand parts you might need to replace some with new...
One my 200Tdi conversion most time has been spend on designing a bracket for the 300Tdi A/C pump, changing the pulley to take the narrow 200Tdi v-belt, cutting a hole into the bulkhead and removing the full size intercooler. Electrics supplied with my 300Tdi kit only needed two custom made connections to harness. So on your 300Tdi that should plug in easily.
I'm planning to have the system charged within 4 weeks to be sure it's operational when temperatures start to rise.
Cheers
Marco
Hi Marco
I have just checked through the kit I bought and I don't have any fitting instructions! Would there be any chance of getting a copy of yours? My kit was brought of eblag and I have contacted the seller but haven't had any joy....
Any help would be greatly appreciated!
Regards
Rob
-
I've not yet tested the airco... due to lack of time a winter. Will connect it up soon... This set-up has been designed for North America, or tested in NA desert conditions according to the manufacturer.
Just fitted another kit... Defa warm-up the complete opposite!
Cheers
Marco
Hi Marco
Any more pictures of your AC installation? I have managed to get hold of a genuine parts land rover 300tdi kit for my 110 and plan on fitting it over the next week or so.
Any tips/help would be appreciated.
Regards
Rob
-
Probably a footwell mat

For what it's worth, I learned t'other day that YRM have expanded their useful range to include all the component parts of the B/C post & sill assembly (apart from the upper B post it seems...but I don't think they rot? Mine aren't anyhow...):
http://www.yrm-metal-solutions.co.uk/defender-8-c.asp <- See bottom of list.
Even if you bought the whole lot and stuck it together it would still be cheaper than new ones from LR (circa £400+ per side), so I may go for that option. I need to assess the parts of mine when I get them off, but the C post will definitely need replacement (big hole right next to seatbelt mount...)
As much as I admire Rob's fabrication skills above, YRMs products have been good for me in the past and have the advantage of being laser cut so should be straighter than my efforts
Oh man....had I known about these repair sections, well that would sure have saved me some time! Ah well, it was fun doing all that welding, at least I have a REALLY good set of B-Posts now.
-
I'd like to know where you sourced the fat mat from ? was it in UK or from overseas & what costs to fit out a 110SW. ?
Hi Ralph
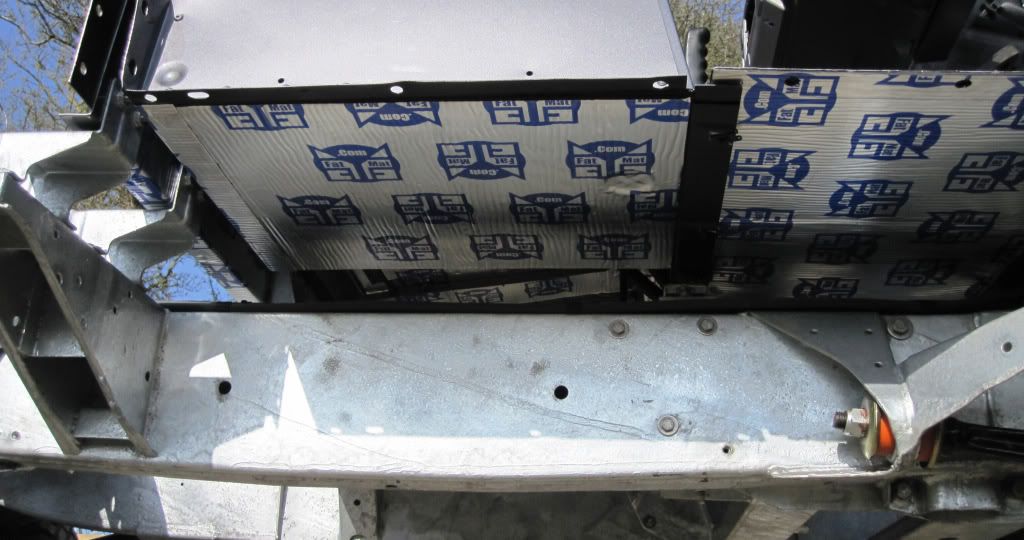
Cost is around £2.80 per square foot. So far I have used 40 sq ft to do the bulkhead (both front and back), the front floor panels (inside and out), the seat box (again inside and out) and the foot slam panel that bolts to the back of the seat box on a 110 CSW. I plan on doing the inside of the rear floor panel and lining the rear tub, plus the insides of the doors. All in I would estimate around 100 sq ft to do a VERY thorough job, though you could get away with around 60-70 if not doing both sides of the bulkhead, front floor panels etc
I purchased it from ebay from a seller called tecknick. Very helpful and even supplied a free roller and stickers. Its great stuff, very easy to manipulate once warm and sticks to panels VERY well (providing no grease etc is present). It’s both heat and sound reflective AND its resistant to oil, water and salt.
Here are a few close ups!
Regards
Rob
-
Wow, some really useful stuff on here, thanks Defender_300TDI!
A blatantly O/T question, apologies, but how did you repair and/or refurb the battery box to such a high standard?
Nice to see the wiring done properly too!
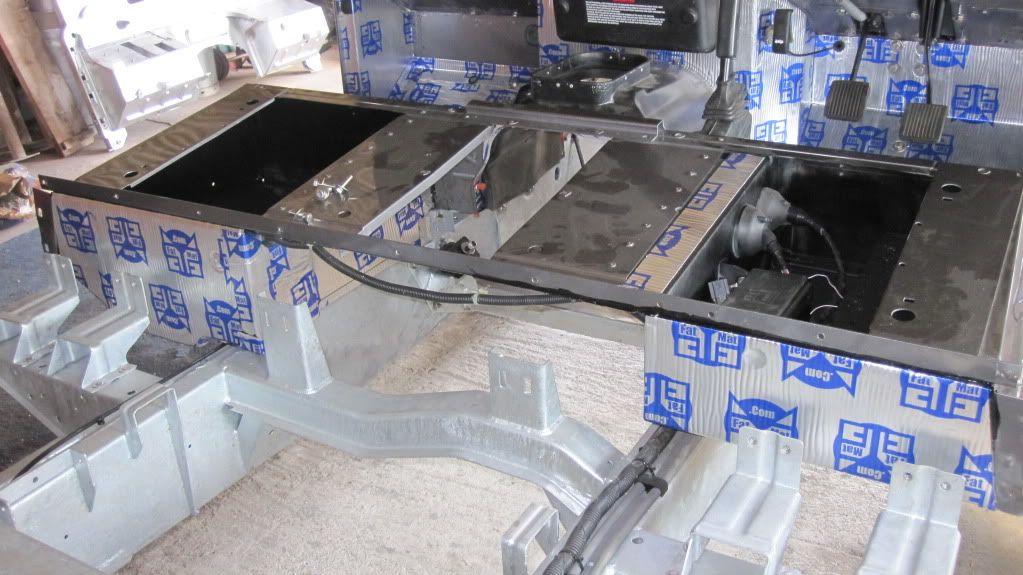
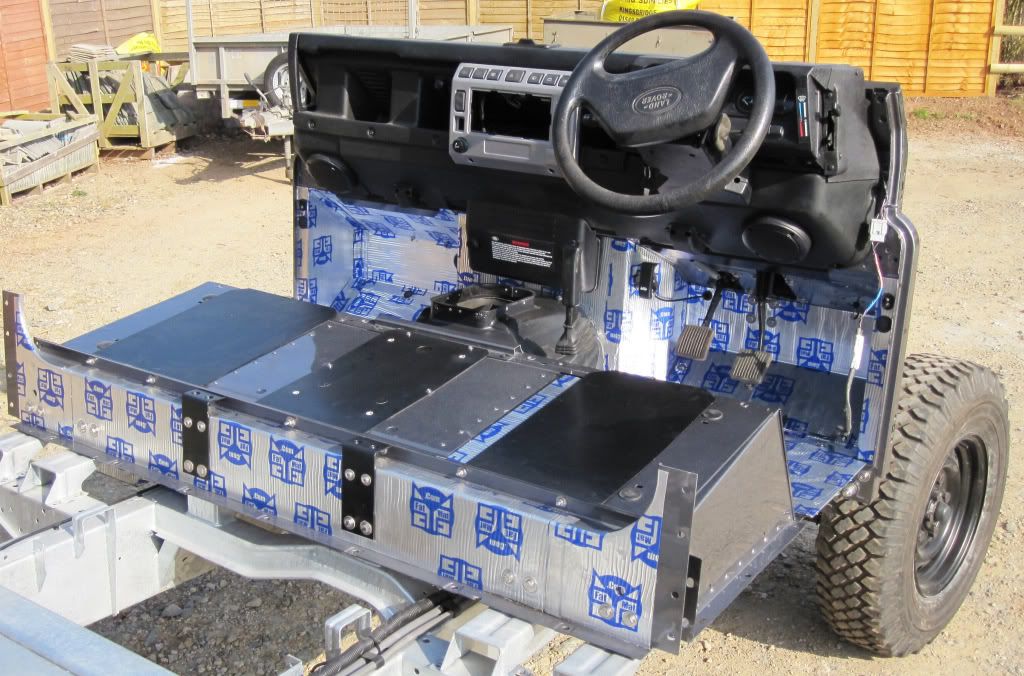
Well I have an obsession with FATMAT! Well that and I believe in doing things properly and doing them right first time. This Defender is going to take me to Cape Town one day so it’s got to be right in my mind. As to the seat base, well I bought a half decent Td5 one and stripped it back to bare aluminium, had it sealed and sprayed by the car body shop that is doing all the panels on the Defender. Once home I set about covering it in FATMAT which is a soundproofing sticky backed, heat reflective material that can be formed around curves with a hot air gun. Wasn’t too hard to do but will keep the noise out and stop much of the heat from the transmission.
Bare Ali Seatbox and floor pan:
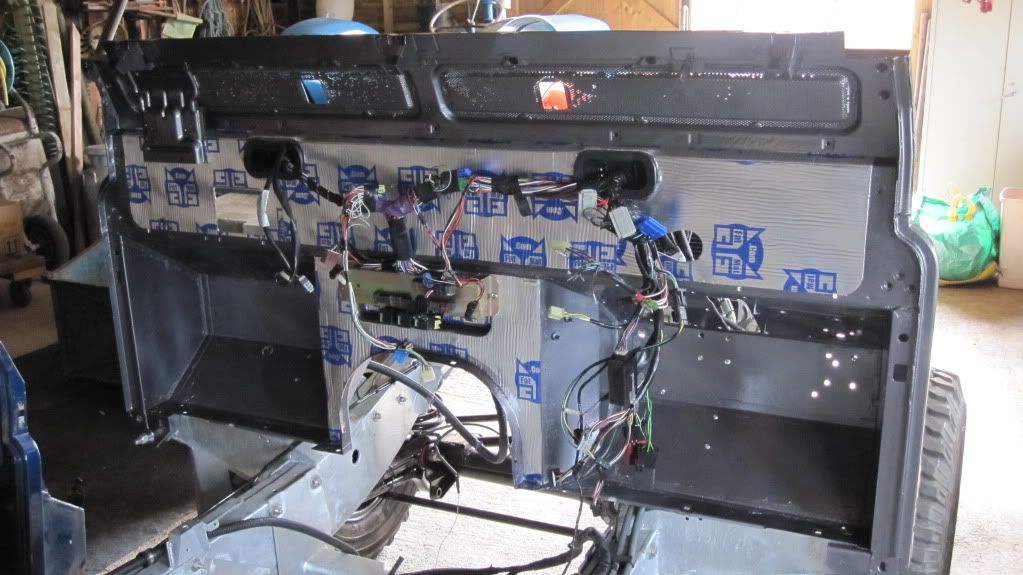
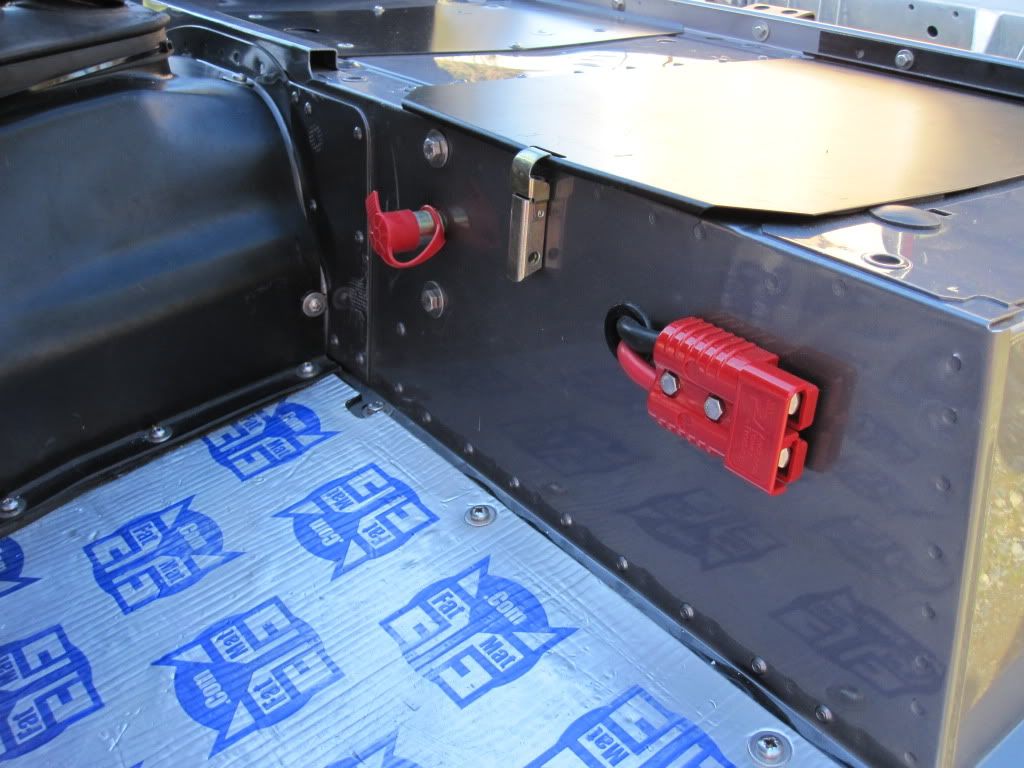
Painted, wiring done and FATMAT fitted:
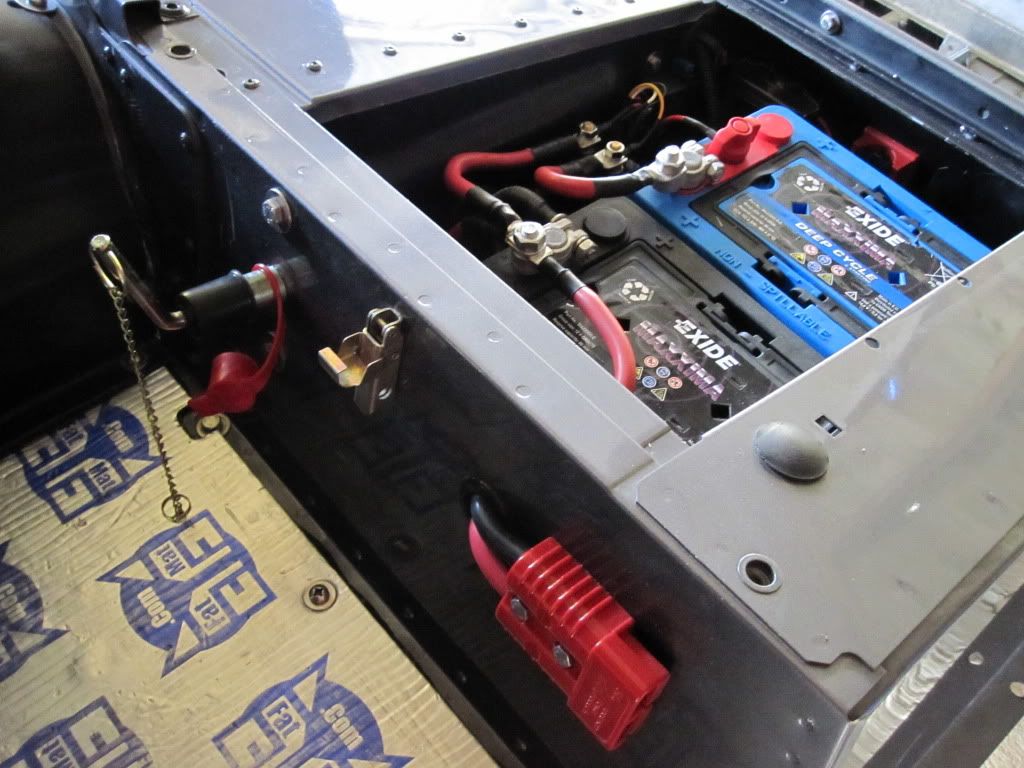
Speaking of wiring check this out (I am rather proud of) my wiring for my split charge which I made the loom for and wired in the additional fuse box which will run accessories.
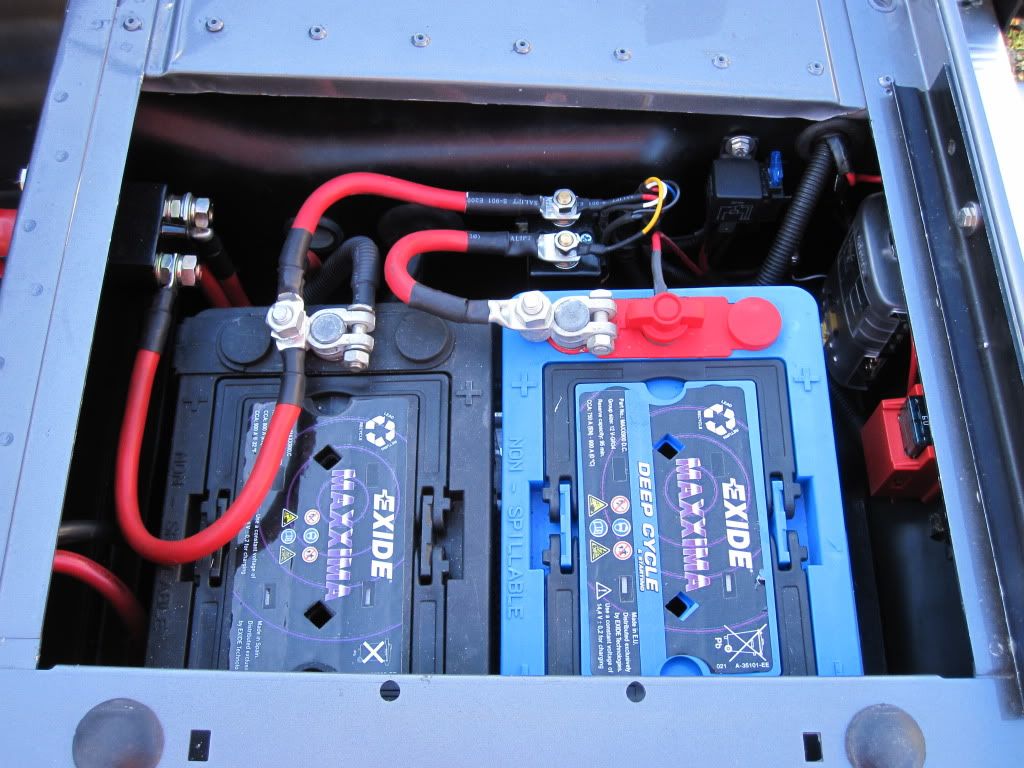
The Anderson plug (which will allow me to jump start the vehicle and other vehicles) is wired to the heavy duty isolator switch you can see on the left, this also has the winch feeds connected so I can completely isolate the winch...From the switch its then wired direct to the starter battery (both poles to make sure that the winch sees the current it needs and its earthed to the chassis).
Cheers for the comments!
Rob
-
It's amazing what you guys are able to do! I gave myself a pat on the back when I changed a prop shaft

How do you learn to do this kind of work?
Well I bought a Series 1 when I was 14...and the rest is history! My dad and I had already rebuilt 2 x Series 3's and well I fancied something a bit different, so I taught myself how to weld and now 10 years on I reckon I would be happy tackling most jobs, this Defender has tested me a bit at times though! But the fabrication side of things is mainly self taught, just jug everything up, take lots of measurements and weld in a sequence to give minimum distortion...one of the best things I have discovered is flap disks for angle grinders, they are brilliant for tidying up welding and flatting back the harsh grind marks left by normal cutting and grinding disks AND if you want it to last...GALVANISE it!
-
James, no worries, the C-post was the most difficult, but I made some templates out of cardboard, took lots of measurements of what was left of the original post and then found a local fabrication firm and got talking to the shop manager...had him fold up all the bits for both of the C-sections, the sills themselves and the sill finishers (where the door seal runs) for around £80! All in I think they probably cost me around £150 which is a fraction of what some of the breakers what for un-galvanised Land Rover parts stuff...just take your take time and lots of measurements!
-
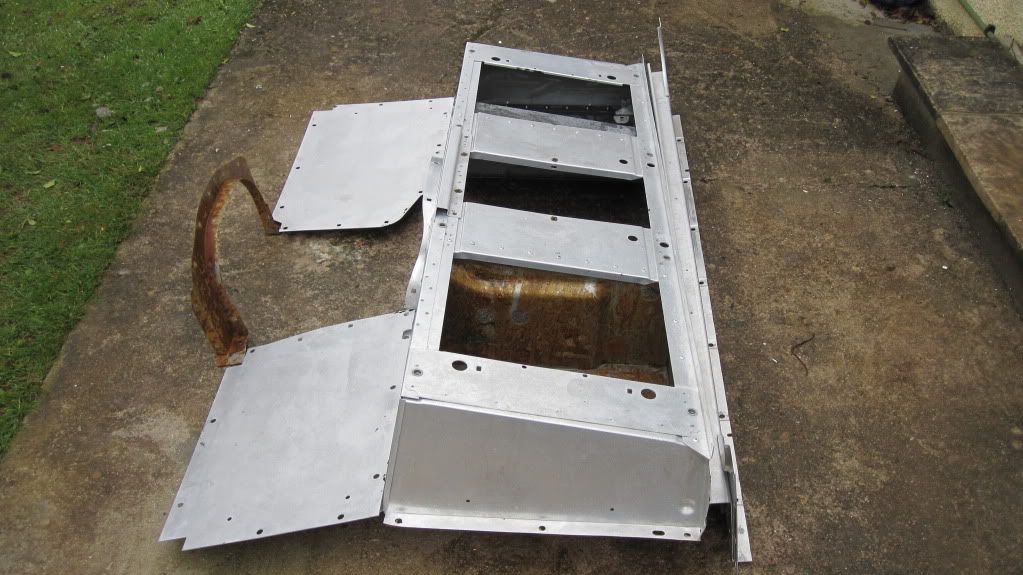
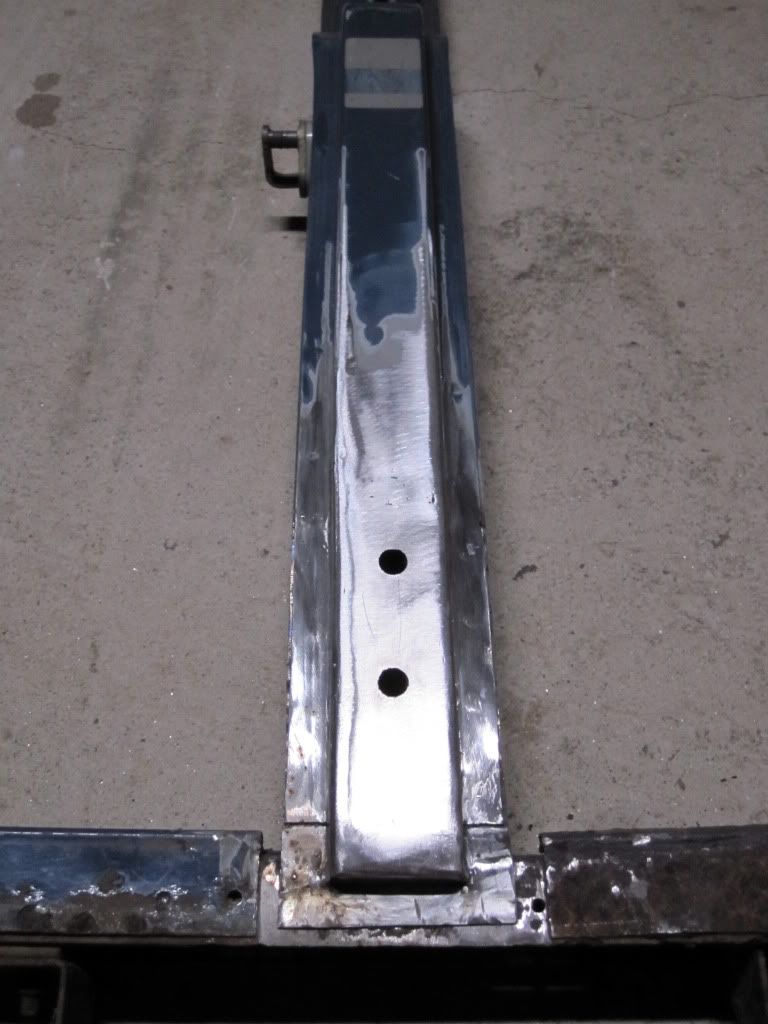
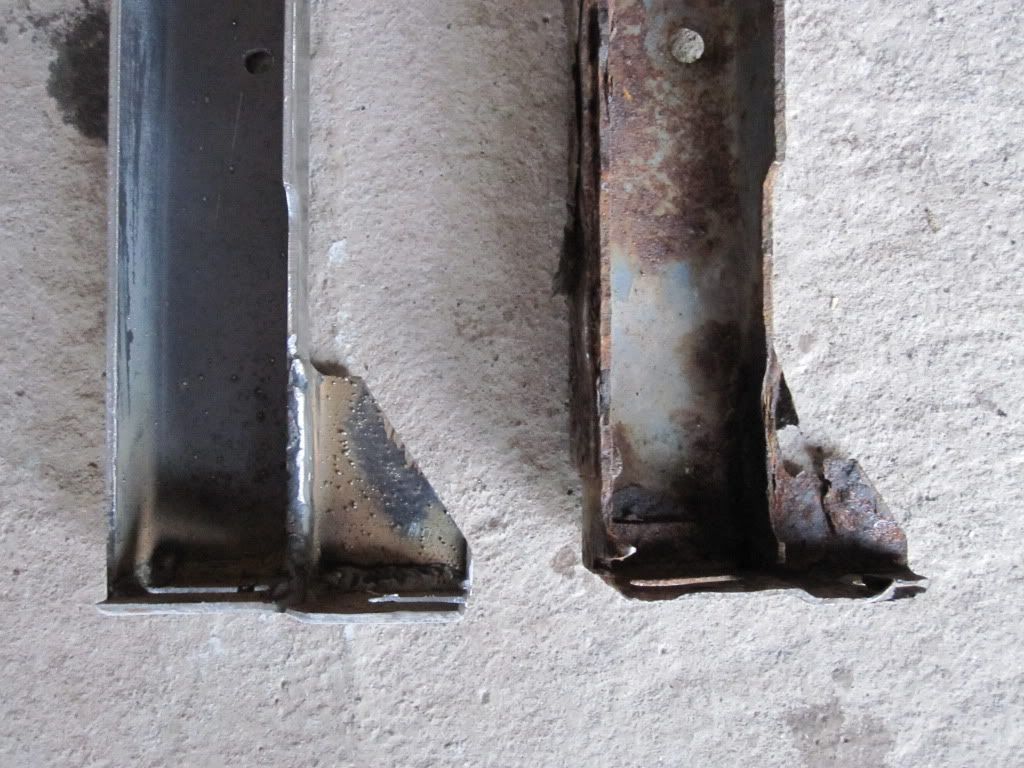
It was a lot of fabrication! But worth it as I now have a complete set of lovely strong galvanised B-Posts. Here is some pictures of the process...
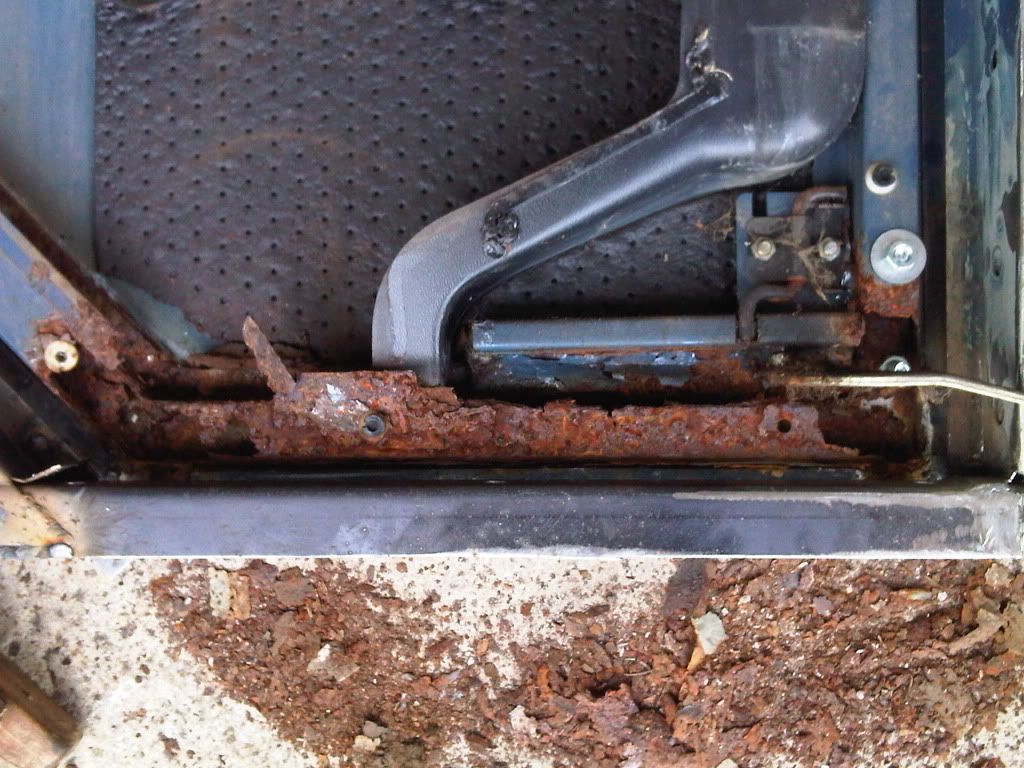
Take one knacked B-post:
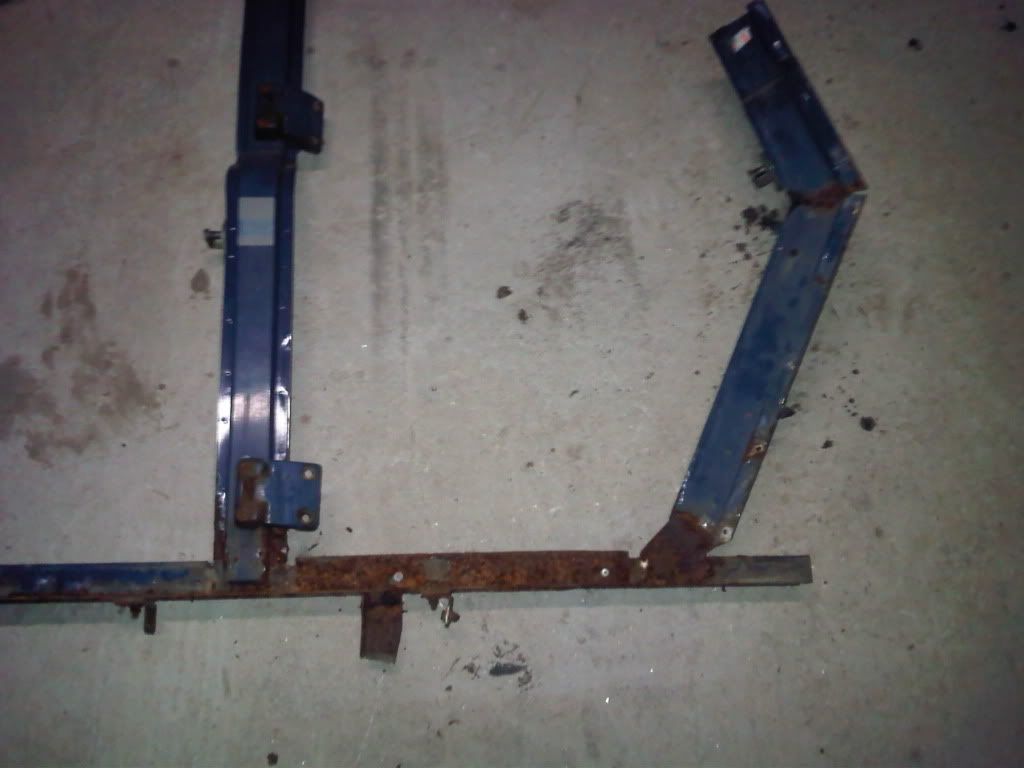
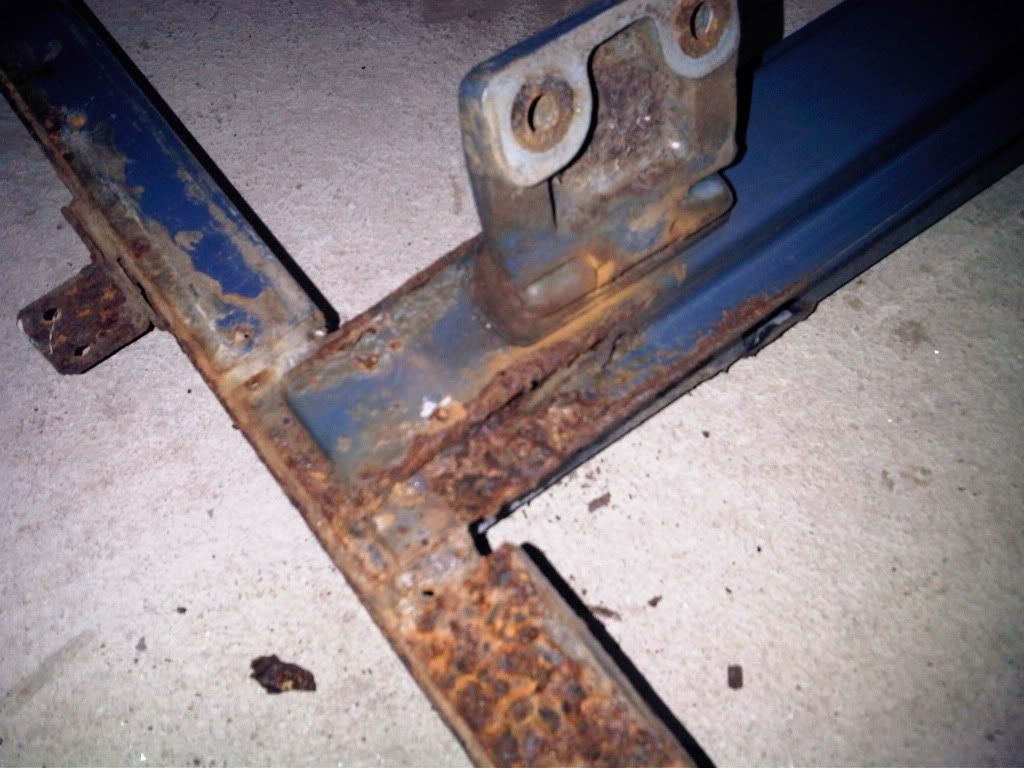
Begin repair of B-post:
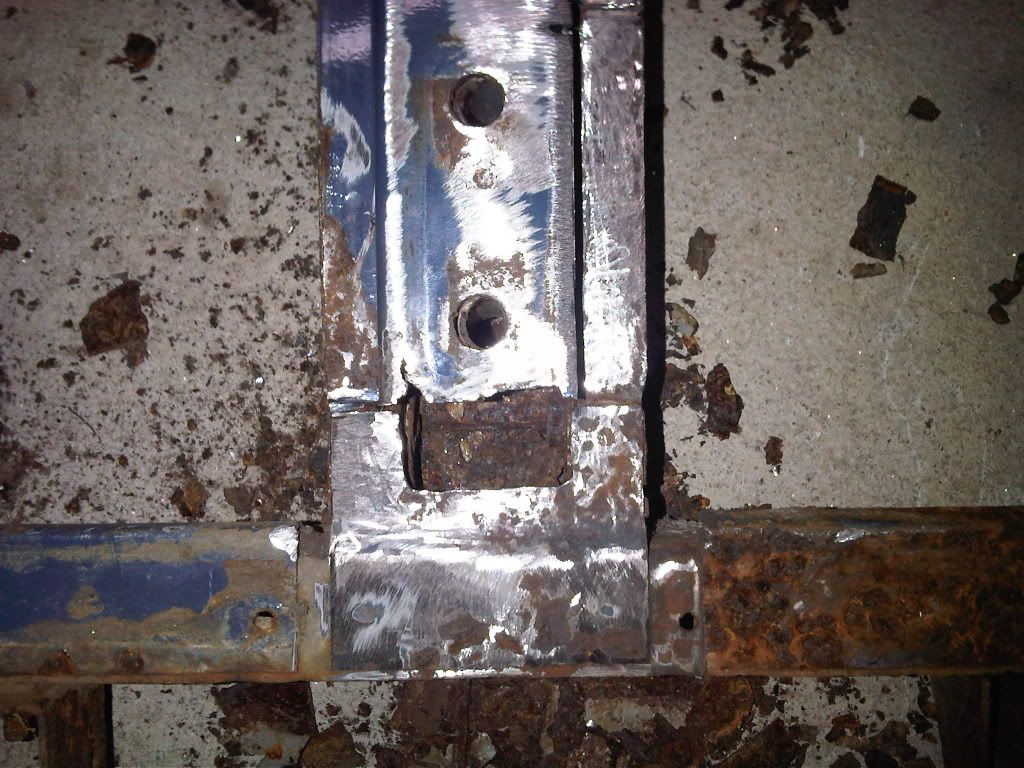
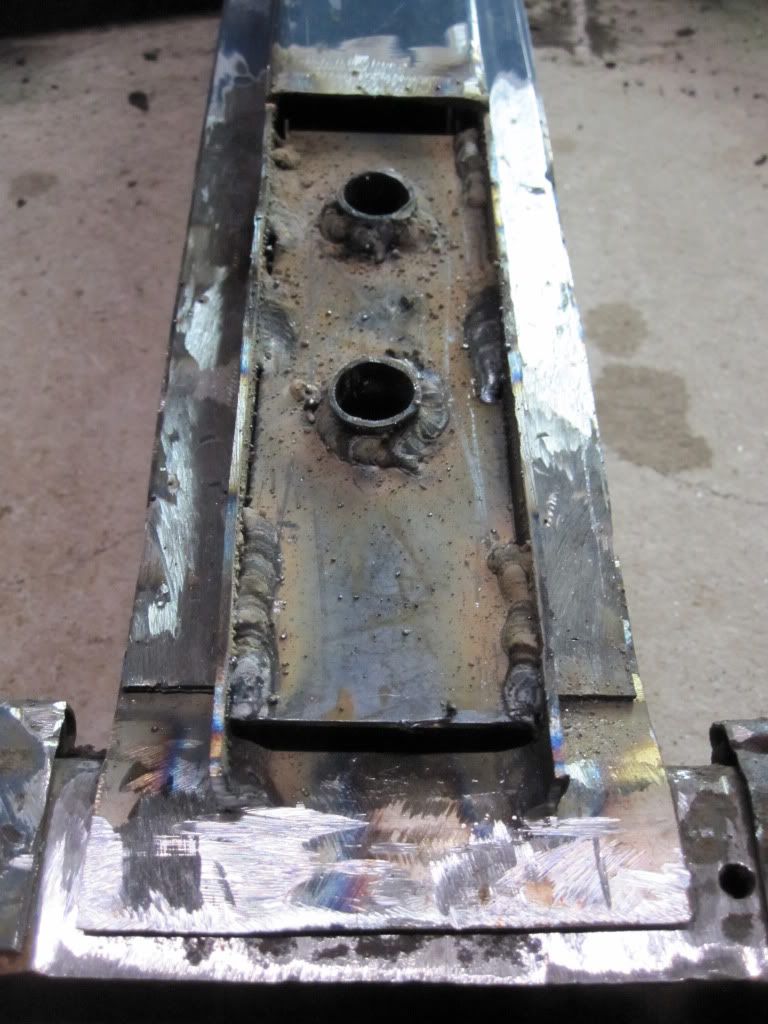
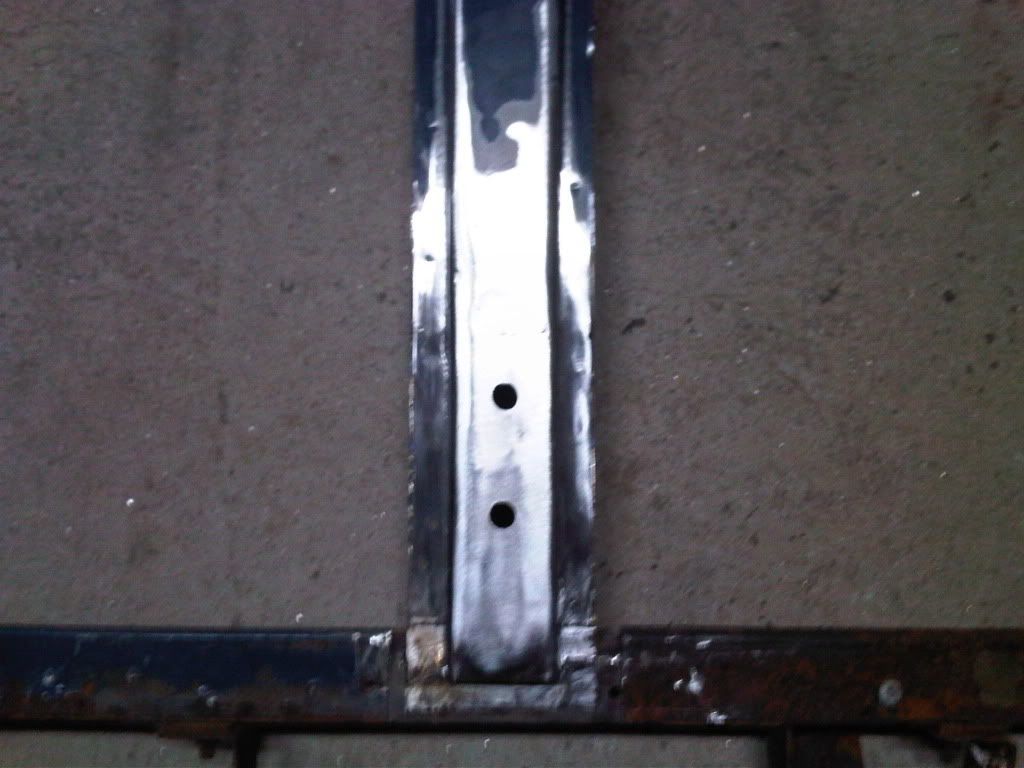
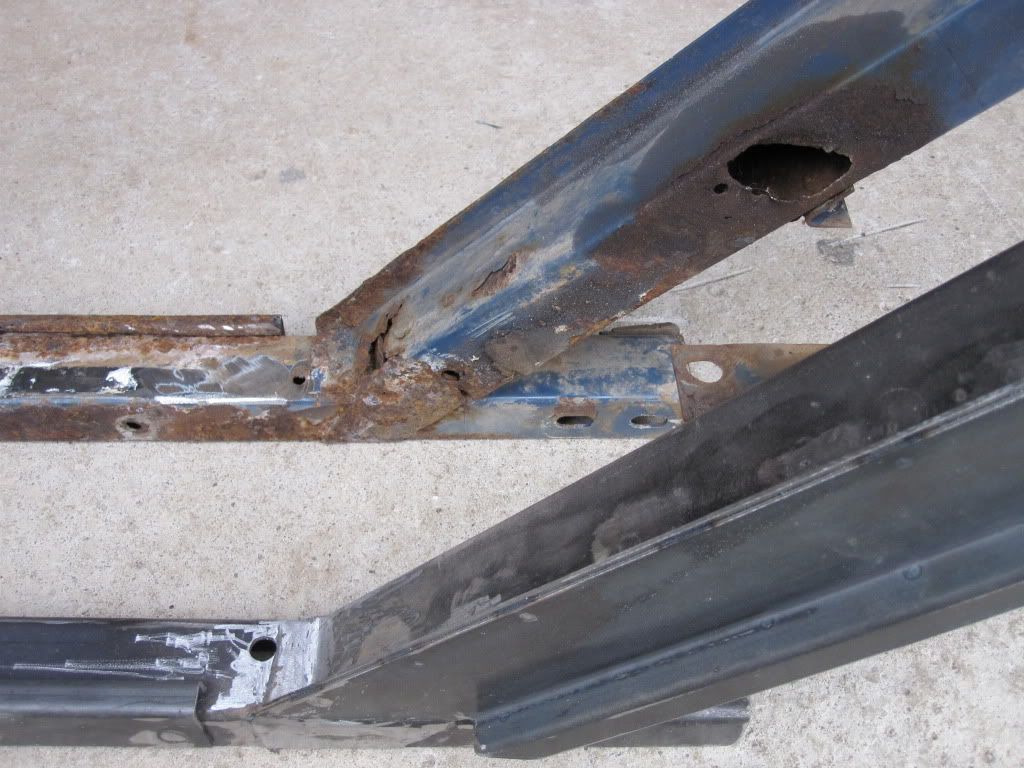
Cut off C-Post and mount on jig...
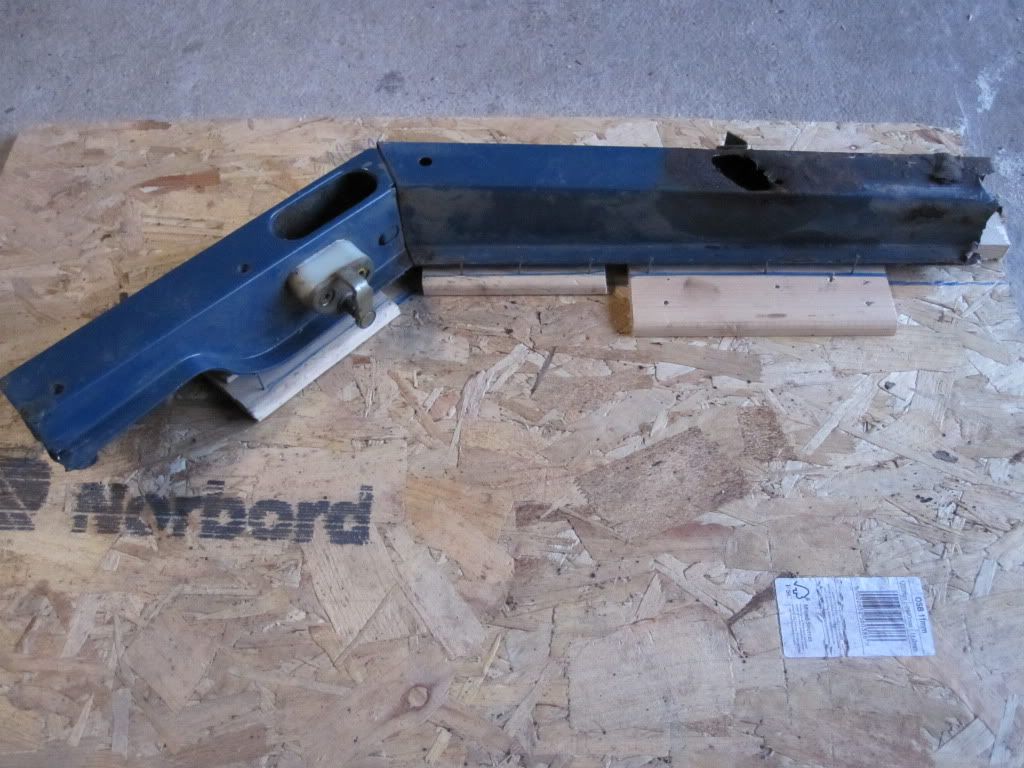
Start adding in new folded sheet
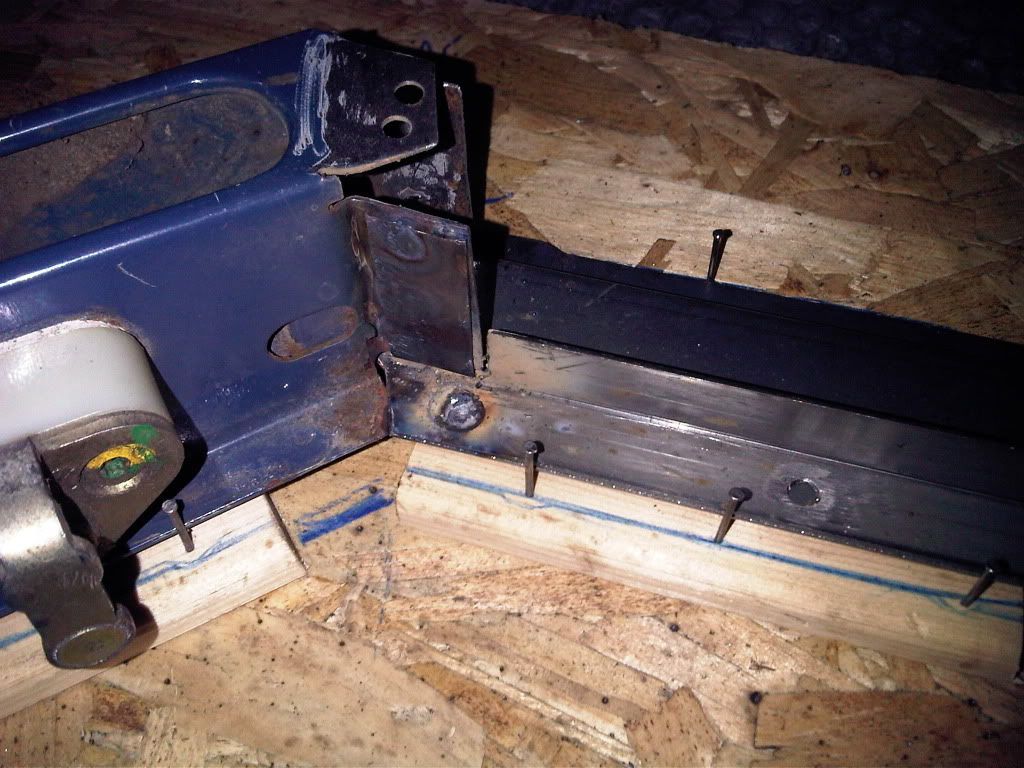
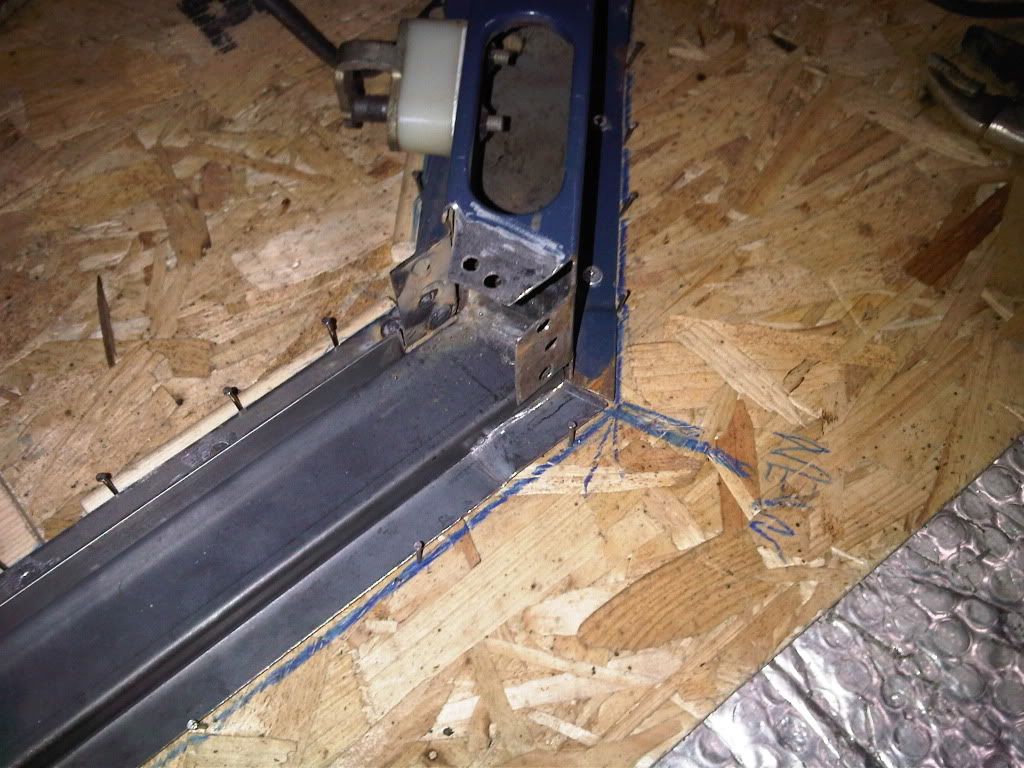
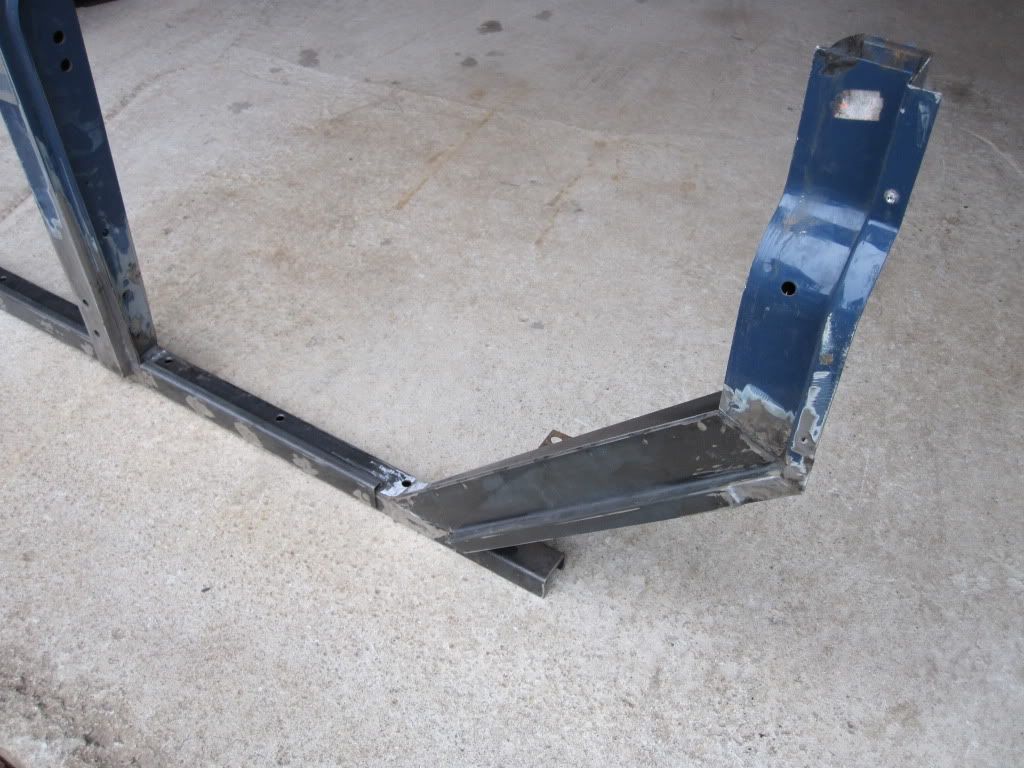
Cap with folded C-section
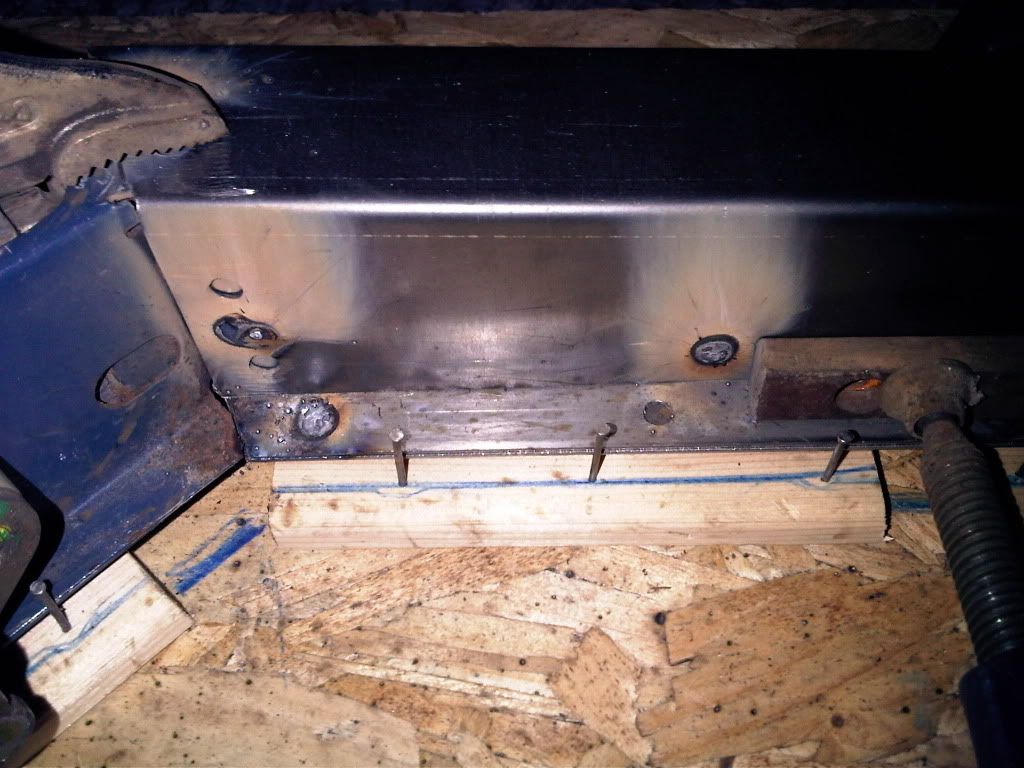
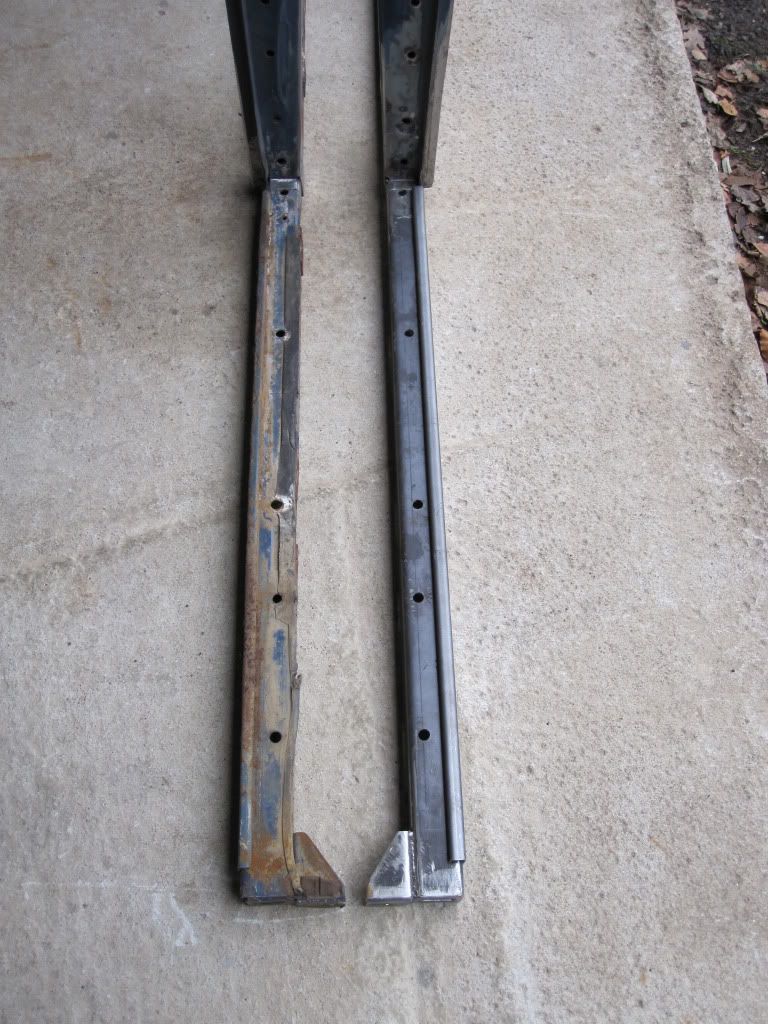
Mount B post on new sill (also made by me!)

Position door and line up C-post:
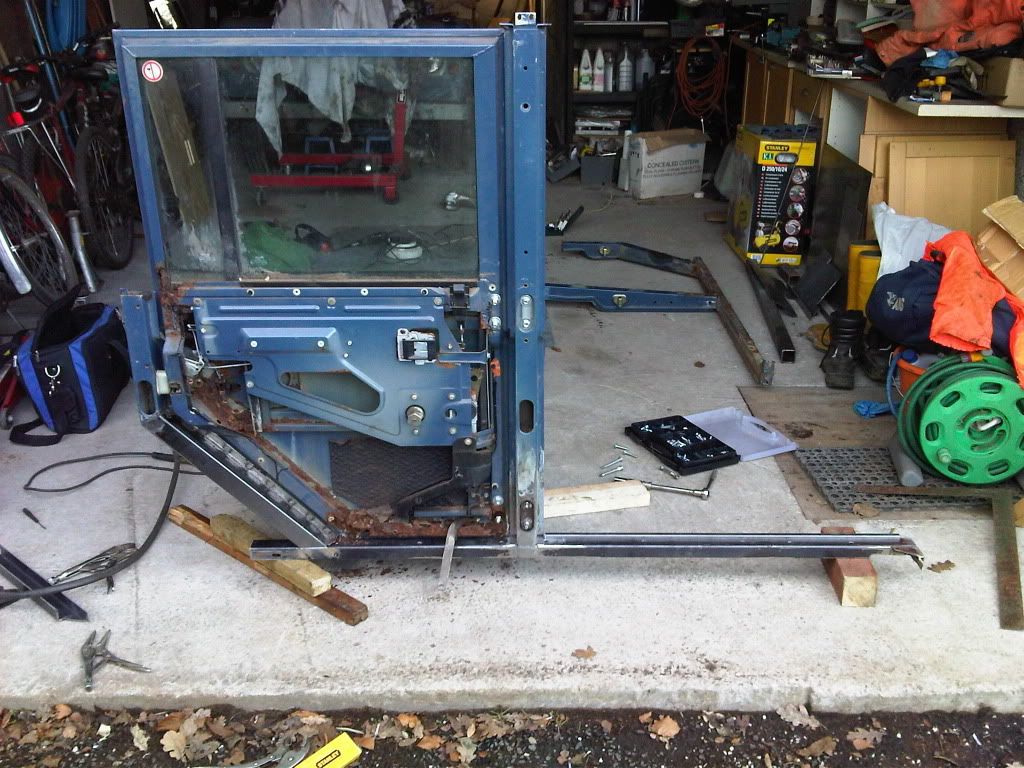
Then beed blast and galvanise....pictures to follow!
-
Rob,
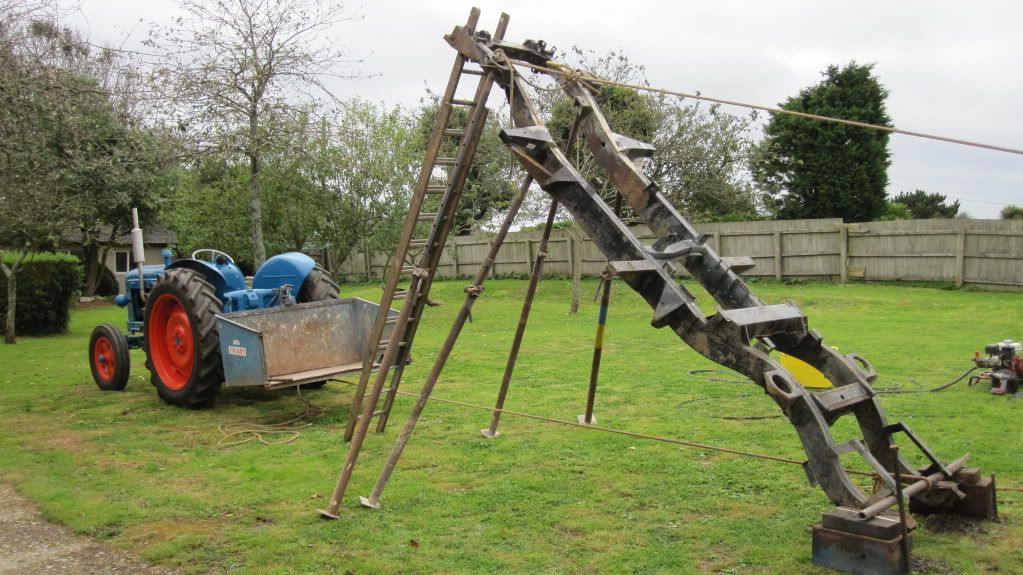
Thanks for that, food for thought definitely. It was your build which gave me the idea of having the old chassis galved, and I was going to use a similar process to yours (but cheat with a forklift to get the chassis basically vertical
) to remove some of the rust. I'm pretty much decided on a new chassis, but I've got to have a chat with the galvanisers re. the bulkhead about paint etc. removal so I can ask them then and see what their take on it is.How is your build coming along?
Well, I will be happy if I get 15 years out of mine.. hopefully by then I will have put away enough cash for new chassis, if its fine in 15 years then I wont bother! I would really like a new chassis, but at the time founds werent there and as I said I needed it for other bits.
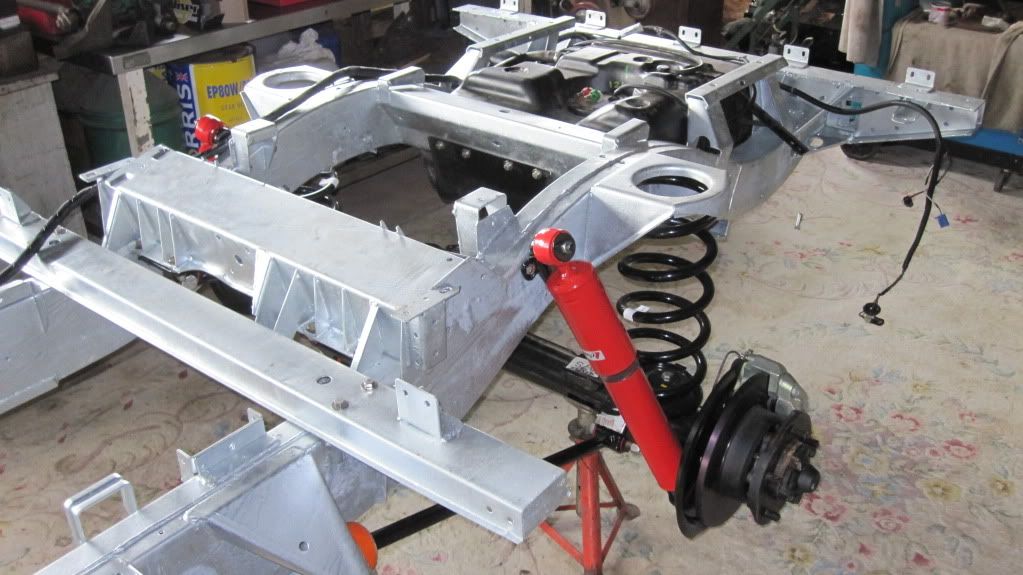
My build is coming along...ok have just got my B-Posts back from galvanising..I have to say they were a PAIN to repair, well build... I ended up making up complete new sills and C-post lower sections. The B-posts themselves I managed to repair and I am really please with the way they all turned out and I fiegure seeing at my sills are not folded from 3mm steel and everything is full welded and not spot welded then they should last! When I was last home I managed to fit my ARB high output compressor, plumb in my on-board air reciever tank, fit my gensis split charging system, up-grade all the earth wires (I installed one on either side of the engine, starter wiring, wire from the alternator to the solonde all to 35mm2 winch spec stuff (wasnt cheap but its very flexiable and will hold the current) See more pictures..... haha

-
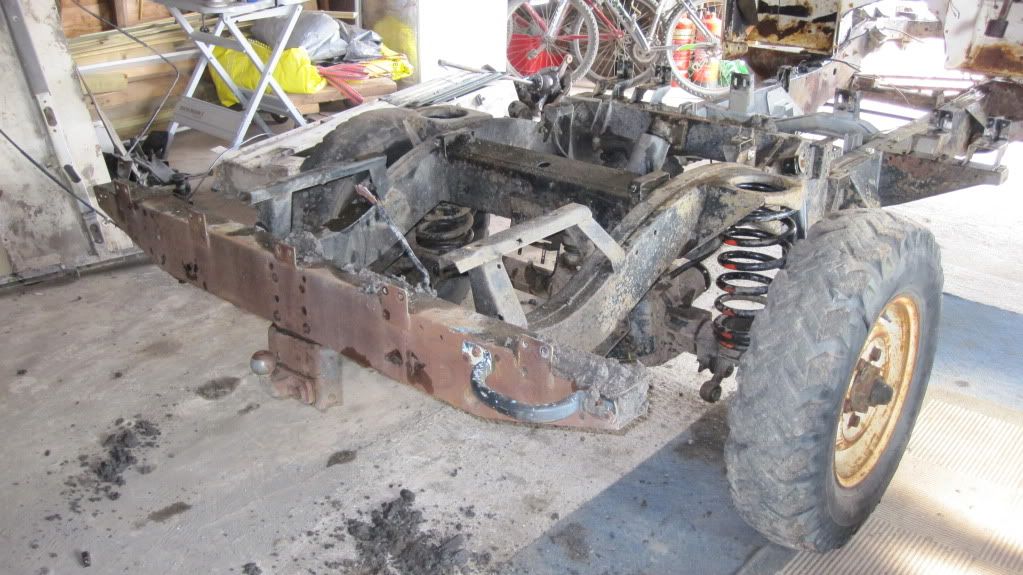
Retroanaconda.... well I hate to put a fly in the ointment but I had my "old" 110 chassis galvanised and frankly I am VERY pleased with the result, this is what I did:
First I cut the rear cross-member off the chassis, I also renewed two of the bulkhead outriggers, this was a matter of cause... I then up ended the chassis, hired a high power petrol driven pressure washer and stuck that in the top of each chassis rail until the water ran clean and clear. I then got a large hammer (yay) and bashed the rails up and down their length to remove any loose rust. Then welded on my new rear cross member and set the whole lot of to be shotblasted, once back I again put it on its end and bashed it a bit more to remove anything else that had become dislodged and the bis of shot etc. After that it was off to the galvanisers, where they stick it in hydrochloric acid for 2 hours (which is enough time to eat into the steel to clean it up, then dip it in water, then dip it in a flux, THEN it goes in the zinc tank which is around 450 degrees centigrade.
I had cut/enlarged the holes at the end of the dumb iron and I reckon this allowed me to really make sure the inside was a clean as I could get it, plus it allows the galvanising process to really do its work. I have since inspected the internal rails of my chassis through some of the peep holes Land Rover kindly made for me and it’s thoroughly coated inside and the outside looks brilliant.
I am therefore of the opinion that if your chassis can be repaired to a high standard, you can get all the rust out of the inside and make it clean then you shouldn’t have a problem getting at least 15-20 years out of it. The whole process including shotblasting the chassis and a bulkhead (which I also had done) cost me £430. Now when you consider that a new chassis is £2000, it then freed up a lot of cash to spend on the suspension, new axles, bushes etc etc and if like me you needed to get on the build then why not?
Please take a look at some of my pictures.............
Anyway thats just my two cents...
Towing Electics Question
in Defender Forum (1983 - 2016)
Posted
I agree there is an argument for that James. I apologise for recommending such a product! I know there was a time when I was raving about it....
As I plan to really travel with this Defender I didn't want to risk it I guess. Its also worth noting that the FatMat isn't much good in cold temperatures either. In fact like I said it just seems to get stated on Forums for all sorts of reasons.
Will definitely let you know how it all goes together with the new stuff. Like I said SecondSkin seem to get consistently very good reports, their customer service was brilliant (considering they where dealing with someone on the other side of the world) and the delivery/dispatch time was quicker than some stuff I have brought in the UK!
Oh how I miss working on the Landy though!