


jessejazza
-
Posts
72 -
Joined
-
Last visited
Content Type
Profiles
Forums
Events
Gallery
Blogs
Everything posted by jessejazza
-
Many thanks. I've found the motor but not the heater matrix and how it was secured. But now I've done what I've done so I'll have to leave it.
-
Thanks. I didn't get a pic of what the S3 heater was like so I really only had this option. Domestic 15mm pipe is well worth using - I used some on my Reliant Scimitar where the heater return hose had to go underneath the exhaust manifolds to the back of the water pump. Originally there was a clip for rubber hose but it didn't support the hose adequately - length of copper pipe overcame the problem. Cheap but good solution and easy to make up. It's not really a burnt arm... just like having one's elbow on a domestic rad. Short distance ok but a 2 hour trip a bit much.
-
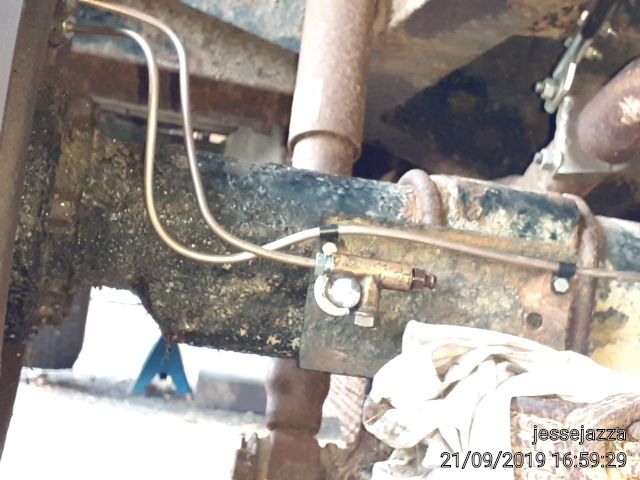
She is now in place - looks high in the pic but fine when one sits in. Must say it's one hell of a heater... which is why I installed it. It provides a lovely arm rest but a bit hot. I didn't bother with a valve (they stick shut in my experience and a little heat from water going round provides enough heat to clear misty windows); just out of the block , into heater and then on to the front nozzle (near water pump). I have used domestic piping which I will paint one day - works quite well for connecting as the straight connector provides a perfect fit for 5/8-16mm hose and provides the right angles that one needs to make a reasonable installation. Managed to avoid cutting any of the original panels although had to remove the two next to the seat rails. I will use a panel flange crimp tool on some new steel strips to make a fitting underneath and round the side of the heater nozzles. Look neater than at present once finished but need to use her as everyday transport. The motor will have to wait until I have sorted out wiring - BUT I am thinking maybe it's not required as it gives out enough heat to the cab just as it is which is what I hoped (just like a large radiator). This summer I am hoping to remove the modified rear tub with wide doors, replace for an original and put on the unused truck cab I have. I got two unused heaters for £50 about 6 yr ago - so I am now tempted to put the other one in my S2 LWB. Was it worth it? Yes just in case anyone is thinking along the same lines.


-
I know what you mean but as I have mentioned it depends if you have the right rad cap with the double seal, and appropriate slot. It's the same system on many 60s motors but often doesn't work. The rad cap I took off this 4 core rad didn't have the slot so never worked. The expansion bottle I have put on is a single nozzle (ex Reliant, Leyland Allegro/marina and others), and has a flat radcap on rad and then 10 psi on expansion bottle so no fighting between them.

-
Many thanks for your contributions - all sorted now.
-
I forgot to mention that the other vital thing to look for is the slot in the stem (pic added). Without this coolant won't be sucked up the stem. Thought I'd mention this just in case anyone has stayed with the original system and found it not sucking back. So in fact all these rad caps are u/s for the original system.


-
I don't disagree but it didn't work well on Scimitars and was not that good on my Herald. Gunge tends to get in around the rad cap pin. Pic *625 (1st pic) is what I have at present. Pic *131 (3rd pic) shows 3 rad caps (just happened to have them handy) but as you know only the one on the RIGHT will work for that set up - some come with both seals, some no pin (left) but both seals. Ideally one has a "header tank" (2nd pic) rather than an expansion bottle (as I have at present) and conveniently one gets no airlocks - left tank is Scimitar and the right is an early unused Defender one (got an ebay bargain for once £25 still available new at almost £200 ESR2734) but the header tank has to be higher than the rad. I hope to fit the Defender one and presumably it has to go above the rocker cover somehow. The expansion bottle can be placed lower than the rad and still works fine. I will probably turn the Scimitar one into an expansion tank and save the Defender one for my kitcar.
-
Curious - mpg from a 2.25 or 2.5 petrol with Mega bits
jessejazza replied to Snagger's topic in Series Forum
I would research the use of synthetic oils carefully. The previous owner of my Herald ran it on synthetic and ended up getting a new engine. I've not looked into it I just stay with 15W/20W for all classics. -
It seems the main Land Rover parts folk are selling Britpart, Bearmach or Allmakes which after doing a google seems to lead to heating problems on series, Defender, Discovery and Freelander. The Land Rover parts world seems to be inundated with buy cheap - just not worth it. I've just gone to a local motor factor in the past and bought Quinton Hazell or whatever and never had a problem... but I'll look out for Gates now. I wondered if it was the same thing with a 3 row rad but now with a working thermostat I have had her fine - temp at halfway.
-
I have an unused 24V heater motor which I want to fit onto my artic heater. The black box calls itself a filter unit. I am not sure about the wiring and what I need to change to use on a 12V SWB. In theory once connected the motor will run at 1/2 speed which is fine... remembering my time driving an artic fitted lightweight in 29 CDO - full speed one is cooked! Be grateful for the help - hoping this fitment will be worthwhile. I've had two arctic heaters for years and found the S3 one was completely shot.

-
Call me a sausage! Got round to investigating today. It was the thermostat. I fitted a new 82 deg and did the saucepan test when I put her on the road so I didn't suspect the thermostat. I must say I have read about folk who have had problems but I never have... for 30 years (on any motor). I have had airlocks. One thing I believe in is drilling a 3mm hole in the thermostat flange. Over the years I have noticed how the different manufacturers have varied the product; had the jiggle pin, very small hole, or no hole. This new thermostat had a very small hole which I doubt would have let much air past. The hole is also the bypass on a LR... without it and in summer when the heater is shut an air lock will build up on starting. I put it in the boiling saucepan and it didn't move an all - yet when pressed with a screwdriver seemed to open but only part way. As I am fairly desperate to be on the road tomorrow I robbed the thermostat from my LWB - it's a 74 deg but I've not found much difference I just fit the higher temp as that shortens warm up time. The temp went to 1/2 way and stayed there so the sender (and voltage stabiliser) seems ok. I just wondered about the 3 core/4 core rad choice - presumably someone with a PTO giving it hard work and LR being stationary would need the extra cooling option. I don't know how many folk stick with the original expansion bottle - I've not found the suction back works that well so I have a single nozzle entry tank (flat cap on rad) which fills with the water temp increase but sucks back to the engine on cooling... rad always kept full. I did try a header tank but the LR rad is high up so the intended concept is not so good. It would seem the quality of thermostats varies - I'd rather spend £15-£20 and have a quality item that lasts the life of the motor. LR ones for £5 is not good.
-
Many thanks for the reply. I wondered if the 3 core was ok and 4 core for HD use. The 3 core is NEW.... but shouldn't be running at 3/4 high. At present I am attempting to clean up the 4 core and I'll fit that. Can't think of any reason why the temp should be so high... perhaps the 3 core rad is from Britpart! I have an expansion bottle for extra water rather than the original "catch bowl" (never found the suck back through the rad cap idea worked that well). Thinking of using bars leaks just to get me through until spring. May attempt the head gasket over Xmas we'll see.
-
Just been out for a spin to find that the head gasket appears to be weeping. Since I have had her on the road the temp gauge has settled at about 3/4 up short of red by 2-3 mm and I have thought that it is just the sender. It was only a short spin just to get her fully warmed up and didn't boil up but I could hear gurgling when I opened the bonnet on my return. I fitted the new rad that I had which I now discover is a 3 core in line channels. The other landy I have has 4 core staggered channels. Looking at two known suppliers websites it seems one can have either 3 or 4 core for a 2.25 petrol but I would guess that the 4 core is for petrol and 3 core for diesel (petrol runs hotter I think ?). Another problem could be the thermostat but I fitted a new one along with new hoses and tested it and all seemed fine. Be grateful if someone could just clarify: a] It would seem a 4 core rad is what should be fitted and the temp gauge should be sitting at halfway. b] I have read that one can fit a copper or composite head gasket. It would seem that the composite one STC1567G (Payan) would be best choice. A copper one at £3 Britpart to me wouldn't seem worth fitting but there may be quality copper ones available.
-
Thanks for your replies. As finance is a problem I have decided to fit the military heater. From what I can deduce now there are panels either side of the central one about 4 ins wide which can be removed but only visible from underneath. The S3 had a double sided seat rail which lightweights presumably did not (presumably the arctic heater was standard for the Commando forces... I don't think the army had them [I was a former solder in 29 Commando Regt yonks ago]). So once a mod is carried out on the side rail the heater will fit - along with the tool box removal as that is where I'll route the pipes. The heater has a super quality core on it - having got one it would be a shame not to fit it. Even if it is a bit bulky and excludes a seat space. I couldn't see at first how the heater nozzles were supposed to fit without serious modification which I didn't want to do. A 1.5 ins slot on one side of the seat rail is fine. I'll put up pics when done - trouble is it's damn cold outside!
-
My heater was completely knackered when I got my landrover and then had a move so I lost/mislaid items and the heater has not surfaced. An artic heater (Williams model) came my way but it seems that the nozzles are too wide to make a mod to fit it between the seats. Done a search and can't see any heaters fitted to an S3. I would be grateful for the following a) a pic of the original S3 heater assembly in the engine bay and cab (parts manual does not show how it's installed) b) alternative heaters that folk have fitted c) if someone has fitted the military one on an S3 I would be grateful for a pic of the installation. thanks
-
Many thanks - couldn't think what you meant at first until I went to have a look at a tubeless rim for my kit car (forgotten I had hidden it up on a shelf in the shed). One can see the bead groove is there from both the outside and inside of the rim. Took a pic but can't insert the image it asks for a URL. Couldn't see any stamping 'tubeless' on the rim. As far as putting a tyre on presumably for tubeless one needs to have an airline to get enough air in there to force the tyre over the bead groove? So as I am intending to fit myself I presume I have to stay with the tubed rim and get the tubes. I remember someone saying that if fitting tubes one should buy tyres (for inner tubes) that have smooth internal walls - I have never seen such things. Were the 7.50 x 16 tyres smooth on the inside?
-
Many thanks for confirming my thoughts but I wasn't sure. In your pic (right) it would seem one can still get tubeless rims (looks recent). Appreciate your prompt reply as I have got to get some off ebay. Only using 235/85x16 as that's what was on there - presumably as no overdrive gives a little more leg. Currently got a set of 205/75x16 fitted and engine revs a bit high at about 40-45mph.
-
I would be grateful if someone can provide some guidance. Just been out to check on my S2 LWB to find that it would seem that inner tubes are on each rim with 7.50x16 tyres. Presumably the 7.50x16 has a smooth inside wall suitable for inner tubes? For the S3 SWB it would seem the PO was running 235/85x16 without tubes. If I recall correctly for tubeless rims one should have a shoulder each side of the rim to secure the bead which this rim does not have. Are folk fitting tubes OR is it a question of getting away with it? Maybe this is why folk fit Compomotive rims which being more modern have the shoulder.

-
My first attempt - must be an easier way. The last part i found was the hardest *****629 (last but one pic) I had to stand on the rim and use the 2nd crowbar to rotate the rim out of the tyre. Note the blue scissor jack has a nut welded on - makes a scissor jack a useful bit of kit (once one has cut off the silly loop and added a nut). The crowbars were Gorilla 36". I thought I would give it a shot when ATS quoted me £18 per tyre - I found trouble getting 235/85 x 16 and got some on ebay for £75 each (then found the added bonus of being commercial tyres). My kit car is on axle stands (rear on wheels) and I wondered if it was worth a try. Be grateful for any tips inflating as one has got to seal the tyre against the rim first.


-
It is in the right place but had to use the adjuster kit RTC3176 on the rears. the original adjuster was much more robust.
-
I have one that I hope to remove shortly if you haven't sourced one already. But I am in the Fens but not a problem to do by pallet freight.
-
Many thanks for your replies - sorry not to respond earlier but had to go away and then sort out other things. As well as doing a bit of research. Now I seem to have sorted the pedal sink but have too much travel. It seems that I hadn't bled the system properly. In the sense that whilst I checked MC and put female connectors on the end of the rubber flexi with bleed nipples and got a rock hard pedal. [Bit 'belt and braces' but worth doing I feel]. It seems that the thread in the slave cylinders is a little iffy - as I was bleeding air was seeping back in or wasn't pushed out of the system from the flexi to slave cylinder. I found a male union was a better fit and so piped that to a 3-way with a blank and bleed nipple (as attached pic... perhaps only temp measure for now). I did buy a couple of brake hose clamps (good suggestion thanks - not having problems with brakes on any motor before it is one bit if kit I haven't had). I then bled the rear with clamps on the front - and similarly bled front with clamp on back. Hard pedal! - thus intending to cut down the travel of the piston slave cylinders. Released the clamps - still a hard pedal BUT travel is to about 1 cm from bottom. It would seem that suggestion of MC being incorrect is possible. The MC I fitted was one from a LR supplier dia 0.75" bore #90569126G TRW/Girling (SWB mine being a S3 88 1971 fitted with 10" drums all round) and #90569128 (for a LWB and after a bit of research it appears to be a 1.125" bore). [Most suppliers don't say what the bore is]. According to the parts manual these were for the single circuit system without servo. With the servo it seems there was only the NRC6096 BUT looking at the diagram it would seem it was a fatter cylinder and presumably 1" bore. If the CB was fitted to the SWB it was a 0.75" bore and the LWB one was 1" bore. This is where I am 'at a loss' - there is more movement in the slave cylinders with 10" drum setup than the 11" drum setup. LR had no reason to fit a MC with 1" bore to the LWB - being physically larger does not affect the brakes... the weight does and that is why it had 11". Land Rover spent ££££££ in research? So I have tried to apply some logic and physics to the situation. Along with my kind neighbour, pair of G-clamps and a vernier. Let's consider MCs (I have used aluminium alloy in the past - just prefer them as when new they are a sealed bag. Steel tend not to be and may have sat around in a parts store for a while). Stroke length of alloy ones I believe are 1.4" (3.556cm) whether they are integral reservoir or remote. I've bought the extension housing for integral ones and then found it can be cheaper to stay with the remote ones - prices of reservoirs seem to wildly vary. [maximum swept volume for MC I'll call msv and slave cylinder swept volume I'll call sv, csa is cross sectional area]. Using cm, cm2 and cm3 as it is easier to visualise. MCs 0.75 (3/4") =1.905 csa=2.850 msv=10.13 0.875 (7/8")=2.2225 csa=3.8795 msv=13.795 1" =2.54 csa=5.0671 msv=18.019 Note: certainly a big difference between 0.75" and 1" I wasn't expecting that. Slave cylinders 10" drums front 1 1/4"=3.175 csa 7.9173 With G-clamps applied I reckoned the front piston moved 1mm and the rear moved 2mm (new shoes fitted). Per slave cylinder that's 3mm (0.3cm) sv=7.9173x0.3=2.3752 two drums total is 4.7504 rear 1"=2.54 csa=5.0671 sv=5.0671x0.3=1.5201 two drums total is 3.0403 Total sv 4.7504+3.0403=7.7907 msv was 10.13 so a mere 25% (approx) spare. Hence why I have a hard pedal about 1cm of the floor (if that). S2 setup 11" TLS front with conical adjuster on rear. front slave cylinders are 1.125"=2.8575 say 1mm travel each if adjusted properly. Estimate but not wildly out I trust. csa=6.413 sv=6.413x0.1=0.6413 front 4 cylinders total sv=2.5652 rear slave cylinders (assume 1" dia) say 2 pistons per cylinder each move 1mm csa=5.0671 sv=1.0134 rear total sv=2x1.0134=2.0268 Total sv=2.5652+2.0268=4.592 If 0.75" MC was fitted it would seem that there would be hard pedal almost 1/2 way down approx. S2 conversion setup 11" drum TLS front with 10" SLS rear (Post 1980 fitment on SWB I believe). front sv (4xslave cylinders)=2.5652 rear sv (2xslave cylinders)=3.0403 Total sv = 2.5652+3.0403=5.6055 If 0.75 MC was fitted hard pedal would be a bit more than 1/2 way down. Whilst mere estimates I must be in the right 'ball park'. Let's look again at the 10" drum all round and allow for an extra 0.5mm movement. front sv=7.9173x0.35=2.7711 both sides=5.5421 rear sv=5.0671x0.35=1.7735 both sides=3.5469 Total sv=5.5421+3.5469=9.089 Note: 9.089-7.7907=1.2983 So roughly an extra 0.5mm of movement in each piston reduces MC capacity by 13%. I don't understand how the 0.75" MC can be adequate for the 10" drum. I noticed the #90569128G bore 1.125" was fitted later to the LWB (presumably after the CB was dropped - I gather they are the ones that give trouble with bleeding). I bought an alloy 1" which I fitted yesterday and then loads of rain! This morning 0900ish bled the brakes and WONDERFUL hard pedal about 0.5" down which is what it should be at least on any motor. Even better no doubt with the #90569128G but that I think is a steel one and I prefer aluminium. Thanks for your advice - as I don't know some of Landrover history I would be interested to hear if others have the 1" MC or what arrangements they have. I had no trouble bleeding, I did about 3 pedal pumps to clear the air (I listen for the spurts), and then adjusted the bleed nipple so it will just pass fluid thus giving some resistance when the pedal is pushed - always worked perfectly for the past 30 years. Only other problem I have had was yonks ago when at a union connection the pipe has been slightly bent and then the flare seal does not seat properly.
-
Can't see how you could possibly have found it on google when all the photo had was a date. Even though photos are public on a forum it is still out of order to steal. This occasion you've been caught
- didn't you think someone with a photobucket account would be posting on LR forums. I do normally watermark - this was a friend's landrover that was posted for someone's...


