


tommi
-
Posts
129 -
Joined
-
Last visited
Content Type
Profiles
Forums
Events
Gallery
Blogs
Posts posted by tommi
-
-
Recently got a few quotes for a full respray of a 90 - between £6 - £12k… most places insisted on it being media blasted back to bare aluminium too.
Kind regards,
Tom
-
Hello all,
Looking for some collective guidance!
I have just purchased a refurbished 200TDI head from a reputable supplier. There is some corrosion around the waterways which concerns me - surely this is likely to lead to premature gasket failure? It extends beyond the red lines on the gasket (which I assume is where the actual seal is made). The head gasket has smaller “openings” where the corrosion is (circled in yellow).
This is my first engine rebuild; am I right to be concerned, or is there a good explanation as to why this won’t cause any issues?
Thanks!


-
Many thanks all - it was 5/16” UNF!
-
Thanks Western - I hadn’t realised the 08 reflected the thread.
Mine are definitely not M8 however… above diagram is from the SIII parts book. I’d like to put a longer bolt in, but unsure as to the thread! 1/2” bolt head.
Tom
-
Hi all,
I wonder if any knowledgeable forum members can help me identify the size / thread of a bolt…
1978 Series 3; the bolt that fastens to MUC1324, circled in the attached diagram. I understand that MUC1324 has been superseded by AHR710300 which is M8, but I’d like to know what the original thread is.
Many thanks!
Tom

-
Unfortunately I've been rota'd in at work, so won't be able to make this after all...

-
Count me in!

Not sure if I'll stay the night yet - not all that far away from me.
Tom
-
Got a Waeco kit that I've been meaning to fit for ages - I quite like this idea:
-
red/blue trace is rear number plate light & LH tail light & LH front side light -- do yours work ? if not now you know why
plain black wire is an earth
blue/red trace goes from fuse box to ign switch doubt it's this one
All the lights are working - passed its MOT a few days back. Vehicle is ex-waterboard - it does have a couple of switches / holes in roof where rotating beacons were presumably fitted, but can't see a logical reason for a connector in that location...
-
you haven't posted what the colours are in the 2 pin connector,
One of the wires is red & blue, the other is black as far as I can tell.
Not the reverse light switch wiring is it?.Typically a two wire connection on the back of the gearbox but would quite likely be removed to clear the way when changing a transfer box.
No, definitely not the reverse switch. Seems to be part of the original loom, but everything I can think of is connected up and working...
-
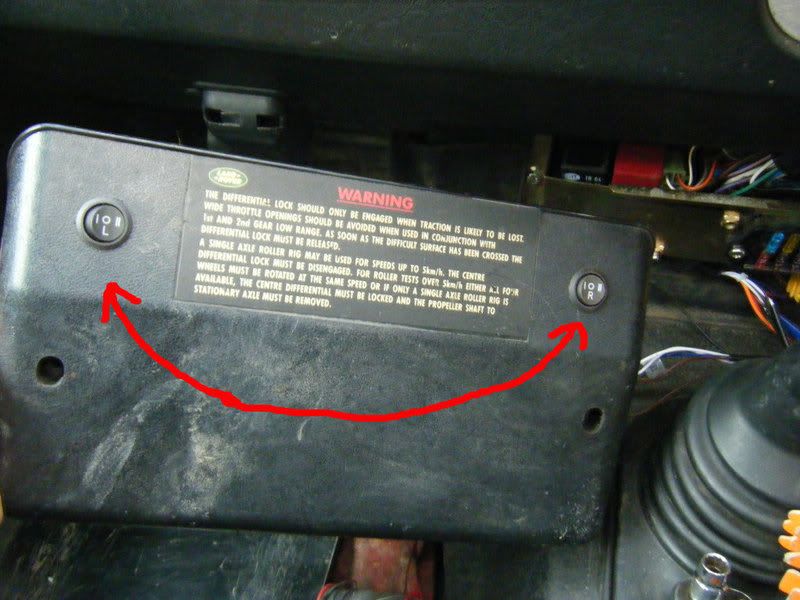
on my '89 110, the difflock warning light is a single bullet connector black/blue wire colours, the switch is earthed from one terminal to difflock housing bolt by a short black wire.
what wire colours in the 2 pin connector ?
Thanks for your help western - had a better look at it and the single cable is actually black / blue and has a bullet connector - much appreciated. No idea what the other connector is for thou!
-
Hi all
Some time ago I fitted a replacement transferbox in my Defender - it's been off the road for quite a while now. It's been so long since I did it I can't remember what the deal was with the diff lock switch wiring. On the right hand chassis member I have the following:
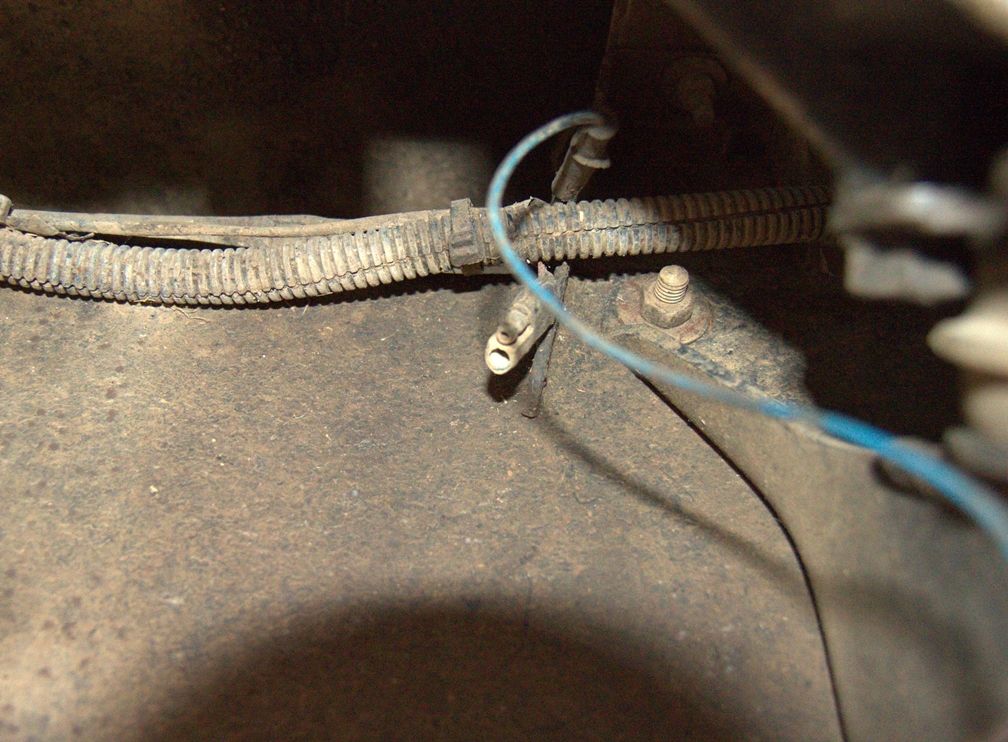
A two pin connector, and a single blue cable with a spade connection on the end of it. Assuming this is factory, does anybody know what's what? Logic would say the two pin connector is the diff lock switch loom?
Any help is gratefully received - save me having to roll around in the cold with a multimeter

-
Some more info about replacement etc here, from the tech archive:
-
So what happened to JJB Serenety?
We are also reduced to:
2.
- GBMUD
- SimonR
- Steve200Tdi
- TJ101 + JST
I guess DirtyDiesel and Tommi can choose which group to join!
Chris
What sort of time might you happen to be leaving on sunday morning, where i might coincidentally happen to meet you?
- GBMUD
-
take the round plate on the back of the transfer box off it should then push home had the same problem,then use the plate off your old transfer box
Thanks for the advice steve, will try taking the plate and input gear out tomorrow.
Hi,
I would guess it's one of 2 things :
1) if it's an auto you may need a new coupling shaft with the longer spline,
http://www.ashcroft-...od&productId=47
2) you should have 2 dowels, one big hollow one at the top and one smaller lower stepped dowel, you may have 2 in one location and they are fouling,
Dave
Thanks for your reply Dave, it's a manual, and I have already checked the dowels as per the thread in the tech archive; I can't see anything physically obstructing the mating surfaces
 I presume if I take off the PTO cover and pull out the input gear, if they dont go together I will be able to see what is causing the problem?
I don't think that you have the same problem as I had as you haven't fitted a new input gear by the sounds but I thought I'd post as it had the same symptom as you.
When fitting a recon LT77 to my 200tdi conversion 90 last month I also bought a second hand discovery transferbox (1:22). I also bought the relevent crossdrilled input gear for that case. When mating the two boxes together I couldn't get them to go fully home, all but 20mm or so. I scratched my head for a bit and then after a few brews I realised that when I replaced my old input gear, the transfer box had an oil feed plate previously fitted to help against spline wear. I didn't realise that if fitting a new cross drilled gear and your tx/box has the oil feed plate it has to be removed or the gearbox won't mate up fully.
Jack
Interesting - I will try taking off the PTO cover and taking out the input gear; as above - presumably I will at least be able to see what is causing the problem?
-
It seems more likely to me that the splines on the gearbox output are not lined up with those on the transfer input. Try engaging diff lock then twiddle the output flange while pushing the transfer box. I'd replace the seal anyway and the output seal on the gearbox while you have the chance anyway.
I was under the impression that by the time the t'box was that far on the shaft, the splines would already be lined up and engaged? It is only perhaps 8mm from being home, which is the same width of the seal/shoulder.
I did give the flange a turn or two but just presumed it was already engaged on the shaft
If you have tried turning everything and you still don't get anywhere, there is another thing to try.
Has this replacement transfer box had it's input gear changed to a new improved splined one ?
Been there and it wont close the gap as the shoulder won't go inside the new gear. Can you take the input gear out and confirm that it will actually go on
Dont know the history of the box, but was removed from a low milage disco. When you say the shoulder wont go inside the input gear, I can see plenty of clearance inside the t'box 'behind' the oil seal?
-
Hi all.
Had some fun and games today trying to fit a replacement transferbox to my defender. I managed to get the new box into position on the shaft, but couldnt get it all the way home; it seems the oil seal that sits flush with the mating face of the t'box doesnt want to slide onto the 'shoulder' on the shaft. I didnt want to put too much pressure on it in case I knackered the seal, or pushed it inside the t'box housing.
The seal isnt new but looks fine, will get a replacement and have another go on thursday. Any suggestions on what I could try next would be gratefully received
-
Planning to be there, but still only for the sunday unfortunately

-
I may be in the area and happen to follow you that day then...
-
Providing I sort out my transferbox, am I ok to join you on the sunday for the day? Have work on saturday unfortunately, so can't make the full weekend.
-
Result! From the figures you had earlier and the figures a few of my mates have mentioned their kids are paying, £1192 is an absolute bargain
I agree, Im 19 and currently pay £1200 for my defender with Footman, and the best part of £1000 for a 1.8 Focus with Admiral. A lot of my mates are paying £1500+ for little 1.2 litre euroboxes...
-
Not feeling it myself. Looks like a Kia??

-
What SLR and lens are you using tommi?
As James pointed out it was a canon 1000D body with the standard 18-55 lens. I've since purchased a 450D with a 28-135 lens, which I have found to be significantly better.
Aww, I'd forgotten about this thread. Now I want to drive to Europe again. Just wish I had someone to go with!

It says he used a Canon 1000D above, but doesn't specify a lens.
You're right about that, biggest problem is finding other people to go with... My mate is up for it again this year thou which is good

Yup, same in Strasbourg - all the parking is underground or multistorey inside an old building and invariably 2m max height. First try was the underground car park by the station, went down the steep, curving, single-lane ramp to meet the height barrier - cue reversing back-up a steep, curving, single-land ramp in a fully-laden 110 after 12 hours on the road! Luckily it was 10pm on a weekday night so I got to the top without meeting someone coming down. After that experience every car park is reccied on foot now. Eventually found a multistorey with a 2.1m limit the other side of Strasbourg city centre, but Strasbourg's not that big, so it wasn't too bad.
Edited to add - just Google mapped & streetviewed Strasbourg - the 2.1m car park is on Rue Fossé des Tanneurs if anyone's planning on parking a Defender in Strasbourg!
Gotta love the exclusivity thou


Next time why not come to Scandinavia?
Ferry from Harwich or drive round through Germany to Denmark, short ferry to Norway,
or cross the bridge by Copenhagen and go through Sweden.
Sounds like a good possible trip for the future, I think Morocco might be next on the agenda
-
I'll be there with a couple of mates. Hopefully there will be some interesting stuff to have a look at


 I presume if I take off the PTO cover and pull out the input gear, if they dont go together I will be able to see what is causing the problem?
Defender Rear Quarter Panel Replacement
in Defender Forum (1983 - 2016)
Posted · Edited by tommi
Hi all,
I recently replaced the rear quarter panels on my Defender tub – thought this might be useful for anybody who’s considering the same. Mine had corroded around the rear crossmember bolts, and where the corner cappings were bonded.
Before you start; if you’re content with your current rear door gap, measure the opening at top and bottom of the aperture (between each side of tub), so you can use this as a reference when fitting the new panels!
First, remove the top cappings from the tub, along with light fittings etc:
The panel is attached with pop rivets and spot welds. Both will need to be drilled out (I used a 4.8mm drill). First I tackled the spot welds on the corner of the tub:
Once removed, use a suitable tool to split the panels:
Next, drill out the five spot welds in the centre of the panel:
There are four spot welds where the door seal is retained:
Three pop rivets on the inner face against the wheel arch:
And a combination of spot welds and pop rivets at the bottom of the panel – not a great picture but you get the idea.
Finally, there are two solid rivets at the bottom of the panel, which have to be dealt with through the wheel arch. I used a grinder; access is not great but workable:
You should then be able to ease the panel away and remove (taking care not to distort other panels in the process):
You can see some of the corrosion here:
I used replacement panels from Paint Man Panels (https://www.paintmanpanels.co.uk/). I have nothing to compare against, but they seem good quality.
First, clean up the mounting faces, and deburr any holes. You’ll need to ensure that they are sufficient size for your new pop rivets (in my case 4.8mm).
I used Sikaflex 221 sealant to bond the panels together; apply a decent bead to the mating surfaces:
Fit the new panel into position; I secured with some clamps, before adding a rivet into the top corner (this will later be covered by the top capping):
At this point, you should make sure make sure the rear door gap is good (based on your previous measurements). There is little ability to influence the bottom gap, but the top can easily be tweaked by 10mm or so by pulling the assembly inwards (to ensure a parallel gap). Once you’re happy, drill holes for the pop rivets through the new outer panel, using the old spot weld / pop rivet holes for positioning:
And then rivet; I used “sealed” rivets.
Repeat in the middle of the panel:
I’m removing the tub again for paint, so will add additional fixings in place of the two solid rivets in due course (it would be difficult to drill these in position). Complete:
Hopefully this might be useful for anybody sizing up this job!
Kind regards,
Tom