


roamingyak
-
Posts
341 -
Joined
-
Last visited
Content Type
Profiles
Forums
Events
Gallery
Blogs
Posts posted by roamingyak
-
-
I'd greatly appreciate some sense checking please.... 🙂
Coming down in Brazzaville, Congo about 9 years ago the brake fuse blew every time I pressed the brake.
Seemed the wire through the chassis was shorting.
So my mechanic mate ran a wire from the brake servo, into the dash firewall and straight down the inside of the landy and plugged it in there to a standard LR 3 way splitter and the brakes have worked ever since.
If for any reason I accidentally cut that wire (as I did doing internal remodelling for example) the brakes didn't work until I fixed it.
Finally today I decided to replace it ( I have the dash out etc) and it took a very angry and frustrating hour to run some wire into some cable protect and thread it along the top of the chassis and around/through all of the extras I have under there (rear wing fuel tank was really in the way).
On the brake servo side of the new wire I added an inline fuse and put in a 10amp fuse.
At the back the grey rubber wire connector/splitter (grey rubber thing with 3 bullet female connecters on each end) was tired and the connectors were a bit loose, so I replaced it and carefully replicated what was plugged into where. Other than the fuse and the new wire splitter its exactly the same as the old one...
Of course it didn't work, no break lights ;-(
I checked all of the connections and they seemed fine.... I used thicker cable could that be a problem?
I assume the cable should go to the fuse box, fuse, and then another cable down into the rear wiring harness?
Any thoughts appreciated 😉 -
Easy to follow video here btw...
-
Funnily enough just stripped mine out yesterday.
Are you in Zim? Do you need a heater at all?
If not, you could...
1. Leave the drivers dash and steering wheel as it it, not worth the hassle to move for a few inches, easy to fix things then, resale value....... etc
2. Strip out as in the above picture, but also strip out the heater box in the engine bay, then mount the windscreen wiper motor (thing on the left of the photo) from inside the cab in its place. Then you have a saved about a foot of space from the door to the steering dash unit..
Send us some pictures with what you do... -
On 11/20/2018 at 10:53 AM, Chicken Drumstick said:
Jate rings are ok, but do require you to crawl under a bit to attach to them. Which off road may be an issue if they are buried in the ground or under water. You also need to have some way of attaching to them, meaning you need to carry shackles about with you. And you really should use them with either a bridle or long enough rope to attach to both sides of the vehicle.
Thanks for the suggestion, but I have a (Aluminium) Safety Devices fuel tank guard, and suspect it would get in the way, or at least the edges of it would chaff if pulling on an angle...?
-
This one also seems popular, made by Britpart I believe?
https://www.jgs4x4.co.uk/land-rover-swivel-shackle-recovery-eye-bolt-on-db1322/

-
Another on here, I'm spoilt for choice 😉
https://www.sahara4x4.com/b2c/producto/RA01247/2/rear-swivel-ring-gold-style-for-land-rover-defender
What is the advantage of having a shackle through a metal rod (as below) as opposed to a pin or just a solid loop as per the examples above?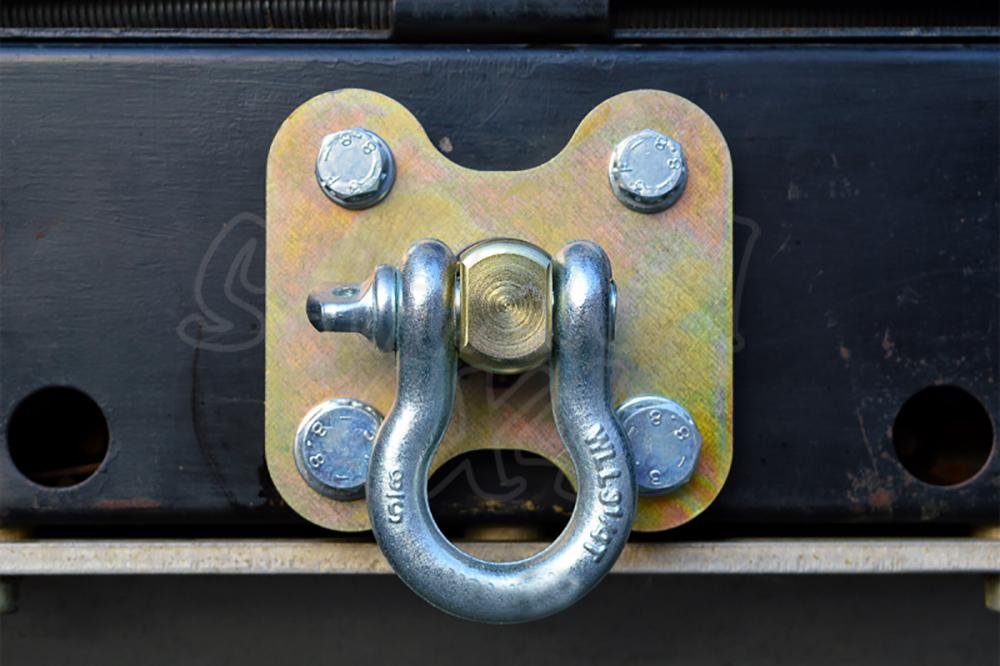
-
Thanks Martin (Motorhead!), looks ok, but 4 bolts would be better than two.
Western, definitely not with the groin whacking ball in such a protruding position (and I don't have any use for the ball...)
Thanks! -
Any suggestions for something lighter/smaller than a NATO hitch when you just want to recover/pull things rather than tow a trailer from the back of a Defender please?
I'm replacing the rear chassis cross member so seems a good idea to save some weight and hopefully knock myself in the groin less with its replacement!
-
Note: The sedimenter on mine (exMOD 2.5n/a, now a 200TDI) next to the fuel tank will clog up with black mould/gel over a long period, so worth pulling it apart every few 5 years and cleaning it out etc. I've seen some that were completely full and blocking the diesel flow, that takes many years usually...
Example here:
https://www.landyzone.co.uk/land-rover/diesel-choke.295501/ -
Hi,
What is the optimal way to paint a galvanised chassis (black) - in this case just the rear cross member?
As in what are the best products to use, number of coats of each etc
(I'm booked into having it done next month and keen to question how it will be done forearmed with some knowledge 😉 -
Back to the original question 😉 (as I'm buying Koni regardless 🙂 )
Are the larger Heavy Tracks ones worth changing to? -
Koni have the 'normal' Track Raid shocks that I've always used and had very good milage and value from over the last 14 years in a few sets, even if they have doubled in price without changing.
It's now time to proactively change them out again, and wondering if the larger and more expensive 'Heavy Track Raid' offer any benefits?
Vehicle is a 1991 Defender Hard Top with expedition equipment used for long trips in Africa
LR Heavy Duty Springs, 130 helper springs at the back.
Dual koni shocks at rear.
Single Koni shocks at front
No ARB's fittedAdvantages I can see:
- do away with dual shocks at the rear.
- carry less spares as less likely to fail?
Review here for those who are interested:
https://www.youtube.com/watch?v=GoNQibuDnEg -
Hi,
I'm replacing all of the foam and seats covers in the front (1991) and one of head rest metal pieces is rusted beyond use.
Seems when you buy a replacement head rest it comes with the foam and cover as you have to specify what colour and cloth you want etc
Can you buy just the metal piece?
or does anybody have a good one sitting around they can sell please?

-
I spoke with one of my previous Landy fixer uppers and they said they get theirs from:
http://www.ddsmetal.co.uk/about/
Anybody know much about their product quality?Recommendation was to get a galvanised one as normal steel is often gone again after 5-7 years (they are now replacing ones they originally fitted that time frame ago).
-
On 10/26/2018 at 6:08 PM, Paddy said:
Hi Roamingyak,
Did you settle for Dixons, how did it fit, was the courier service ok. Any general comments, as I too will need to replace this cross member and for it to be delivered via courier.
Hi mate, no progress on this for me yet... hoping to do in in December...
-
I think its nice to return to older threads and update on the solution used to add to the pool of knowledge out there.
So in the end I couldn't find anything locally, and struggle to ask for it which is perhaps the biggest problem.
Shipping from ebay for such big bulky and heavy items wasn't great, and I was ordering a whole bunch of seat stuff from exMoor trim anyway, so in the end I found a good solution from them plus others:
1. Everything covered in Silent Coat 2mm
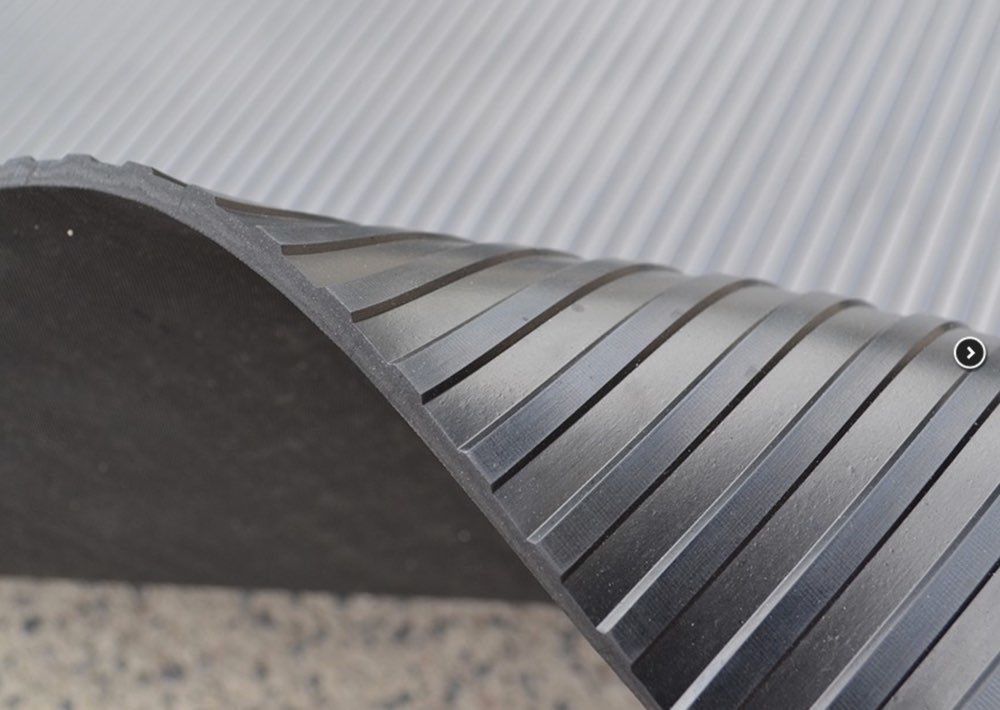
2. Load bay has 2mm Tecsound Sound barrier and then this 5mm rubber from exMoor. It should be hard wearing and the channels make dust removal very easy. Could only find 3mm rubber locally and it was pitted so dust is harder to clean off.
3. For the wheel arches I used this kit from exMoor which comes pre cut and was easy to install. It's 'sound capturing' foam glued to rubber.
Used velcro for now, may glue later, but velcro is better if it works well.
The kit comes with a load bay piece, however I measured this up and it would give me 3 strips that I could use elsewhere....
4. For the curved side walls above the wheel arches I cut two strips and then screwed them into place use Ali strips at the top and then velcro in the middle and bottom (the foam and rubber pulls apart if you don't screw it in place with the Ali strips, bloody gravity)
5. Enough was left over the cut a strip for the part at the bottom of the internal bulkhead and the rear of the seats.
I can't fasten it all down 100% due to wanting to fit a water tank etc, but its 90% done. I can't drive on the motorway at the moment, but its clearly moved from being a tin can echo chamber to a quieter place just from driving around my property and working inside her...
Principle is to 1. Dampen vibrations (ie: stop it) and then 2. block sound from travelling through the air (closed cell foam) and then 3. protect these materials (rubber, which also helps with blocking sound)
I used Silent Coat because its cheaper and seems exactly the same as Dynamat, but is silver, the black of Dynamt looks better its its not covered etc
Brett has a video of his experiences here if your interested.
Thanks again for all of the help and suggestions!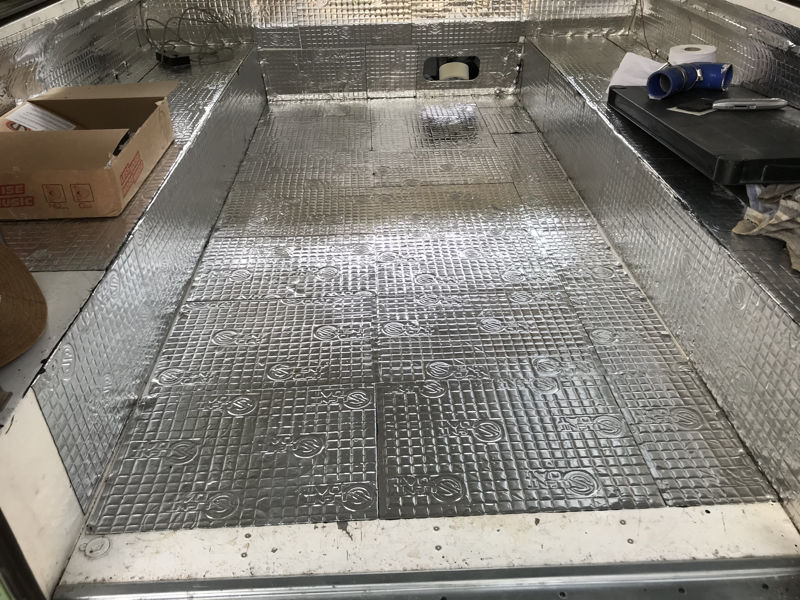


-
 1
1
-
-
( Hint, post some details and it might spark others into being interested 😉 )
-
This might help.... the etched white writing on each glass panel is:
Drivers side (rhd) correct way up (ie: readable) and at the rear.
Passengers side, correct way up (ie: readable) but writing at the front.
(Seem to recall the writing end had two dots pushed into the glass at the top and the bottom also?)
Get a second person to help - when you push one end in, they hold it in place whilst you work your way down to the other end, else it just keeps popping out and its seriously demoralising 😉
If stuck, jump on the Eurotunnel, pop down to Portugal and for a cheap bottle of wine my neighbour will do it in 20 mins 😉 -
Job done. By my neighbour who's been doing it for 50 years
")
Watched this video for tips, painted the inside with a white acrylic spray paint from the local equivalent of Halfords, fitted new genuine seals (expensive), used the Gunson tool kit (link) that is about £12 for the strip filler, but neighbour preferred a thin flat head screwdriver for getting the glass into the main large seal.
Needs two people to hold the window in place at one end whilst the other pushes it into place down the other. Note when you remove the window which one goes on which side as the curvature seemed different at each end(?) and we had to swap them around.
As suggestions for a sealer that I can use on the inside please?
I intend to cover the inside in acoustic foam and then headlining, so would like to try to ensure that no water comes in for years, but wary of products that will perish the rubber or make it shrink etc


-
Importing into another country, or trying to:
Hardtop as N1 tax = €4,400
Hardtop as M1 tax = €15,300
I was assigned a M1 but Land Rover don't hold this information so challenging where in the process I was assigned it.
And yearly tax is half price as well. -
Hi all,
Any ideas about vehicle category codes (M1, N1 etc) as I've been given a M1G vehicle category for a 1991 Hardtop (exMOD, used to have inwards facing seats in the back I think) when having a N1 would be highly beneficial.
Can Hardtops ever be given a N1 code given they are classified as commercial vehicles in the UK I think? (my V5 says private Light Goods Vehicle)?
http://www.dft.gov.uk/vca/vehicletype/definition-of-vehicle-categories.asp -
On 8/22/2018 at 5:08 PM, neil110 said:
Think when I did mine I had them blasted "gently" if that makes sense? Stripped them completely first, removed the sliders from the rails and everything. Painted them with some red oxide primer that I managed to scrounge from work, we used it to paint steam pipes, then sprayed with satin black. Rebuilt them with new foams and covers, from Exmoor trim, that was umm 10 years ago and all is still good
Can anybody link to some paint that would give a similar finish how they are originally please?
Happy to do the sanding and priming myself but might get a local paint shop to do a spray finish rather than my ham fisted painting efforts 😉 -
3 hours ago, Red90 said:
Why is it so hard for a vendor to do a proper test with before and after dynos?
Does this help at all?
-
Had a chinwag with Drew at Wrights:
- r380 version with the channel/hump raise built in is wider at the gearbox tunnel, so you'd have gaps either side if you go with that option.
- as said, there for support for the middle seat, can cut it if not used as a middle seat, but I like strengthening to be in placeThey don'y supply it with the channel mould for the LT77 as apparently customers has so many different requirements etc etc etc
I suggested supplying a product that matchs the default configuration would be a good idea.
Anyway, cut the matting or grind off the channel is the answer.-
1
-


Brake wire issue
in Defender Forum (1983 - 2016)
Posted
Oh, 200 TDI btw, used to be a exMOD 2.5 n/a, most things changed over to civilian spec over time