


Jimmy Two-Jacks
-
Posts
807 -
Joined
-
Last visited
-
Days Won
1
Content Type
Profiles
Forums
Events
Gallery
Blogs
Posts posted by Jimmy Two-Jacks
-
-
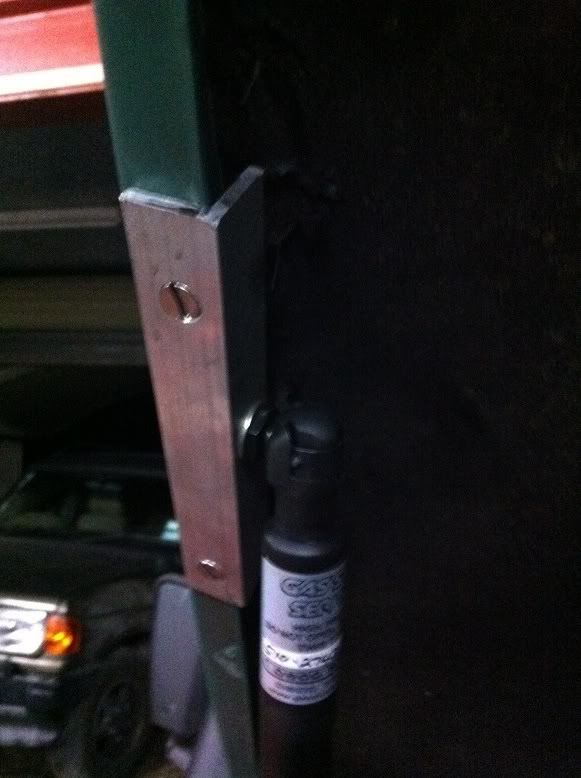
I was looking at some recovery points and thought they were expensive for what they where so have had a go at making my own. I intend to drill some 8mm plate for the loop to go through and get my mate to stick weld the loop in back and front and then have an 8mm spreader to go on the other side bolting through at each corner with some 8.8 bolts.
Feed back welcome...be gentle its my first attempt

Cheers
J2J

-
Thank you,
Good tip about the negative I wouldn't have thought about that side.

J2J
-
Thanks for the reply.
Just out of interest do you know the capacity required of the cable?
Many thanks
J2J
-
-
I get this mechanical clank if my gear change is a bit quick and careless and I jump off the clutch or jump on the gas at that point I thought my uj s on the prop maybe a little worn but its probably just my driving as I tend to try to drive it like a modern car if I haven't driven it for a while!If I take my time it doesn't make a clanking sound I think their has to be some noise when metal moves against metal though.
Have a look at your rear prop joints.
Best of luck
J2J
-
Thinking of replacing positive cable from battery with longer one rather than joint and insulate
 what should I do regarding cable size go bigger or stay standard?
Err what is the standard size 32mm2 ?
 I searched but didn't find anything and Googled and got zip.
Cheers
J2J
-
Well today I went to see my mate who is a motor sport fabricator www.vulcandezign.co.uk and told him what I needed to do.
He came up with the idea of widening the lower section of battery box by removing the humped section nearest the outside of the vehicle to enable me to get both batteries in side by side.
He folded a tray insert on his cnc box pan bender that will drop into the hole when I have cut a strip from the corner of the battery box and will fix either with an overlapping flange by welding or by some fairly hefty rivets and sealant.
I will post up the results when done but I think he could sell these as it’s a fairly simple mod that will get round the problem of fitting deep batteries.
This is the prototype of course.
More to follow
J2J


-
I've used one of these (ebay linky) 12 and 24v and never had any problem with alternators and other electronics.
I can feel another eBay purchase coming on
Cheers All
J2J
-
Thanks
Better safe than sorry
J2J
-
Hi All,
Just a thought before I start work on my battery box I would ask. If I do any welding in situ on my old 90 do I have to disconnect the alternator and battery?
All of the welding to date had been done outboard so to speak so I don’t know as some people say just disconnect the battery others say alternator too.
Cheers
J2J
-
Wow!!! That looks very neat I think I am suffering from battery box envy
J2J
-
Going to see a mate of mine who is a fabricator on Saturday and see if he can make me a simple two piece drop in and rivet tray to drop in the hole I am going to cut in the bottom of the battery box
dropping the box by about 1"If it works out I will post up some images.
J2J
-
That looks like a right POS, I've seen some good armoured vehicles in my time and some right rubbish , The vehicle in the photo should have a armoured bulkhead in the rear to partition the occupants from any incoming from the rear but if it hasn't lets hope it never has to be used If the brown stuff hit's the fan and at the mo with whats happening out in Nigeria
Jimmy two jacks, Humber pig-9 tonnes of armour and a breaking system off of a 1 ton truck-more you than me mate

John
Great fun though...to be fair I did have the length of Long Marston airfield to give it the welly. Wouldnt like to drive one in anger!
-
Thanks all, great food for thought. I will let you know how it goes.
J2J

-
Thanks western. here is another pic just to confirm. it was a few years ago so the paint looked better than in the other one. You still think it is the one above

I have got to ask did you reverse into that waterhole?

-
I am shortly fitting a pair of batteries with split charge in the 90 but I am a little concerned because if I mount the batteries side by side I have to raise the batteries to take into account the slight dip in the bottom of the battery box. This makes the rear terminals about 5mm from the edge/lip of the battery box and not far from the battery box cover that’s metal
.I have got heavy duty terminal covers but would feel happier if I had another 10mm clearance between the terminals and a steel lid.
Just wondering if anyone has modded/ deepened their battery box and how did they do it?
I could mount the batteries in a T configuration as that would give me about 10mm clearance but I would have to find some Heath Robinson method of fixing the batteries so they don’t move about and also so it doesn’t fail its MOT. How have you fixed yours?
Any suggestions welcome.
J2J
-
Save yours and their potential embarrassment if it gets damaged or pinched and you have to get the money off them...don’t do it
-
if its a standard engine it must have some great 0-60 figures......
I was once instructed to sell by auction a batch of ex mod armoured Humber Pigs retrieved from some initially bought for scrapping and spent a day moving them about into groups These had RR 4.2 straight six engines and did about 40 to 50mph, I think, I kept running out of runway

Slightly off topic but comparative..ish

-
is it possible to fit these with out having to drill and fit a bracket to the bonet? i fancy putting them onto tdci but never like the idea of drilling into the body work.... am i just being a classic tdci poof owner???!!!
These struts produce a fair amount of force and so in my opinion you need the security of a bolt or plate fixing.
However I suppose you could rig a kind of clamp set up clamping to the edge of the bonnet and side of the wing but It would be a bloody faff to do
J2J
-
Thanks to this thread, I did this mod on my 110 today. Sadly, my struts cost NZ$110 each rather than the GBP 12.00 or so you guys got them for but it's a blinking' great mod, thanks!
Here's my top end detail:
Bottom end, 15" in from the back of the wing:
The whole shebang done, lifts to the same height as the original stay:
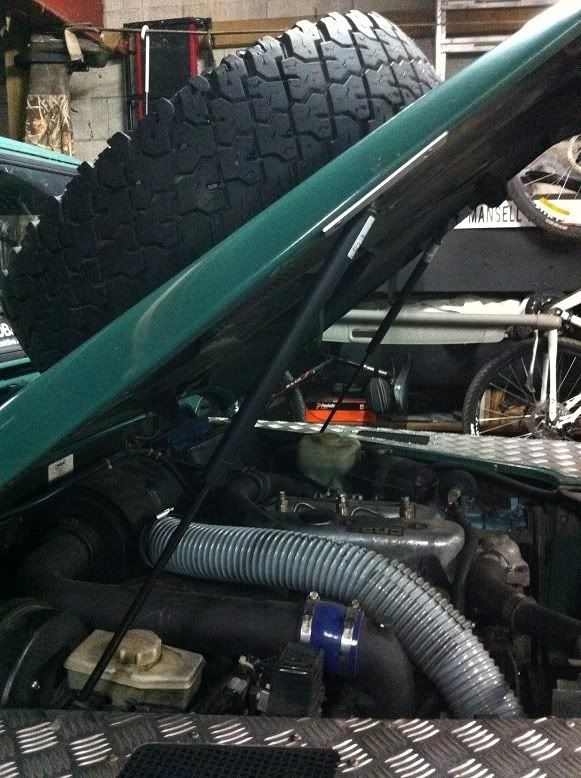
When the lid is closed, the struts force the bonnet to the front and take up any slack in the hinges. I had to move the striker plate (bonnet latch?) as far forward as it would go to allow it to mate.
Very happy with it.
Have to add that without the tyre on top, you would seriously risk facial injury when opening!
Ray.
I didn't take into account the unladen bonnet's force when I first lifted it to start the rise and it nearly chinned me almost a case of Land Rover TKO
-
Mine did this and would only work on one speed and park only when wet so I took the top bit of the dash out and greased the wheel box if that is what its called with spray grease and now they sort of work but I think early 90/110 wipers did their own thing anyway but the park switch seems to be a common problem.
-
Thanks all
-
Doh....13000lbs 6hp 12volt
Thanks
-
I am just gathering the bits and pieces I need to fit my winch. When I bought my winch sometime back I bought a keyed isolator to fit when I eventually got around to fitting the winch
.Looking at the current that the winch could draw is the isolator up to the job? It was the biggest I could find within reason at the time. I avoided the red plastic key type that seems to melt!!
Specs below:
250A Continuous @ 12v 2500A for 10 seconds


 what should I do regarding cable size go bigger or stay standard?
 I searched but didn't find anything and Googled and got zip.


Radiator Blind
in Tools and Fabrication
Posted
That sand coloured 90 is mine I bought the first one from him. They are very good. I did have to fit a zip so I could get to the bonnet catch though..
J2J