


BogMonster
-
Posts
10,917 -
Joined
-
Last visited
-
Days Won
23
Content Type
Profiles
Forums
Events
Gallery
Blogs
Posts posted by BogMonster
-
-
I get it now, bog as in that muddy stuff you destroy kittygrippers in.

I was going to try and edit my penguin to be carrying a kitty on its back but that was a bit beyond my powers of image editing, the union jack took me about half an hour to get right!

-
Mine should be obvious from the avatar

but if not I am "the moderator formerly known as scl" (or sci by some people...!
 )
) -
Don't know if it can be done as you suggest but you can always stick it on your sig like wot mine are
-
Definitely need Nigel's finest tales of woe preserved for ever

The Definitive Alarm Spider Post has also just migrated
Thought about editing the "original" to say "Removed due to there apparently being no technical information on this forum" but couldn't be @rsed

-
I decided it was past time I did a proper "how to" on this as it crops up quite regularly.
A common failure on Discovery Series 1 vehicles (both Tdi & V8) with the two-button alarm system (i.e. all vehicles from 1996 model year to 1998 model year) is a component called the "spider".
Symptoms of this failure are typically an intermittent non-start or cutting out while driving (or both), which usually gets progressively worse until it is happening very regularly. Typically you will find that leaving the vehicle from a few minutes to a few hours will allow it to be started, only for the fault to repeat later on.
The spider unit is a small black box of relays, controlled by the immobiliser & alarm, mounted on a panel just in front of (toward the front of the vehicle) and below the radiocassette slot - a very inconvenient position which is designed to be very inaccessible to thieves in a hurry. This contains relays which isolate various key circuits of the vehicle; the feed to the fuel solenoid, and the feed to the starter solenoid on a 300Tdi, and ignition, fuel and starting circuits on a V8. A combination of heat, vibration and a not very good quality circuit board eventually results in a dry solder joint on the circuit tracks inside this unit, which often then get hot and burn out completely. It happened to my 1996MY Discovery V8i, the first one I ever saw with the problem in about 1998/99, and it took me about three months to find the fault by which time I was not in a very good mood ... the purpose of this post is to prevent anybody else having to relive the level of irritation I faced with a vehicle which would sometimes start, sometimes not, sometimes cut out while driving and then come back to life while coasting to a stop, sometimes die at junctions, sometimes die for an hour or more at a time.
So far, I have seen the fault affect both the fuel and cranking circuits on different 300Tdi vehicles, and the ignition circuits on my V8. I assume it can also affect the other circuits on the V8.
Diagnosis
Before you do anything else check all the fuses and that the battery is OK - it's really very annoying to pull everything to bits only to find a blown fuse somewhere! The next thing to do is to check that the immobiliser is not actually active - if it is, there will be a red "key" symbol in the dash when you try to start the engine - and if there is then the problem is elsewhere, perhaps the alarm ECU, key fob programming or whatever.
First you need to identify and check the offending circuit. Does the vehicle crank and not fire, or does it not crank over?
If it cranks but does not fire, then the problem is in the fuel solenoid circuit on a Tdi, or ignition/fuel on a V8.
Take a digital voltmeter (DVM) and check if the fuel solenoid (Tdi) or ignition coil/fuel pump (V8) has a 12 volt supply to it by connecting the meter to the relevant blade connector and earth and turning the key to position 1 (on). If there is a 12 volt supply to the circuit, then the fault probably lies elsewhere. (Note that a dry joint may not always provide a perfect break in the circuit; on my own vehicle, it caused a voltage drop at the coil which was only apparent once you started cranking. As a result all appeared OK at rest, but when you tried to crank there was no spark. As I "knew" there was power to the coil, I didn't look at this any further, so it took rather a long time to find out that the power consumption when cranking was causing a voltage drop at the coil, which in turn caused the ignition amplifier module to cut out).
The connectors you are looking for are:
- The small blade connector on the back of a 300Tdi fuel pump, down by where the injector pipes come out
- The + connector on the coil of a V8
...if it's the V8 fuel pump you're on your own as I haven't had that out!
If there is no voltage at the circuit in question, then the next stage is to take the spider unit out - jump down to Repair.
If it does not crank, then the problem is in the starter circuit (Tdi or V8, much the same on both). Take the thin lead off the starter solenoid on top of the starter motor, and stick a DVM between it and a good earth. Turn the key to position II (start). You should get 12 volts across the meter. If you do, then the fault is most likely with the starter motor ... but to be sure, put the lead back on, stick the meter probe into the back of the connector, and operate the starter again. If the voltage is still present but the starter isn't doing anything, it will be the starter. If the voltage does not appear under load, it will probably be the spider unit. Time to take the dash out...
Repair
Removing the spider unit
This is fun. Really fun in only the way that a dashboard with lots of fiddly little screws and bits that you can drop in inaccessible locations can be... allow 2-3 hours at least. You don't need many tools, in fact I think only a couple of Philips screwdrivers, a soldering iron/solder, and something to make some clock keys out of, plus the radio removal keys for your particular type of radio.
I suggest you get hold of a workshop manual for this as it makes life easier if you know what order to take things out in and where all the screws are hidden but a brief rundown is below -- sorry if I have forgotten anything but it's a while since I took one out.
- Disconnect the vehicle battery
- Remove the radio (you will need radio keys for this) and its cage
- Remove the ashtray & the blank switch panel on the opposite side (they just pull out)
- Remove the clock on one side and coin tray on the other (easiest way is to get 2 flat bits of metal about credit card thickness, slide in above and below the clock to release the retaining tabs and it just slides out)
- Remove the twin pop out cupholders (about six screws)
- Pull off the 3 rotary heating/ventilation controls
- Unscrew and remove the plastic surround to these
- Unscrew the heater controls so you can move the unit around
You will now be pretty much at the stage of being able to take the black centre console panel out ... so take the screws out and wriggle it out. It tends to catch on things but will pop out with a bit of a tug. The face vents etc come out with the console.
Behind all this you will find a small black box screwed to a metal face which slopes towards you at about 45 degrees. It has two screws holding it in and a 10 pin multiplug coming out the RH side which is covered up by a metal security plate so you can't easily disconnect it. Take the unit out. This is a "sealed for life unit" which it is not possible to repair. Ignore that sentence.
You will see that on the end of the box where the connector is, the plate is a press-in fit. Get a small flatblade screwdriver and lever out the end plate, working your way round until it pops out. The whole circuit board will slide out.
Look on the back of the circuit board (the solder side). Chances are the fault will be immediately obvious, if it is a little blackened and burned, but if not, examine all the solder joints carefully, if the unit has failed in the normal way there will be a "dry joint" (where the solder joint has cracked up making a bad connection) on one of the larger pins on the board. Basically all you need to do is to get a decent fairly high powered soldering iron with a small point on it (I use a 40 watt) and re-solder the broken connections. Depending on how much you enjoyed taking the unit out, you might also want to do all the other relay and connector pins while you are in there - it makes sense.
As an option of course you can replace the unit, I think it costs about £40 or so and the part number is on the unit, usually AMR4889.
Put the box back together once it has cooled off a bit, and connect it up. At this point it makes sense to test the system before you put everything back in ... so reconnect the battery and fire it up - hopefully everything will now work!
Assuming it does the remaining steps are simple:
- disconnect the battery again,
- throw all the dash back in,
- congratulate yourself on fixing a unit that isn't supposed to be fixed
- reconnect battery, set clock & radio code etc etc
- Robert is your mother's brother go for a beer
One for the technical archive I hope, once somebody points out something I am bound to have forgotten somewhere
I cannot begin to explain the aggravation this caused me and the amount of work that went into finding one teeny little dry joint on a circuit board inside a sealed unit for which there is no circuit diagram hidden right in the guts of the dashboard ... so I thought it was worth sharing the detail in order that others don't have to go through the "learning process" I did!
There is indeed a bypass solution (on the fuel (Diesel only) solenoid side of things anyway).
Just supply it with a ignition conrolled 12V supply. Not always considered a 'proper' fix but it worked form me no probs.
Oh and if this circuit completelty lets you down (and it will!!!) leaving you no way of getting home simply take the solenoid controlled plunger (again Diesel only) out of the stop valve and put it back together.
Your car will now start BUT it will not stop running when you turn the ignition off so you have to stall it when you get home and then either fix it as per Stephen's post ie the 'proper way' or as above 'The cheapskate way'
OK a few other bits...
The spider circuitry is detailed in the official 1996 Discovery Electrical Troubleshooting Manual, though I always found the circuit diagrams in that as clear as mud! The official name for this horrible little box of nightmares is "Engine Immobilisation Control Unit (Spider) (Z271)" and it appears on various pages to do with starting and charging though AFAIK there is no single diagram anywhere in any of the literature that shows the whole thing and there is certainly nothing showing what goes on inside it - I suppose that is a security measure.
You can do a bypass of any of the circuits as a temporary measure, though the V8 fuel pump would be rather hard I think as you'd have to pull the floor up in the back - probably easier to fix it properly! However, since you need to take the thing out to be sure that this is the problem, once you have it out you might as well fix it anyway.
The final straw for me on this one actually happened after I fixed it. I'd been working on it from 9am one Saturday morning, checking and following through all the circuits in turn, I was at the spider unit when I found almost by accident there was an odd 3 volt drop across the input and output wires. As the fault only occurred when cranking I'd not spotted the difference between the voltage drop caused by the starter, and the extra voltage drop over the dry joint. I pulled the thing to bits and was unbelievably chuffed when I found it was all burnt up inside because I knew I'd found the problem. Finally, at about 4pm that afternoon, I had it all back in to the vehicle, fired it up and away it went, a dozen or more stop/starts later and I knew it was good to go.
Opened the garage door...
...selected reverse (she was still a manual at that point) ...
... and the %%%%ing grub screw came out of the gear selection linkage!!!
Nearly a year later... I finally have some pictures to add to this so it makes a bit more sense!
Thanks to Underdog for most of the pictures, a couple of the circuit board ones are mine as I just fixed another spider for somebody yesterday, but most are Ian's.
Take out the heater controls...

...take out the clock & hazard light switches, and the switch blanks from underneath...
...take out the coin tray and ashtray (note one of the screws in behind the coin tray, this holds the whole centre console panel in)...
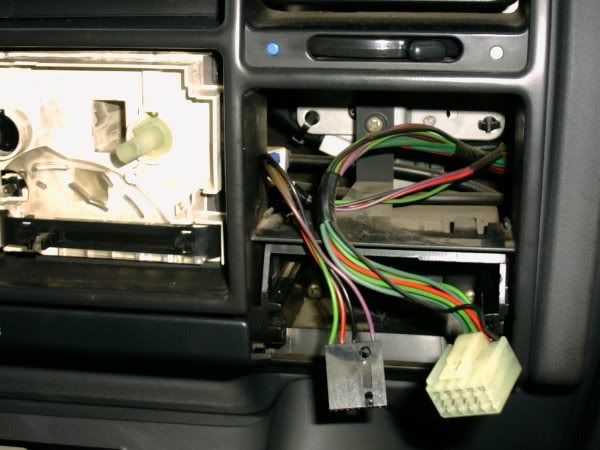
...out with the radio etc, and then the drinks holder from underneath...
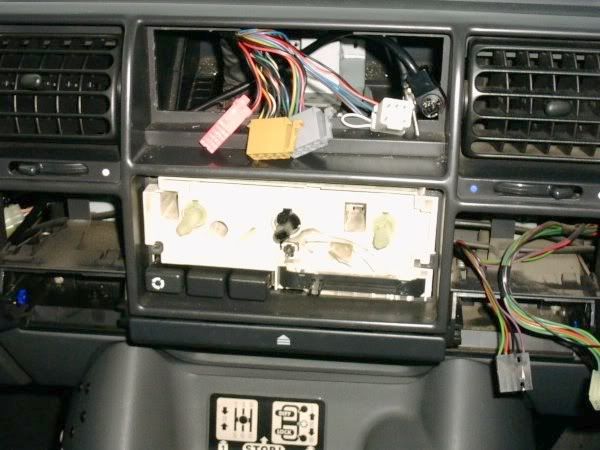
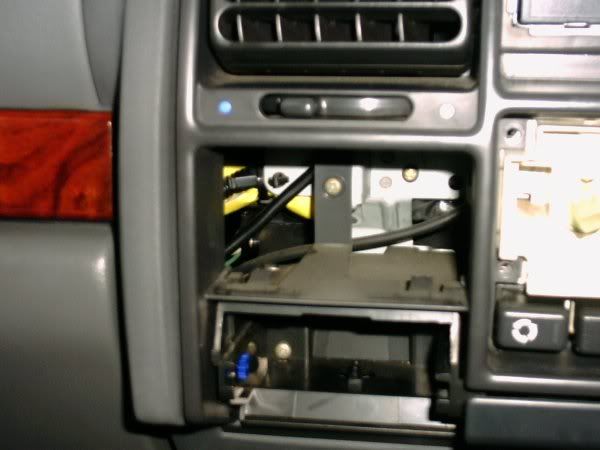
...then once you have found all the screws, pull out the whole main plastic centre console panel so it looks like this...
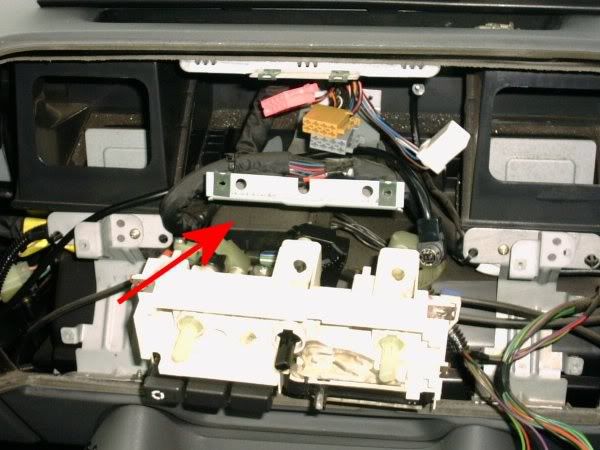
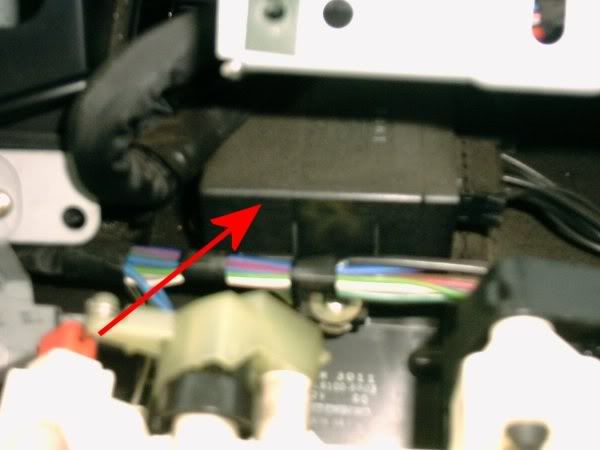
Now you can see the spider (arrowed)
Unscrew the two screws holding it in, pull it out, then unplug it...
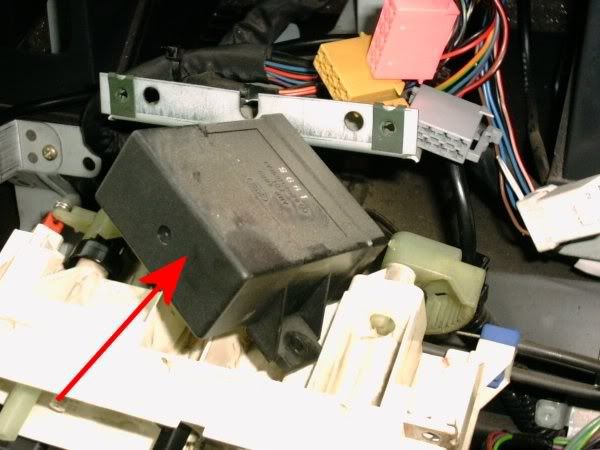
...and here it is, the little *&*&%$^ Resist the temptation to stamp on it, as you can't buy them any more!
Carefully lever out the end plate with a flat bladed screwdriver and the circuit board will slide out...
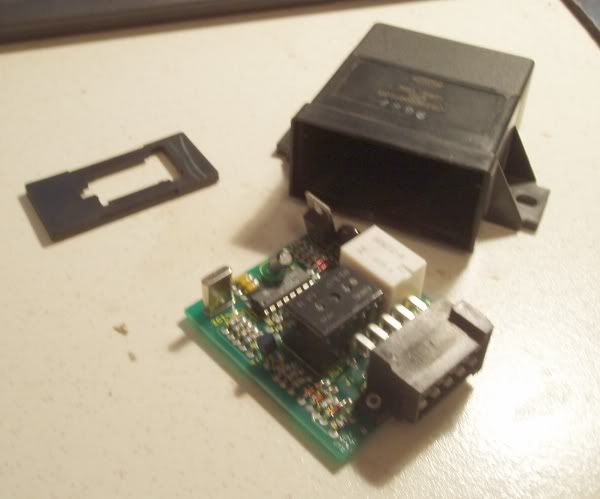
See the problem?

If not, look a little closer at the arrowed joints, particularly the top left one....
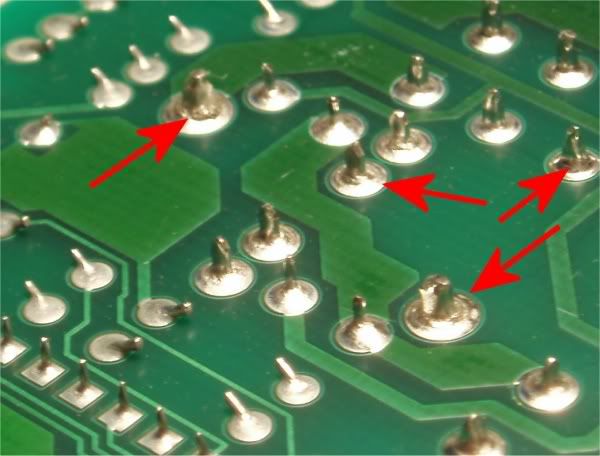
A less than perfect bit of soldering
 While you are in there, re-solder all the pins going onto the multiplug in the end, and all the pins going onto the 2 relays on the board, as any of them can go and I don't suppose you want to take it out again! The re-soldered article ready to go back together:
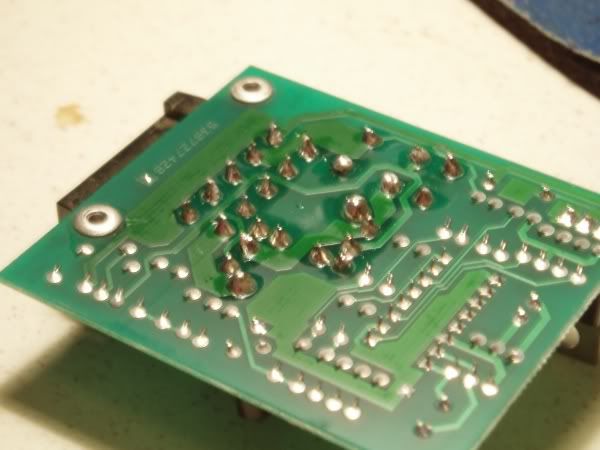
It can be much worse and more obvious than this, in extreme cases the tracks can be burnt away and you have to re-build the tracks joining the pins, which I do with fine solid-core wire, but even one that is only just starting to go is not hard to spot when you know where to look. Which is why it took me 3 months to find mine when it originally happened.... because I didn't
-
 3
3
-
-
I didn't destroy it, I just, er, "adjusted the geometry slightly"
-
The bad news (or good, depending on your view!) is that only admin can changer user titles on this forum software, moderators can't, so you'll have to ask Les or Geoff to do it
-
Humph
Actually I haven't broken it since before I went to England at the beginning of June
erm
actually come to think of it I don't think I've used it since before I went to England at the beginning of June...
anybody would think I had a reputation for buggering up ground anchors or something
-
I am up to bimbling around the countryside:


Godforsaken windswept freezing rock this is...
No idea why I live here really
-
It would be highly appreciated if folks would keep their image sizes down a bit generally, 600x450 is fine for most sorts of things on a forum and not everybody has broadband
 anyway if it doesn't fit on the screen then you can't see it anyway
-
Sort of dark green forces, yeah
-
Thought I might as well go the whole hog and change my avatar as well as my username B)
-
Hmmm well I ain't driving down there to say hello it's a bit cold for a Defender heater
-
What do you call "way down south" then?
-
Backup of what?
he he he
-
I reckon it's your fault Tony, Nigel was too busy winching you out

Oh well never mind. one of these days I might manage to get there for real....
Nigel's videos of the last two were excellent
-
Blimey, it's even quieter in here than in another Freelander forum I can think of
-
Did anybody do a video for this one?
-
Over where?
-
Me too, but anything involving credit cards (presumably including Paypal) is out for me at the moment as HSBC are so stupid they have managed to issue me 3 new credit cards in the last 6 weeks, 2 of them don't work and the 3rd one is waiting in a branch in Sussex for me to pick up which is about as useful as a broken Mitsubishi
Happy to post a good old fashioned czech to somebody though
-

Yep that seems to work B)
-
All of the above
-
Talking of look and feel
why don't we have new colour scheme
"GREEN"
:D Erm no then again perhaps something else, I've gone right off green lately. In fact I'm going to follow OrbitalPear's lead and go and spray my Discovery pink....
-
Thanks for doing this Geoff
I'm still turning round and round in my nest putting things in order but I'm starting to feel at home already
 )
)
 While you are in there, re-solder all the pins going onto the multiplug in the end, and all the pins going onto the 2 relays on the board, as any of them can go and I don't suppose you want to take it out again! The re-soldered article ready to go back together:

Welding Chequer Plate
in International Forum
Posted
It's very hard to find the special welding rods with the chequer pattern on