


BogMonster
-
Posts
10,920 -
Joined
-
Last visited
-
Days Won
23
Content Type
Profiles
Forums
Events
Gallery
Blogs
Posts posted by BogMonster
-
-
Not like that!

You can find the odd place in valley bottoms that has that sort of three-feet-of-freshly-recycled-sewage look about it - but you can usually drive round it! I can see why people were saying the other day when discussing the Ladoga, that the best thing is to carry half a dozen winch line extensions and forget about a ground anchor.....
I think if I had to paddle round in stuff up to my waist (or higher judging by some of those photos) I'd probably give it a miss, that's getting a bit too serious for me

I guess there must be something vaguely hard underneath though, or the vehicles (and maybe people) would just disappear
Good fun to have a go though, as long as you had:
1) a good washing machine
2) an immersion suit
3) somebody else's vehicle ... that you didn't have to clean before you gave it back

I was just thinking about the most appropriate vehicle to tackle it with and I reckon if you had a Bowler Wildcat with one of those jack thingys built into the belly, it ought to work a bit like a paddle steamer if you could modify it to "flap" a bit faster
The other thing about stuff like that is that it usually smells like **** as well as looking like it!

Very, very impressive pictures!
-
Just followed a link from ORRP to some pictures of the Ladoga here
They're mad!
It looks like they are trying to invade somewhere that is some sort of cross between a sewage farm and the Everglades....
Some superb pictures though
 rather a lot of large tyres in evidence too
 -
No time like the present....
-
Another Phoenix rises from the ashes ....
Edited out some of the "padding" BTW
Sadly I now have a Td5 chassis which is made of Bacofoil and far harder to do a proper job on

----
scl
A while ago, in response to a question, I said I would post some pictures up on what I consider to be the way to make a virtually indestructible rear towing point suitable for snatch recovery etc.
Note that this post only applies to pre 99MY Defender and 90/110 vehicles, later models (Td5 age onwards) have an entirely different rear crossmember, far weaker in its design, and need a different approach to make suitable for snatch recovery. You must also be absolutely certain that the rear crossmember of your vehicle is 100% sound.
To start with you need the following heap of bits:
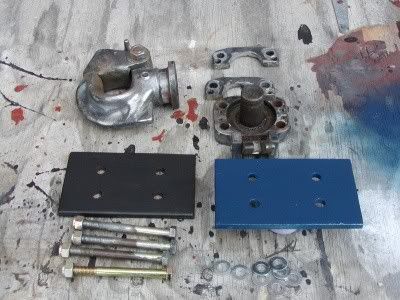
1 x NATO 4.07 tonne military spec towing pintle (shown here in bits, not all the bolts are shown in the picture)
2 x bits of good quality steel plate approx 190x110mm and at least 8mm thick
4 x M12 high tensile bolts, 8.8 grade or higher, nuts and washers to match
1 x Defender (obviously )
The above size of metal plate is as big as can be fitted in to the inside of the crossmember, which is what you need, as big as possible to spread the load. My bits were pre-drilled to suit a NATO hitch. I used 8mm steel plate and 8.8 grade bolts; to make it even stronger you could use 10.9 or 12.9 grade bolts, and thicker plate (although this is only really worthwhile for the inner bit) - you'll need longer bolts as well of course. It goes without saying that the nuts need to be the same grade as the bolts.
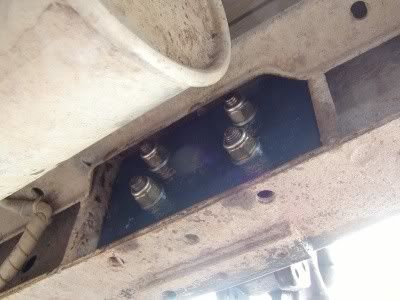
Fit the blue plate inside the rear crossmember. Why is it blue you ask? Because I had some Stratos Blue paint left over from my old 90 which I thought I might as well use.
Put the bolts through the NATO hitch, then through the outer plate (the black one in my photos) then through the crossmember, then through the inner (blue) plate, then some washers and finally nuts. I used Nyloc nuts but you can also use doubled up ordinary nuts locked together. Do everything up just tight at first to get it all seated in place, then wind the nuts up about as tight as you can get them with an ordinary combination spanner. You won't distort that bit of 8mm plate, and you really don't want them to come loose!
After this is all done, it is best to give the whole lot a good coat of paint. This will prevent moisture getting in - there was a lot of surface rust on my crossmember under the NATO hitch when I took it off, although nothing serious. I used some matt black brush on paint, which gives a finish I like for the crossmember and hitch.
The finished product from the inside:
and from the outside:
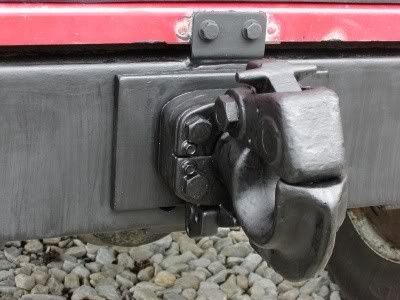
The function of the outer plate, for anybody who might be wondering "what is the point", is to spread any sideways forces generated on anything other than a straight pull back, and stop the crossmember distorting. Otherwise you can bend the crossmember slightly, then the bolts are loose and that's when large lumps of metal can start flying round rather too quickly to be healthy!
Now go and pull something ... but be wary of others because yours is probably now stronger than theirs which means if theirs isn't up to scratch, it'll be you getting the bumper round the back of the head
Always use snatch recovery with caution and preferably only if you know what you are doing, and know the other vehicles towing points are as good as this.
But if you manage to rip this setup out of the back end, you're either using a chain or trying far too hard! I know from experience that I can take off absolutely flat out in 3rd low difflock on the end of 10-12m of nylon rope and this won't even blink.
I hope somebody finds this useful!
Hybrid_from_Hell
Steve,
Absolutely spot on !....nice bit of work and info for many.
There is still the risk of the crossmember distorting, for even more bomproofness there are 3 holes under the bottom face of the Crossmember near the hitch....
(these are often used to mount drop tow units)...
If you drill and bolt onto this a large )5mm / 6mm thick) angle, then at the ends fabricate a mount, this can then be bolted to the mounting lugs on the actual chassis rails each side about 14 inch inbord of the back of the 90...
This way you in effect end up with a Triangluted frame between the Hitch and the chassis legs...
Depends just how bullet proof you wnat to go, but if you have those quiet moments !...........
Nige
scl
Nige,
Yes, there's a few ways of making it even stronger -- using a bit of U-section behind the crossmember instead of plate, doing what you suggest, or even going the whole hog and welding a huge bit across the whole back end between the chassis legs, and welding another bit onto the outside of the crossmember. Might need some heavier rear springs then though...
However, making it as I did it above, I know will comfortably stand any sort of pull that I will feel happy doing, bearing in mind the likely strength of most recovery points on most vehicles and my desire to prolong my existence.
Venturing into the sort of brutality that would twist a whole back crossmember with only a tow rope is definitely too close to the "death" side of "life or death" for me!
mark90
Stephen, you say M12 bolts for the NATO hitch, I've heard a few people say this. Are there different sized holes on some NATO's? I always used to think they where M14, when I fitted mine a few months ago M14 bolts fitted, and it is the stadard LR sized NATO hitch not the big truck version. The cross sectional area of an M14 is about 30% bigger than an M12 and hence should be about 30% stronger, so worth using M14 if they fit.
scl
I think they are normally fitted with either M12 or 0.5 inch, I don't know if I would have got M14s through the holes in mine, certainly the ex-military backing plates are drilled for M12s but I shall investigate - anything that makes it stronger has to be a good thing as you say, as the bolts are probably the weak (least strong!) point. Not sure where I might find an M14 bolt at the mo' but I'll have a scratch around.
The bigger NATO hitch (7 tonne?) has a different bolt spacing and AFAIK won't fit onto the standard holes in a LR chassis, so I think there is only one type that will fit easily.
MOG, sorry I missed yours first time around, happy for that but some other way of hosting the photos will be needed as the Photoisland links will expire in 3 months and at the moment I don't have anywhere to put them ... without the photos it would be of limited use.
western
The bigger NATO hitch (7 tonne?) has a different bolt spacing and AFAIK won't fit onto the standard holes in a LR chassis, so I think there is only one type.have a look here-- Dixon Bate Pintles
absolutly right, the next size up of NATO pintle is for fitting to trucks i.e. Bedford\LeylandDAF 4 tonners it's rated at 10 tonne, far to big to fit a LR's rear crossmember
Ralph,M3WRM, '89,110CSW-200Tdi\R380.
scl
it's rated at 10 tonne, far to big to fit a LR's rear crossmemberOh I don't know, if one was feeling ambitious!
On the M12 vs M14 question, I see the Dixon-Bate site says M12 fixing bolts. I can't find a loose NATO around to measure the hole dia, but the holes in the back crossmember of one of the 110s at work (1996 model 300Tdi) are only 13.5mm according to my calipers, and an M14 bolt is exactly 14mm. So I guess you could fit M14s, but you'd need to run a drill through the holes. Mark, I suspect your hitch may have been drilled out to accept the bigger bolts at some point? When I find a hitch that isn't attached to a vehicle I'll see if an M14 will go through. It's certainly possible and not a bad idea at all but it looks like it would need some extra work.
Also, on a Td5 age onwards, if you fit a NATO to the rear crossmember with the Land Rover "reinforcing" kit (not my idea of reinforcement but there you go!) you have to use M12s because the threaded holes in the chassis are that size. However new Defender chassis are not suitable for heavy use without further modification the back end is far too thin and easily bend even with the LR kit fitted.
Also on the Dixon-Bate site I see the tensile strength of the 4.07 tonne NATO is 22 tonnes. I think that should be sufficient! No wonder I have never seen one break...
... and no wonder they cost an arm and a leg to buy new!
mark90
M14 vs M12......
I don't think my NATO hitch had been drilled out to take bigger bolts, unless it was a very neat job, looked totally original and unmolsted.
Don't know about chassis holes as mine is not bolted direct to the chassis as it didn't have the NATO hitch holes, and being a galv chassis I wasn't too keen to drill it. So my NATO hitch is bolted to a 10mm plate which had 14.5mm holes drilled in for the hitch bolts, as I'd already checked M14 bolts will go through the hitch ok. There is then another 10mm plate behind this which acts as a spacer for the bolt heads (the bolts face backwards and are double nutted on the outside). Both these plates are then bolted to the crossmember using the existing holes, with backinbg plates behind. Looks like this.....
scl
Ah, didn't realise you were talking about a Series, now I see what you mean.
It appears that the M14s won't fit to a 90/110/Defender chassis then, without minor modifications. I'll probably stick with the M12s in mine as I haven't lost one yet.
Does anyone know the tensile strength of an M12 8.8 bolt? Just wondering how much is needed to break four off...
Silvio
The first digit indicates the traction resistance, in 100N/mm2: so an 8.8 has a traction resistance break limit of 800 N per square millimeter. The square section of a M12 bolt is about 84 sq.mm, so do your calculation. More significant is the second digit, which indicates the factor by which you find the limit beyond which the bolt is irreversibly stretched and begins yielding: in the case of a .8 bolt, this factor is 0.8, so take the 800 N/sqmm and multiply it by 0.8, you'll get the safe extension limit, that is 640 N/mm2.
In a 12.9 bolt, the break limit is 1200 N/mm2, the extension limit is 1200 x 0.9, that is 1080 N/mm2.
Everything clear?
scl
Hmmm.... ok but I make the cross section of a 12mm bolt about 113mm2 - IIRC from skool, area is pi.r2 ie 3.142x6x6=113?
So it would be 113x800x0.8=72320 which I think should be 7232kg? So four of them should be about 29 tonnes which I think ought to be strong enough
Thanks
Silvio
No Steve, you cannot calculate the section out of 12 mm, and so 6x6x3,14 (radiusxradiusx3,14): you must consider the depth of the threads, which are cut into the bolt and reduce its useful section: and in fact the actual section depends on the thread used, and varies slightly, for M 12 with 1,75 thread is 84,3 sq.mm, with 1,5 thread is 88,1 sq.mm.
Everything clear?
scl
aaargh! Too complicated!
But, that will still add up to around 21.35 tonnes tensile strength across all four bolts, which should still keep it in place as the tow rope ought to break at about 12 (24mm nylon), and I haven't snapped one of them yet...
-
I think it might have been available as a genuine part ... seem to remember seeing it in a parts book once upon a time. I'll have a look some time (don't have a book at home) if nobody else does before me.
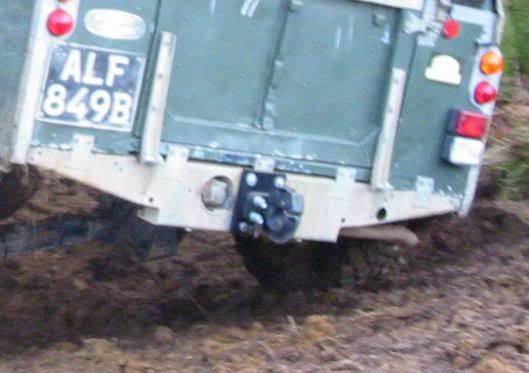
Somebody on here posted a photo of one on the old place, might have been Tonk? a pic of a NATO hitch attached to the back of a Series chassis, it was on the "bomb proof snatch tow point" thread I started which I just realised was one I forgot to save
Edited to say I just remembed I had it saved somewhere from ages back, it was a photo posted by Mark90 of a NATO hitch on the back of ALF.
I'll post the whole thread back up when I have time to sort out photo links etc ... another one escapes the evil clutches of the Green Reaper
-
Neither would I Nige, but them be the two choices in a Land Rover accessory brochure (well there were three in the brochure but I pointed out that the X6000 wasn't strong enough to break a bit of soggy bog paper so that option went straight out the window...)
-
I never got an LRE one
must have had a premonition of its impending demise
-
When I got some from David Bowyer, looking at the "published" strengths I thought 9mm would be plenty but he recommended 10mm for both my Milemarker (10500lb pull) and a couple of bits that were going on XD9000i's so I guess I would have to say 10mm.
-
As the main reason i want a winch is to get me out of carp in the middle of Aus , when i will be miles away from anywhere. And i mean mile and miles. So the last thing is the winch not working
Dare I mention the M-word?
The reason I got what I did was pretty much exactly what you said ^^^
-
We've got a little way to go before we catch up with Pirate 4x4 though
Threads: 290,773
Posts: 3,482,811
Members: 52,429
Most ever online: 1298!
Quite a site, not really looked at it before
-
If you had the choice between a Warn M8000 and an XD9000i for a Defender, which one would you choose and why?
I know the XD9000i fairly well, not that fond of it personally as they don't seem very waterproof, the freespool lever seizes up and so does the brake, but otherwise it seems OK
 but I know nothing at all about an M8000 apart from that it presumably pulls 1000lb less (before somebody points that out
  ) just wondering if it was good, bad or rubbish?
Not for me BTW, my Milemarker is staying right where it is! just after some pros/cons for somebody else.
Ta
-
If you do go guard, you have to ensure stones cannot get between the tank and the guard, or they will grind holes in the bottom of the tank.
That sort of thing is a problem here with a lot of use on gravel roads, and especially with plastic fuel tanks like the Discoverys have! I have not decided what I am going to do on the 90 when my tank guard arrives next month, but I'll have to do something to prevent it as the newer 90 tanks are plastic too. Will probably have a look and see how it fits, I don't like the idea of foam due to the fact it will hold water in.
The other thing LR never thought of is stones in bluddy cat heat shields
 my Discovery gets lots of little stones building up in the heat shields around the cats and they make a hell of a racket jingling away inside the tinny heatshield, if I wanted my Discovery to sound like a stone crusher I'd have bought a Td5 quick blast of compressed air gets rid of them but I keep having to do it.
 -
Oxyacetylene
-
I was just about to post to beware because somebody had ****ed up theirs messing around with it and had to tell porkies to their dealer but you saved me the job and reminded me who it was
-
On current Range Rovers and Series II Discoverys, the autobox is sealed for life and needs no servicing.
Don't agree with that. It is not much more difficult to change than on an older one, mine has already been changed once and having seen what comes out of the box at 24000 miles I will be changing it every 12k from now on! "Sealed for life" on anything is only a guarantee that the life will be somewhat shorter than it might otherwise have been
Draining is obvious ... to refill it (and it isn't sealed for life, though the service schedule says it should only be changed once at 24000 miles and then that is it) you take out the filler plug, fill the sump to the level of the filler hole, then put somebody in the vehicle and start it up, cycling it from PRND321 and back again while you continue to pump oil in the hole. When it has got enough you won't get any more oil in because it will start to run out the hole ... simple as that. Put bung back in and stop engine. Messier than filling it through the dipstick tube on the old one, needs 2 people and a lot easier on a ramp, but that's it.
You can change the filter on the S2 boxes as well, same sort of thing as the old ones, take the sump off and it's there on the bottom of the box.
-
considering fitting a water separator on my diesel, why do discos have em but defenders dont?
are they worth it?
All the Tdi Defenders here have a sedimentor bowl which I think also acts as a water separator, but the Discoverys don't have it AFAIK... might be wrong though (my last two Discoverys have both been V8s)
In our Defenders it is in the rear wheelarch, where the fuel filter is located on a Td5 Defender.
I can get a p/no if required but it is probably the same unit as the Discovery if those have them fitted in some countries - an alloy housing, and a removable bowl in 2 parts with a drain screw in the bottom.
-
Polybushes tend to break up quite quickly, but rubber will degrade more gently.
[cough] not buying polybushes then

I have got some good ones Nige, unbeatable articulation (especially when the shocker comes right off which would have been about another week I think) do you want me to get a full set from my local supplier
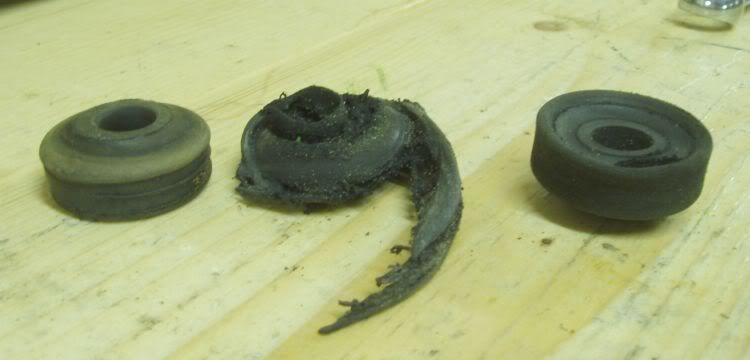
I can let you have the first couple quite cheap ...
edited to add ... I think the one in the middle must have been some sort of polybush ... wasn't rubber anyway!
-
Blimey Dave you must have a big garage
-
Not any more! 4 x genuine bushes sorted the problem. Others were rubbish, I found earlier on that you can tear them with your bare hands, might as well be made of plasticine...
Now all I need to do is get rid of all the transmission backlash and I'll be happy
O what it would be to be not a fussy barsteward and not have such trivia drive me up the wall
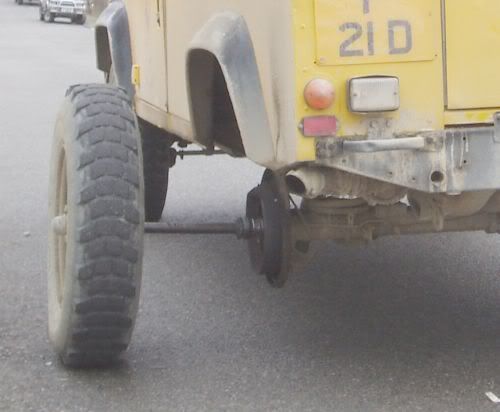
Back to the subject of this post, I hate to think what sort of noise those wheel bearings must have been making by the time it had mangled itself up enough to come right out over the retaining nuts! When I first saw it I thought the nuts must have come undone but they were still there - a few £ to put that right I reckon (new stub, w/brg, hub, seals, lock washers....)
-
Many will say there is nothing wrong with it but personally I prefer coils as if it is broken you can see what is wrong and when you have fixed it, you have fixed it!
If I bought one with SLS I would be inclined to leave it for as long as it is working OK and rip it out when it goes wrong. Not sure but I expect you can get "de-airing" kits like you can for the P38 RR, a thingy that fools the SLS into thinking it is at the right height so all the warning lights stay off when you change the springs.
-
Somebody just sent me this by email ... sounds quite familiar
OIL CHANGE INSTRUCTIONS FOR WOMEN:
1) Pull up to Jiffy Lube when the mileage reaches 3000 miles since the last oil change.
2) Drink a cup of coffee.
3) 15 minutes later write a check and leave with a properly maintained vehicle.
MONEY SPENT
Oil Change $20.00 Coffee $1.00
TOTAL $21.00
OIL CHANGE INSTRUCTIONS FOR MEN:
1) Wait until Saturday, drive to auto parts store and buy a case of oil, filter, kitty litter, hand cleaner and a scented tree, write a check for $50.
2) Stop by 7-11 and buy a case of beer, write a check for $20.00, drive home.
3) Open a beer and drink it.
4) Jack car up. Spend 30 minutes looking for jack stands.
5) Find jack stands under kid's pedal car.
6) In frustration, open another beer and drink it.
7) Place drain pan under engine.
8) Look for 9/16" box end wrench.
9) Give up and use crescent wrench.
10) Unscrew drain plug.
11) Drop drain plug in pan of hot oil, splashing hot oil on you in process.
12) Crawl out from under car to wipe hot oil off of face and arms. Throw kitty litter on spilled oil.
13) Have another beer while watching oil drain.
14) Spend 30 minutes looking for oil filter wrench.
15) Give up; crawl under car and hammer a screwdriver through oil filter and twist off.
16) Crawl out from under car with dripping oil filter splashing hot oil everywhere from holes. Cleverly hide old oil filter among trash in trash can to avoid environmental fees. Drink a beer.
17) Buddy shows up; finish case of beer with him. Decide to finish oil change tomorrow so you can go see his new garage door opener.
18) Sunday: Skip church because "I gotta finish the oil change." Drag pan full of old oil out from underneath car. Cleverly dump oil in hole in backyard instead of taking it to be recycled, and avoiding environmental fees.
19) Throw kitty litter on oil spilled during step 18.
20) Beer? No; drank it all yesterday.
21) Walk to 7-11; buy more beer.
22) Install new oil filter making sure to apply a thin coat of oil to gasket surface.
23) Dump first quart of fresh oil into engine.
24) Remember drain plug from step 11.
25) Hurry to find drain plug in drain pan.
26) Remember that the used oil is buried in a hole in the back yard along with drain plug.
27) Drink beer.
28) Shovel out hole and sift oily mud for drain plug. Re-shovel oily dirt into hole. Steal sand from kid's sandbox to cleverly cover oily patch of ground and avoid environmental fees. Wash drain plug in lawnmower gas.
29) Discover that first quart of fresh oil is now on the floor. Throw kitty litter on oil spill.
30) Drink beer.
31) Crawl under car, getting kitty litter into eyes. Wipe eyes with oily rag used to clean drain plug. Slip with stupid crescent wrench tightening drain plug and bang knuckles on frame.
32) Bang head on exhaust manifold in reaction to step 31.
33) Begin cussing fit.
34) Throw stupid crescent wrench.
35) Cuss for additional 10 minutes.
36) Beer.
37) Clean up hands and forehead and bandage as required to stop blood flow.
38) Beer.
39) Beer.
40) Dump in five fresh quarts of oil.
41) Beer.
42) Lower car from jack stands.
43) Accidentally crush remaining case of new motor oil.
44) Move car back to apply more kitty litter to fresh oil spilled during steps 23 - 43.
45) Beer.
46) Test drive car.
47) Get pulled over & arrested for driving under the influence.
48) Car gets impounded.
49) Call loving wife, make bail.
50) 12 hours later, get car from impound yard.
MONEY SPENT
Parts $50.00
DUI $2500.00
Impound fee $75.00
Bail $1500.00
Beer $40.00
TOTAL -- $4165.00 BUT YOU KNOW THE JOB WAS DONE RIGHT!
-
Best one around IMHO is the Rebel 4x4 metal A-bar in black, an exact copy of the Genuine Parts one but a wee bit cheaper.....
I tried to fit one on mine to hold the lights up out of water etc the other day but it's going to be more hassle than I thought (the mounting holes clash with important bits on the winch mount) so I haven't done it yet
-
I imagine that is probably what they said when it happened
Actually they were military so it was probably a bit stronger than that
Here's another one
-
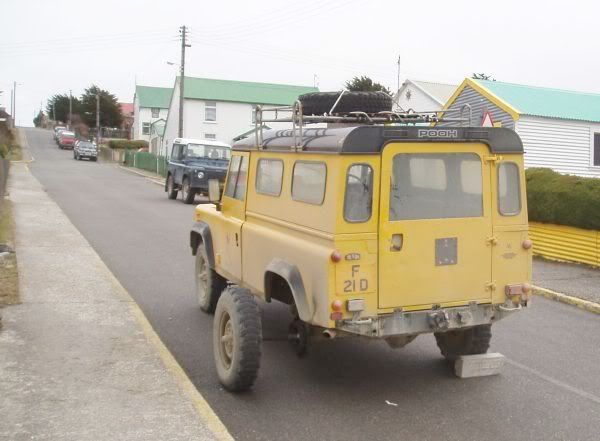
Out driving round in my now "clonk free" 90 this morning, turned a corner and found this, PMSL
oops!
moral of the story: check your wheel bearings more often than this! wheel brg had siezed and mangled itself into a pulp then the whole lot had mangled its way OVER the lockwashers and nuts (they were still on there) and proceeded in an outward direction, now held on only by the halfshaft just sticking into the end of the axle casing!
Bluddy dangerous if it had happened at speed, but made for a good pic because nothing serious happened


 but I know nothing at all about an M8000 apart from that it presumably pulls 1000lb less (before somebody points that out
  my Discovery gets lots of little stones building up in the heat shields around the cats and they make a hell of a racket jingling away inside the tinny heatshield, if I wanted my Discovery to sound like a stone crusher I'd have bought a Td5
What Size Plasma
in International Forum
Posted
Life size picture eh?

That's a very good price, when/if I need any more I'll be after some from you
how much do Scrap Iron sell it for? my Dyneema (10mm) ex DB was quite a bit more than that even with the modest discount for buying 3 bits!