


Vogler
-
Posts
102 -
Joined
-
Last visited
-
Days Won
5
Content Type
Profiles
Forums
Events
Gallery
Blogs
Posts posted by Vogler
-
-
This is exactly why I used the Tef Gel and plastic seals between the components, so I'm not really 'throwing stainless around'. Anyway, if I'm not mistaken most parts concerned are steel (bulkhead, doors, hinges) since it's a 2nd gen Td5 (except for the body at the rear door hinges)
I didn't know about stainless being brittle though, but I don't expect the hinges of the doors to be under thát much stress.
Joris
-
YRM also have an assortment of plastic seals and tapes to isolate parts from another. I recently replaced rusty door bolts by stainless ones, added yrm plastic seals between the hinges and body and applied tef-gel, which should prevent galvanic corrosion and is resistant to marine environments.
Silly expensive stuff, if you do a search here you'll likely find similar products.
Joris
-
Not as heavy duty as what you're aiming for, but I fabricobled a Thien baffle much like the one in the YT film below when I had a lot of sawing work to do in our apartment. I hooked my circular saw to a workshop vac with the thing in between, and it worked surprisingly well for basically just two buckets and some drain piping.
-
I hope I'm not veering too much off topic, but what are/were the symptoms?
Joris
-
Oops, it should have been addressed to Snagger! My apologies!
J
-
@Snagger Looks nice; do you have any pics of the finished project?
@Dfndr I'm curious to see the current and future shape of your project too.
A bit Off Topic: Having a HT for travel myself, I'm not too sure if its the ideal type, we always find ourselves dancing around each other at the rear door, mostly because the stove is on a fold down table at the door. I have changed the windows by gullwing types of Explore - this post made me do a write-up in the International forum.
Always curious to see how others customise their HT, I really like this one
Joris
-
A topic of a poster adapting his hardtop tub for overlanding led me to this write-up of the replacement windows I put in our 110.
It's been over a year since I replaced the horrendous truck cab windows of our Td5 Hardtop 110 with gullwings. I liked the look of the original windows, but I finally had enough of the cheap and fragile plastic latches and sliding windows that took a fight every time we wanted to use them. A reason not to open them often prevailed...
The Explore glazing windows are AFAIK the only truck cab-sized gullwing replacements. Regrettably they weren't available in clear glass so I opted for the lightest available grey ones. It's darker, but its not too conspicuous from the inside.
The holes had to be enlarged slightly - a couple of mm's above and below. Without windows the flimsiness of the body is abundantly clear...


The holes of the windows unfortunately don't correspond, and some overlap which is a bit annoying. Basically the screws seem to be an installation aid, whereas glue is the fixing method. I opted to add an extra pair of screws in the horizontal parts of the frame.
I used industrial grade Sikaflex 552AT to glue it to the body. The choice for 552 turned out not to be optimal, I should have used a more fluid variant. It slightly buckled the body since there was less compression far from the screwed connections. Ideally I should have used a frame on the inside. An instructional video has been on the website of Explore since I installed the windows, there it is clear that a much more viscous product is used.
There were two minor issues with the windows:
- one of the gas struts leaked.
- the hinge points for the gas struts were too close te one another, and bent outward the first time I closed the windows. That in itself wasn't really an issue, but it made the gas struts come closer to the frames, due to which they tended to pull out the rubbers.
I contacted Explore, they admitted that the holes were probably made with measurements for the SW variant. Since they were glued, replacing wasn't an option, so they immediately sent new hinge points, screws and a quality thread cutting tap along with a new gas strut.
Ever since I have been really happy with the windows. They weren't cheap, but the gain in quick acces is a real pleasure and gives sooo much more flexibility when camping. Access is not only quicker, but now the complete window surface opens, and not only half of it.


They also aren't as draughty as the original ones and don't protrude from the body.

I also appreciated the lack of the vertical line in the middle, they feel like they give a more clear view from the inside.
Only downsides compared to the sliding type, is the fact that you can't open or close the latches from the inside, and that they're at forehead height (eye height to some) when open, but that's most likely inevitable due to their geometry. I did bump into them a couple of times.
Greetings,
Joris
-
 4
4
-
-
A late reaction, but the rebuild of the front diff and transfer box took a while due to CoVid and replacement parts not up to specs.
We recently took our Td5 on a club trip to the Marquenterre dunes, first outing with an ATB in both front and rear axle. The difference is impressive, lots more grip in the loose sand, some difficult slopes were taken with remarkable ease. If you're often on loose terrain, they're certainly worth it.
The steering tends to pull towards the centre slightly harder than before. That took a bit of getting used to, initially I thought something was wrong with the power steering. But once you're 'recalibrated', the presence of the ATB's remains unnoticed in ordinary traffic.
Joris
-
2
-
-
Looking at the most expensive part, it seems that the stub axle was cheaper than retail price for a genuine LR one. Price starts at £335 according to https://www.lrworkshop.com/parts/FTC3154. (Maybe VAT accounts for the difference? Don't know about UK VAT)
Most expensive OEM version is £75.
J
-
Ah, I see. I'm afraid I have to disappoint you here...

-
3 hours ago, Snagger said:
Indian engineering to a tee.
I'm not a native English speaker, unfortunately I can only try and guess what you're saying here. I assume that a similar expression would include 'anorak' 😉 ?
1 hour ago, Bowie69 said:Holy thread revival batman
Agreed, but still thought it was the appropriate place.
-
On 9/22/2014 at 8:54 AM, Hybrid_From_Hell said:
But, if your going to have a go, then you may need this list to find the shim you need to get to 0.0 on pinion heights, most (not all) are still available from LR
DO NOT BUY NON GENUINE SHIMS FFS !!!!!!!
Given HfH's advice in capital letters, it's probably a no brainer to use original shims. But which parameter is of most importance? Toughness or thickness?
Here's why I'm asking:
During the rebuild of my front diff and LT230, I've noticed that Land Rover shims are significantly harder when compared to Ashcroft's shim kits. If you need a couple of goes in determining shim sizes and need to drive out the bearing race by punching on the shims (mild steel drift, used if press was impossible), the Ashcroft ones become squashed and bent, whereas the original ones come out of it almost unscathed.
My plan was to determine shim sizes using the kit, and replace them by original LR ones to finish the build. But LR seems to have let go any ambition of delivering quality items. Why build to certain tolerances if you can build to intolerances? 🙄 2 out of 3 shims ordered, with LR picking labels and in LR packaging, were out of spec:
- The front diff pinion height shim should have measured 2,255mm (0.0886", thickest one available). The contraption that came out of the original LR package measured 2,195mm to 2,245mm within a quarter circumference (0.0864" - 0.0883") . So it wasn't only thinner, but also saw a 0,05mm/2 thou difference. I thought of ordering a thicker one and have it machined, but a thicker size doesn't seem to exist and with these 'tolerances' I'd hesitate to stack.
- The same order contained a fixed length tube for the intermediate gear of the LT230. IEJ500180 should have been 58.75mm, but measured 58.82 - that's 3 thou over size.
*rant mode on* How on earth can one do a proper rebuild if ordering correctly sized shims becomes a gambling game? *rant mode off*
In defence of the Ashcroft shims: their thickness is faultless. A stack of three different shims saw a variance of 0,01mm (0,0003"), which might have been due to oil in between. Has anybody ever had issues with Ashcroft shims?
Joris
-
There's a power spec kit waiting to be installed here. I asked LOF's advice for an overlander Td5, specifically mentioning our experiences with heavily corrugated roads, and the power spec is what they suggested.
They responded quickly, Luke seems like a nice chap.
I did express my doubts about risks of a single mass flywheel. They have the answer on their blog here.
It must be noted that they're defending their own products of course, but the explanation seems legitimate.
-
A local club member I talked to a couple of years ago spoke highly about Castrol Transmax Z (Td5, R380). I see it being referred to in African context (SA) too.
He used it during a Morocco trip and gave feedback after 5k miles. Cold nights, hot desert days, steep climbing, and long distance highway traffic. He said the gearchange was like butter, and the box was more silent and significantly cooler.
To be honest I would be reluctant to chanhe from MTF based on this info only, but who knows it might help...
Joris
-
You will also have to undo the bracket that holds the brake line in place, which means undoing bolts of the top swivel bearing. These are open holes, so anything which falls into them ends up in the swivel grease/oil, clean well before you undo them.
When you undo these bolts, the tension on the swivel bearings is undone which means that the hub will have a lot of play and that swivel grease will leak from the bottom of the ball. If you have a second pair of hands, ask them to pull the hub outward, so you keep the large swivel oil seal tightened to the ball. Best to have some one shot available since you might need to top up.
IIRC correctly, the 12 point bolts are size 14. I invested in a folding ratchet spanner which saved a lot of time. The bolts look flanged, but it actually is a ring.
I suggest having available some 12-point replacement bolts for the brake calipers and the stub axle (different size), a pair of stub axle oil seals (the ones which the drive shaft goes through) and one shot grease.
While you're at it, install a magnetic drain plug in the diff housing, this is the same as in the LT230, or order extra strong ones at Nigel's.
Good luck,
Joris.
-
Western, you probably didn't get the complete link <- this should do it
It's the 3rd edition, of 2000, Publication Part No. LRL 0081ENG, where it is written in capitals and in colour not to use a crush tube.

I have recently read or heard mention on one of the Land Rover related YouTube channels that Ashcroft use collapsible tubes in all their LT230 rebuilds.
Greetings,
Joris
-
7 hours ago, FridgeFreezer said:
MAGNETIC DRAIN PLUGS!
Coulnd't agree more. Three front crown wheel bolts of our 110 broke and chipped some teeth. The drained oil showed nothing but literally one tiny single flint, despite the presence of plenty of shrapnel in there. With magnetic plugs I wouldn't have suspected and disassembled the LT230.
11 hours ago, oneandtwo said:shift dog with enlarged splines,
Out of curiosity: who supplies these?
2 hours ago, western said:Amazing that all teeth survived. Have you had the opportunity to check the condition of the intermediate shaft holes yet?
Greetings
Joris
-
Thanks for confirming this Dave! Based on the fact that you prefer machining the diff, I presume that the thinner crown wheel is not the best choice.
Yesterday I was about to order your 4-pin diff but I think it's better to see how deliveries fare in the CoVid panic that has been soaring since...
Anyway - that gives me some more time to contemplate between an ATB or an open diff. Unfortunately I won't be able to afford uprated CV's at the same time and I have the impression that an ATB with standard CV's poses more risk of breakage than an open diff.
Joris
-
I'm currently facing the same questions regarding the front diff, only a couple of weeks after having contributed to this topic. First thought it was the LT230, but it turned out to be the front crown wheel bolts that had gotten loose and broken off, so I'm currently rebuilding the transfer case and the front diff 😀😀
A local club member told me that a specific crown wheel allows fitting a P38 4-pin in the front. He's knowledgeable, likes offroading and has worked for LR, so I got confused since it is being told everywhere that it's not possible without machining the diff. Then I found Ashcroft saying the same on this very forum.
On 1/4/2007 at 2:31 PM, ashtrans said:you can fit the P38 4 pin diff centre and bearings to a normal rover diff if you use a different crown wheel and pinion, TBH100050, it is thinner to allow for the different 4 pin diff flange face position,
Thought it's worth mentioning since I haven't found it anywhere else, I presume that this crown wheel is too thin, although it was used in the early 90 V8.
Also: the man quoted above advises to use Loctite 270 and Allen bolts (12.9) for the crown wheel.
J
-
On 2/22/2020 at 12:33 PM, FridgeFreezer said:
These are frickin' brilliant and I'm very jealous of your photographic skills!
Thank you, I'm quite surprised by the results myself TBH....
On 2/22/2020 at 3:07 PM, western said:Super photo's would look great printed on glossy photo paper & hung on garage wall.
I spent some time looking into that today, it might be possible. The site where I keep my photos can enable visitors to order quality prints through a UK company. Never looked into it before, I should do some more research before setting this up. If people are interested I can look further into it.
The images are fairly hi-res and prints up to 30" would still look OK, the water marks wouldn't end up on the hardcopies of course.
The larger part of today was spent on further tweaking the photos and making some variants, I'm quite stoked with these 😃

and a slower gif 😉
Greetings,
Joris

-
3
-
-
And the whole contraption with the input and intermediate gears:
J
-
4
-
-
Here's the update on the layered image. This time I also included the bearings:
Greetings,
Joris
-
3
-
-
Good that you like it.
The R sure looks different, thanks for posting that photo! It seems to have considerably larger holes to let oil into the diff carrier.
Mads, it didn't look as sparkly when I opened the casing, it was more like the land of Mordor covered in black sticky oil. The last year I did seem to notice more heat coming from the gearbox tunnel.
I also made a gif of the diff gear, with an Ashcroft cross pin. Stupidly I forgot to include the copper shims in the pics.
The shims were completely gone when I disassembled the transfer box. One can see the circular scratches that the satellite gears made due to the absence of shims.
Greetings,
Joris

-
2
-
-
- Popular Post
- Popular Post
Hi all,
I'm currently rebuilding the LT230T 43D of our Td5 Defender after an issue in the transmission which eventually turned out to be in the front axle. Fortunately I enjoy doing this - I've always wanted to do a gearbox and I can honestly say that it is the best way to learn how it works and how to treat it.
I also took the opportunity to make some photographs. Initially because the thing looks very nice - it's almost a pity to have to hide it in the casing - but I also realised that I have never seen comparable images. I intended to post these images later because some things should still be improved, but since a member is currently experiencing issues with his CDL, I figured that I already should post what I have. Presumably a lot of forum members know how it works, but for the others I'll try to explain a bit. Feel free to correct or add.
Please mind that I have invested quite some effort in making these - so respect my copyright.
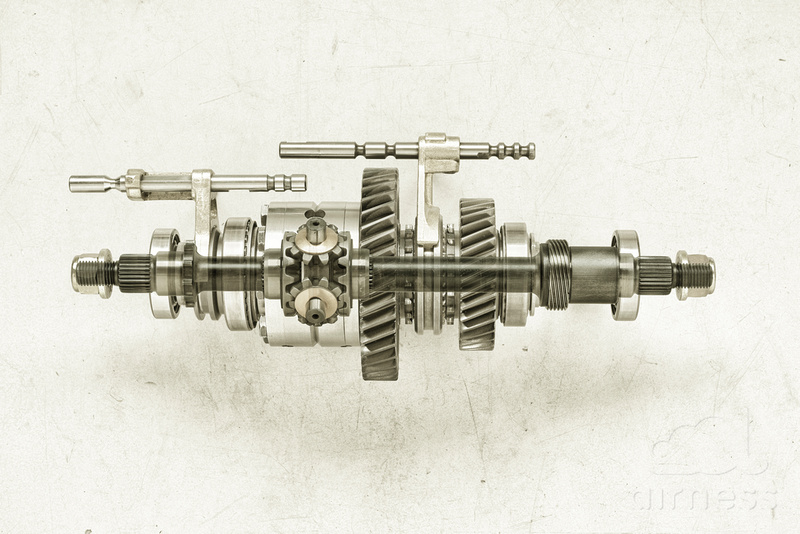
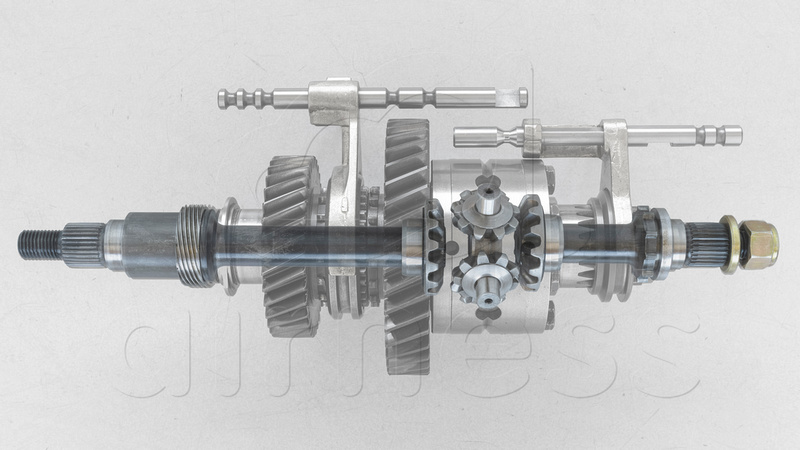
This is the complete centre differential with shifting forks and output shafts:

Here the forks are removed:
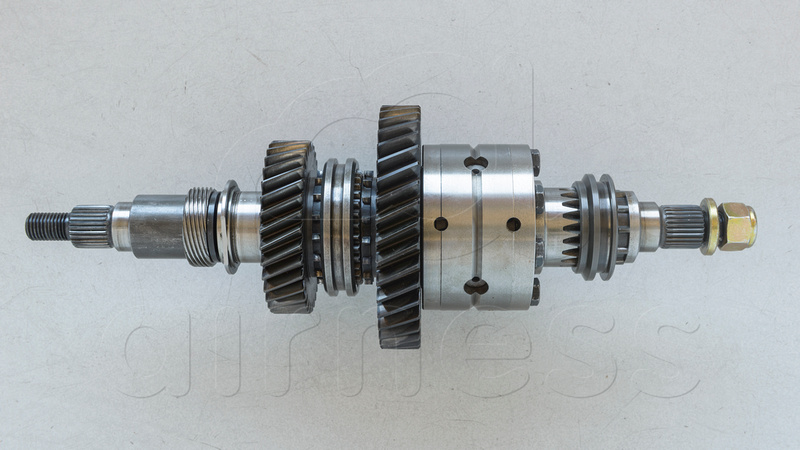
and now the output shafts too:
The large cylindrical volume is the diff carrier which houses the differential gears.
The two large gears are the high gear (smaller) and low gear (larger). They each freely rotate on the shaft and as long as the main gearbox is in gear they're driven continuously by the input shaft through the intermediate gears which are not shown.
The set of small teeth with large distance between them - dog teeth - are each part of the large sprocket:
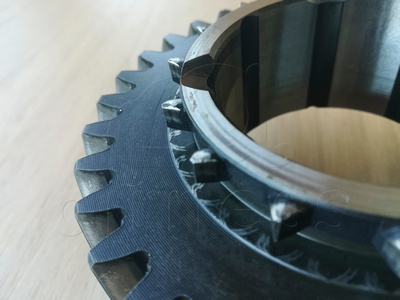
In between the dog teeth one can see a more finely splined part with a large grooved ring around it - the high/low gear selector ring.
The splined part is fixed to the differential housing, and by shifting the selector ring over the dog teeth of one of the gears, that gear will take the diff housing along in its rotation.
In these pictures the ring is between the two large sprockets, so the LT230 is in neutral. If the R380/LT77 would be in gear with the engine running, only the two gears would rotate - the diff housing wouldn't.
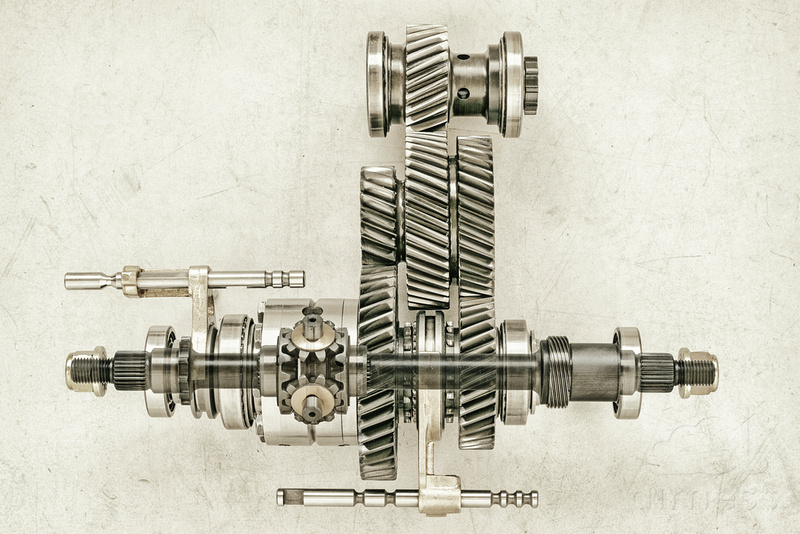
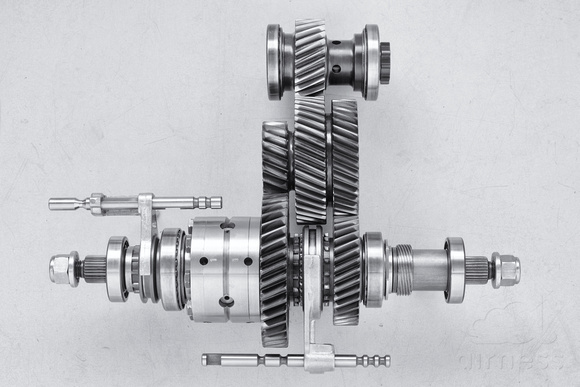
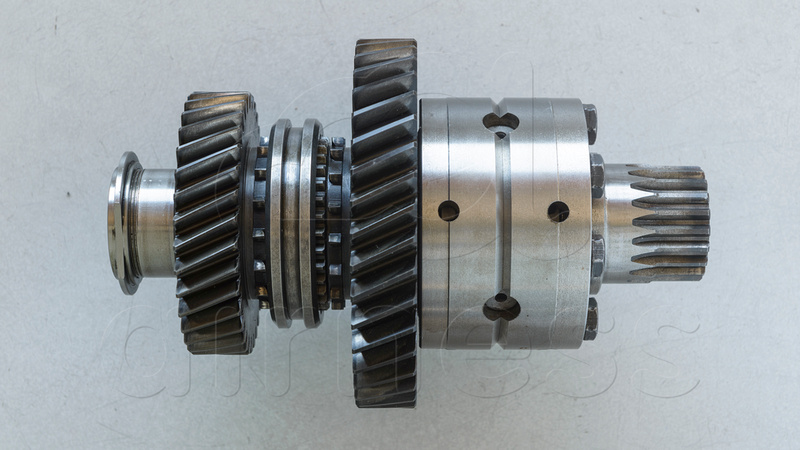
In the following pictures the assembly is positioned the other way round - left and right are switched (one of the reasons I want to remake some of the images).
Half of the diff housing is removed, one can see the actual differential.
On the left is now a smaller ring over the splined end of the diff carrier. That's the diff lock selector.
Again, you see a set of dog teeth, this time they are part of the output shaft (you can see the shafts below). The shafts can rotate freely, so the small differential gears can do their work in compensating any differences in rotation of both axles. So diff lock is off.
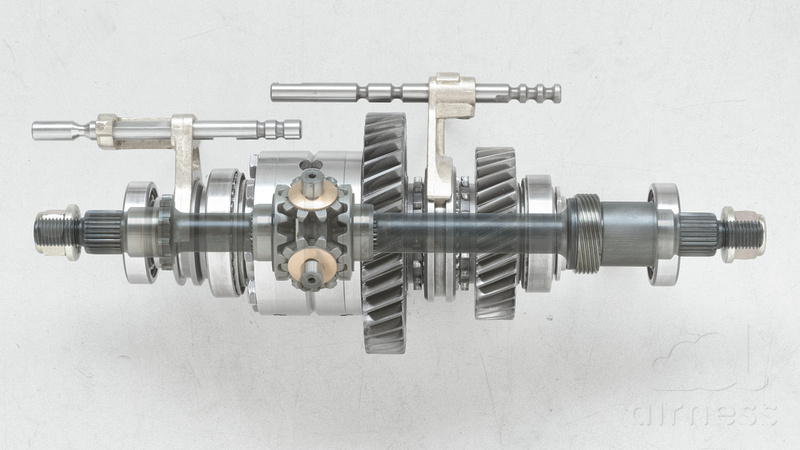
Here the diff lock selector has moved over the dog teeth. The shaft is now connected to the diff housing. None of the parts can move or rotate in relation to one another - everything is connected as if it is one piece, so diff lock is on:

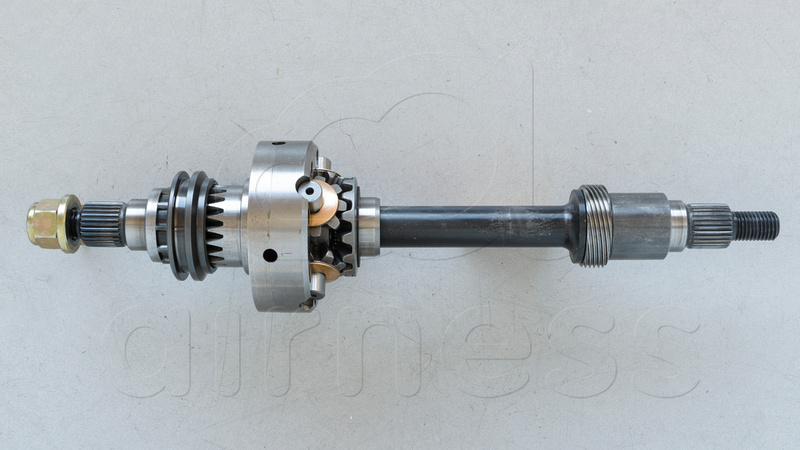
These are just the output shafts and diff gears. You can see the dog teeth on the left. The spiral at the right drives the speedo cable.
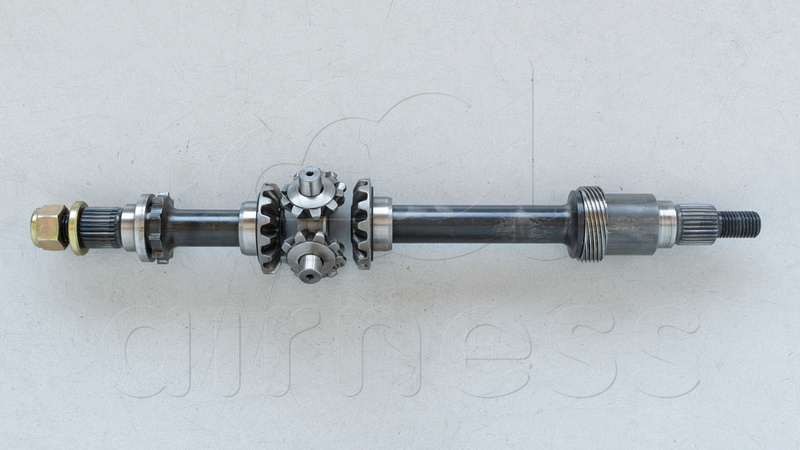
And here they are relative to the whole assembly (although the gears should be meshing, the main reason why I want to remake the series).
Hope you enjoy it and that it can help some people.
Greetings,
Joris
-
7
-
 3
3


Diff Center Change - Question
in Series Forum
Posted
I wouldn't be too sure about that. I recently have rebuilt the front diff and LT230, and have noticed several times that new bearings result in differences. I had to replace the pinion so I couldn't compare the effect of new bearings. However, measurements changed in the LT230 which is quite a comparable situation given the fact it also has tapered bearings.
Make sure to properly loctite the crown wheel bolts with loctite 270. I also used allen bolts with Nordlock rings. The Land Rover bolts (FTC5150) tend to 'eat' their way into the steel, resulting in play and eventually breakage. This was the reason for abovementioned rebuild (Td5 100k miles, after a holiday with lots of corrugations).
Greetings,
Joris