


JST
-
Posts
6,352 -
Joined
-
Last visited
Content Type
Profiles
Forums
Events
Gallery
Blogs
Posts posted by JST
-
-
£10 + postage - which could be an interesting amount due to size!!!! shall i investigate?
are you going to 7Ssisters?
-
Well i was tired and had a typo 5 instead of i, but i tshould prove good info for those looking at td5 ones.
does anyone have the part number for the LR tdi rev counter?
low tension web site i can't get to work.
any other suppliers?
i seem to remember Warwick Banks doing them in the past, are they still around>?
-
can anyone recomment a good supplier,
52mm type please to run off the 'W' connector
-
Sory forgot to add its missing the radiator cowling as well - i have one if your interested feel you need it. (i rmove dit when elettric fans were fitted)
-
OK i am thinking of making a dash for the centre similar to Si Whites (tit for tat on copying!)
so dials etc was thinking
drivers dash - rev counter, coolant temp then 1 spare (suggestions)
centre dash (assuming room for 3)
fuel, voltmeter, plus one spare.
what would you put in the spare ones? clock is an option as i currently have one to fit although time is on the stereo so not a great issue.
oil temp? g/t/u box temps? oil pressure? EGT? turbo pressure?
what would be the most useful and would actually tell you something that you could do something about?
-
Southdown do a demountable front or rear connect winch system - worth dropping him a line - mention my name for the link as i dont think he does them as std.
Frogs island do a demountable system based on cl2 reciever system front or rear.
in fact.... i have one of theirs for sale currently with chassis mount for front. i ran an xd9000i (Warn) in it front and rear and no probs even challenge comps. just need to be weary of acute pulls. see classified for mine for sale , at the minimum theres pics there to give some idea of it.
if i knew dave (southdown) did them before i got mine i woul dhave gone through him, IMHO a stronger setup.
-
Scott i will be leaving home about 11 i expect so after then!!!!!
i cant go any earlier as i wil be up on the Quantocks early doors doing a bit of phys.
red 90 i intend to be in if the misses isin't taking it (that way i cant be 'persuaded' to enter!
-
its a disco 200tdi
green parts as mentioned - cap and dipstick
no serpentine belt
turbo below inlet manifold = disco type
ref the snorkel i would go with the previous suggestion of just undoing the current hose if it has one on the air intake housing and adding the one that comes with the snorkel straight onto the air filter housing.
if there isin't a suitable male end at the housing intake end then you woudl try just purchasing the top of a filter housing with the male end to connect the hose to - would be cheaper than a whole hose.
you may want to think about putting in a long extension so the snorkel can go up the drivers side, that way when off roading if it has a ram top you can easily change the direction its facing, you can see it easily when negotiating between tight sections (trees etc)
ref the drain plug in the air filter housing i blocked mine off using some old inner tube stretched across the hole (bung removed) which i then cable tied in place. seal all the joint with silicone.
if you need to join pipes together a bit of 2.5" pipe (such as surplus off a snorkel tube) does the job well acting as the male.
ref the breather pipes you can just cable tie themupright with a U ben din the top of each to the bulkhead, or extend them and run them up the side of the snorkel (internal or external) external to the snorkel tube is easier. if you decide to stick them internal to the snorkel and are contemplating changing the air filter housng complete a flat box - AKA disco 300 or td5 would prob be easier.
-
Steve H
another war hey. i dont think we really want to go down that route at the moment its taking long enough to get out of the last one and we still loose at least 1 guy a week out there on average. not a pleasent place.
-
no i am still here,
its a cut & paste from an email i had.
i have enough troubke keeping up with one forum let alone anymore. just thought is was good commical value with all the extra ones poppin gup everywhere.
-
For information on the proper Land Rover Addict Forum, have a look here:
http://landroveraddict.kazorum.com/landroveraddict.html
Cheers
- Trevor
Trevor Cuthbert
-
Si,
cheers for the info. i may look into something similar to this in that i was thinking of making up a front facia the same as yours, and then making some sides to attch to the front and just mounting that straight onto the existin g dash. i would cut away the block at the bottom so i can get my stereo in, in the same place as yours, then mount the CB above that. room for swithces and dials further up.
it would have a removable front cover for easy access, similar to yours. not quite sure how to join the front to the sides with out big bolts etc. and want a neat fit.
How far does the front face of your protrude out from the original dash tray leading edge?
still in the development this one i think.
-
i will be going to watch.
dont think Will (exmoor beast) can make it.
Scotty Do is currently planning to go and watch i beleive.
-
well its all in and working now, i didnt have diodes to hand so resorted to 3rd realy in the end.
heres my complete circuit diagram.
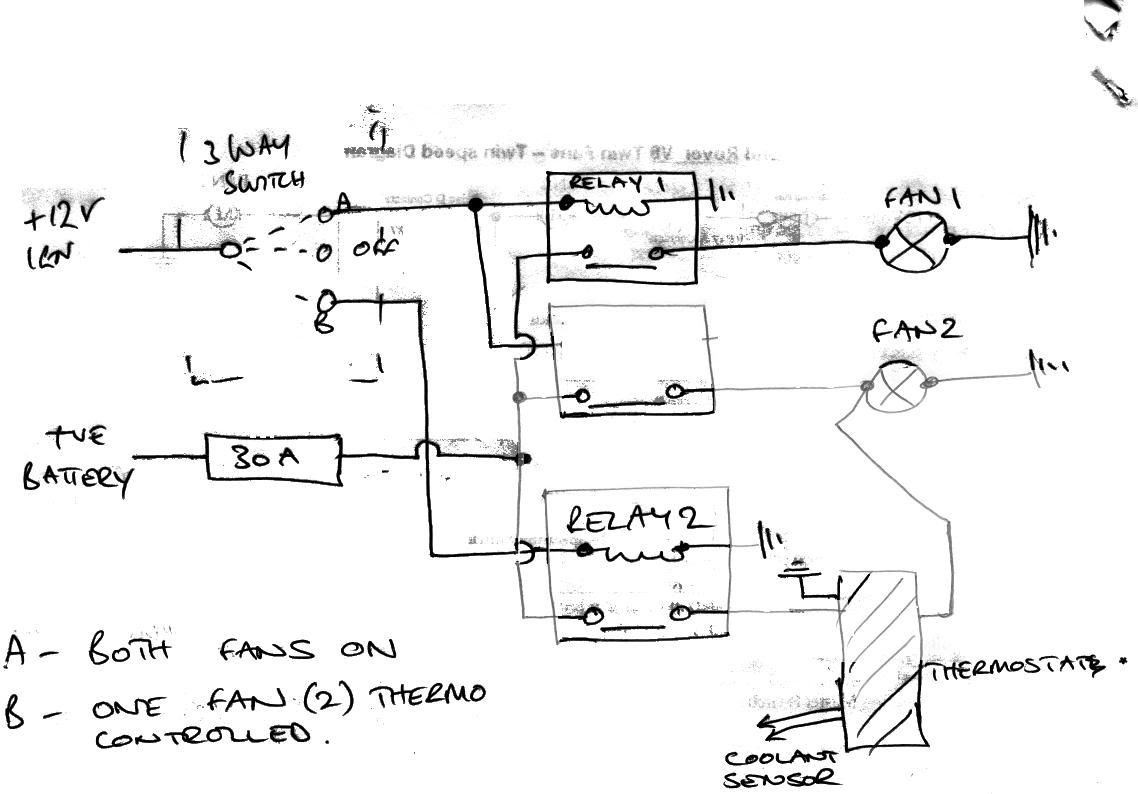
total cost £80....... (£60 was the PACET thermostat) decent bit of kit though and a very good way of connecting the sensor into the top hose (hence the reason i went for it). Veh wiring supplie dthe swithces etc. amazing how it quickly adds up.........
-
i have just started a thread ref the wiring poblems i found when doing this, the end result on the thread is a soution to allow a tin fan set up to run both fans on, both off, or one running controlled by a thermostate. you could adapt this to suit your needs.
my fans were old V8 ones for a £10.
in then end i used a PACET thermostat control box. primaily as it was recommended and has a decent method of attaching the sensor to the top hose. wuite pricy though £50 IIRC.
wiring diagram is shown on that other thread.
-
Si,
i don't suppose you have the part numbers for the bits you ordered do you?
looking at Microcat it look like you only need the complete replacement dash bit that runs from pass door upto instrument binacle, and the vent trim that goes aroudn where the handles would have been.
Can you remember what you paid for it?
i would also go for the solid sheet over the front similar to yours.
-
according to BFG website 285 are best on min 7.5J
-
guys,
thanks for all the input, think ihave amanged to follow most. after experimenting i have found the fault with the original diagram. well not the diagram but the putting it together , there was a short across on of the motors which resulted in the fuses blowing. sorted that so it now works as per the original diagram.
switch B is thermo controlled x1 fan but the other one comes on as well due to wiring setup of option for switch 2. so another relay (3rd!) has been added to to the both fans on option.
switch A is both fans. which means once selected it switches two relays one for each fan. - this works OK.
switch B no does a single fan.
the problem running two wires one to each fan from the same relay meant that when switch 1 was used and the fan engergised, the 12v when back up the wire to the constant on relay 1 then engergised ythe other fan. so ihave just used another relay in leu of your suggest diode as i dont have one.
thank for the tips.
original fault being earthing, they always say earths are 90% of faults!
-
i admit i am an electrics biff.
i tried wirin up the two electic fans on the motor today. the aim being having.
Off, two fans on, 1 fan on thermstatically controlled. via 3 way switch.
originally both fans came on from one switch and this worked fine with a 30A fuse.
i rewired the supply (direct from battery) to relay and then relay to each fan individually with 1 =ve wore for each fan and an earth for each fan. it then would not work without blowing a fuse. connecting it straight up they both come on and faster than before with the original smaller wiring.
if i dosconnect the fans the wiring all works ok, and fuse not blown (no load). the twin on works as does the thermostatically controlled option. that is 12v out of both wires (one for each fan) for twin on and 12v out of the one wire (once engine is hot enough) for the thermo controlled wire.
therefore i am confident that 3 way switch, two relays and thermo are fine.
if i run it as a simple switch on/off, to relay and one or both fans it blows the fuse as well.
both fans and relays have same earthing point. only thing i have noticed is that the rad doesnt have continuity with the vehicle body, could this be a problem>? shoudl i run an extra earth to it?
any ideas.
-
Tim,
thats what i remeber as well far too mcuh money, hence the request. there must be something cheaper out there.
-
i would go straight for the 255, the BFG MT are fairly good on road and seem to last ages, i think Western is running these on his 200tdi (255 as well) he does a fiarly high mileage and could let you knwo what to expect from them.
i would recommend BFG anyway despite the extra price from my experence good tyres and last well.
However......... after doing your sums if you fancy some 235/85R16 i have some for sale!!!!!!! £250 + del for 5 with 9k on them (spare unused) they are General Grabber TR the OEM fit to new defs.
which depsite having some 235s for sale, i would still say go for the 255s!!!!!
My green truck cab as above is running std LR 130 rims or Wolf rims, 6.5J the min width to get 255s on (therefore get the max ht) plsu they are a decent HD rim and give good protection to the calipers when off roading.
-
couple of weeks
best of leaving it a couple of months before you contact Will!!!!!
Scotty you still thinking of doing your suspension at mine at some point?
are you going to the rtv next sun still? if so will see you there.
-
Does anyone know where you can get cheaper than OEM front fogs lights for a 03MY. the small round (expensive) ones on the front skirt.
that 2 that have broken from stone chips.
-
Nige i have found a team mate, so JST and Mike for team 7 please.
CSW Challenge 30 oct
in Competing in Land Rovers
Posted
Tony,.
reckon you will be going?