


JST
-
Posts
6,352 -
Joined
-
Last visited
Content Type
Profiles
Forums
Events
Gallery
Blogs
Posts posted by JST
-
-
double post!!! deleted
-
still 96% odd of dirt stopped.
i think its due to personal preference, a suggestion for home testing i have heard is the £29 test machine of a white cloth ove the end of a hoover on suction then test by sucking air through std and then K&N filters against how much mcuh ends up on the cloth.
ok vaccum then as hoover as we know is a trade name
and i know you cant get a decent hoover/cleaner for £29 but the tests the same.
-
hope this is better and of some use. prices written on are from 2yrs ago, dealer quoted. i used some of the parts for mine then attached it to an exisitng choke cable.
-
still 96% odd of dirt stopped.
i think its due to personal prefence, a suggestion for home testing i have heard is the £29 test machine of a white cloth ove the end of a hoover on suction then test by sucking air through std and then K&N filters against how much mcuh ends up on the cloth.
ok vaccum then as hoover as we know is a trade name
and i know you cant get a decent hoover/cleaner for £29 but the tests the same.
-
-
ok i cant make it any bigger, when i upload it from A4 size photobucket resizes it then only gives options to reduce size, not enlarge.
i will have to have a play around with it.
Mark you win the computer skills front!!!
-
Mark
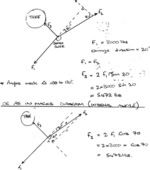
sorry but i would say that your F3 = 2 F1 COS a
its the adj angle hence COS not Sin. Sin would give you F2 in a vertical plan.
or F3 = 2 F1 SIN (90-a)
COS and SIN 45 are both 0.707 hence as you stated the 1.41
i'll do a pic for Si question
-
Si,
sounds good just let me know (i'll pm my mobile yo you) as and when you can.
i am still after a codriver though - any takers?
-
had my first real test run of the landy today since fitting the mid pipe - what a difference, it will now pull a gear higher on twisty devon a roads compared to before. downside is its bloody loud under hard acceleration - i am hoping it will clog/soot a little to reduce this or i could not work it as hard!
mpg - havent filled it yet and have only done 100 miles since fitting so too early to tell yet. due to loud pedal use i epxect ot would have dropped until the novelty wears off. (thats from my old man driving it who couldn't resist thrashing it everywhere!)
my conclusion is that on a std wagon (ecu wise) noise aside it makes little difference, where as on a chipped one it goes along way to helping you get even more torque from the engine.
i will keep you posted.
-
i am unsure of the exhuast setup on the td5s (and dont have one to hand to check!!) do they have the same system as 90 and 110 in that there is a mid silencer?
if so is it a known mod to replace said silencer with a straight through pipe such as def forum topic that is currently running?
-
i think the d4x4 approach is good and those replacement rear x members are v well made, i dont know what they cost though - remortgage no doubt! i think they also have protective bits that fold around the sides to look after the rear quarters.
Blighty had just fitted a new rear x member to my wagon months before i got it so i left it as is, also the reason why i didnt want to cut into it for the rope passage/fairlead. plus the winch can be removed with no sign, bar 4 holes in the load bay.
-
Les,
i questioned this when i was thinking of doing mine, why not just reinforce the rear cross member and bolt it straight onto that? with the rope going through the cross memeber, fairlead on the other side? the X9 can be mounted side on for example (i think!!!)
in the end i went for a husky and also strayed away from the underbody mounting in preference to the load bay moutning option.
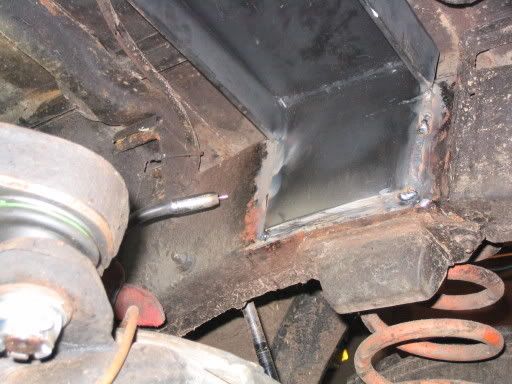
i had a U shaped bracket made up, that was inverted and then welded inbetween the chassis rails at their highest point. this dictated the positioning of the winch in the loadbay:
in the process of being welded in:
i wanted to retain the ability to fit the rear tailgate so therefore designed a deachable fairlead mounting system. a 5mm backing plat is, well on the back of this:
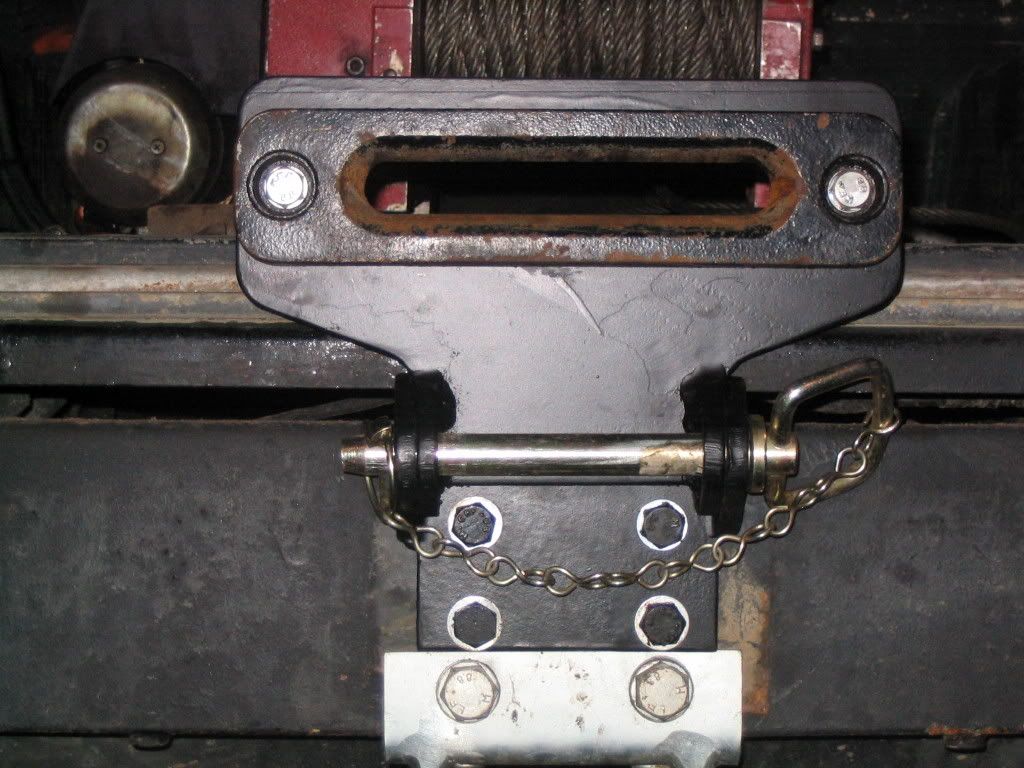
the fairlead can be un pinned and then 'winched' in to hold it secure against the winch body. rear tailgate can then be refitted.
the winch can also be removed by undoing the std mouting bolts from underneath so retaining std low bay space.
there is sufficient room to mount a 255 tyre between the bulkhead and the winch.
the fairlead is far enough away to minimise bunching. although it will still bunch on acute pulls.
its easily reached for cleaning and is well protected being higher up than others and out of the carp, although a husky will work pretty much where ever you put it.
the wiring is via a connector to aid winch removal.
finished product:
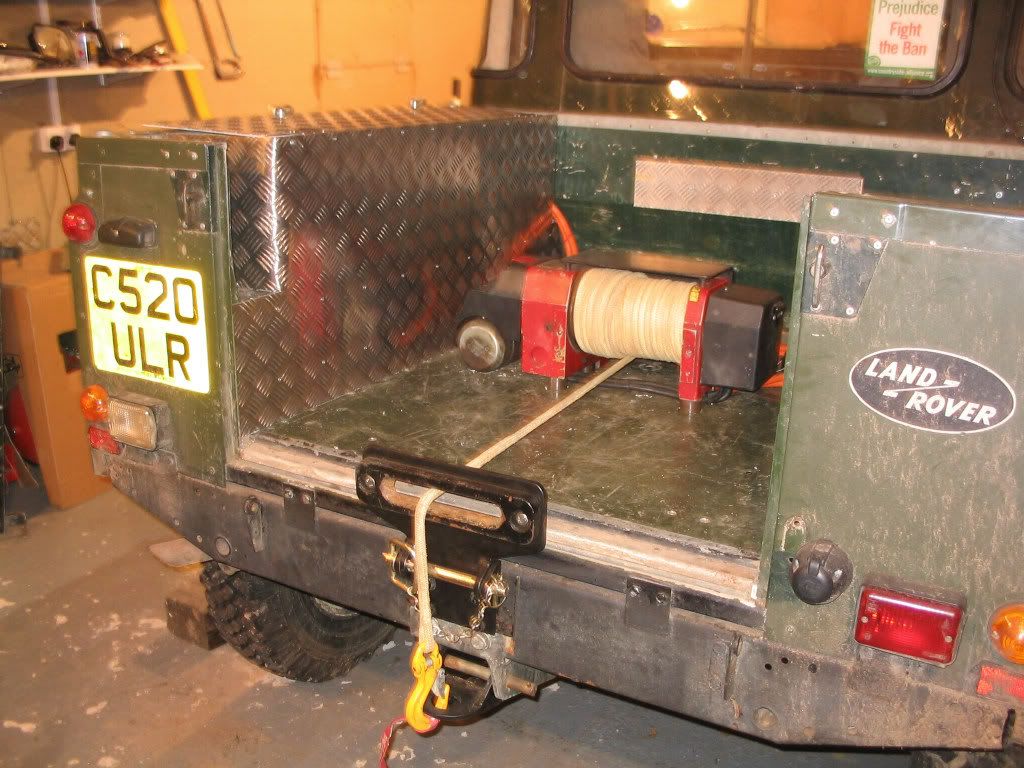
with time i will get to moving the solenoid box to inside on of the rear lockers and also fit a quick connector to the wires for the internal controls. the balck bracket on the winch is also likely to get a letter box viewing slit cut in it at some point so the driver can see the spooling as well as the codriver.
-
also by having the winch drum a little further than std from the fairlead you dont (or at least you minimise) bunching of the cable.
just uploading the pics of my setup for comparison.
-
i sealed mine by streching a piece of inner tube across the the metal hole (after removing the dump vlve (the rubber bit)) and held it in place with cable ties. no probs as yet.
my snorkel system runs with no water drainage point. i ahev often wondered if this is a good or bad thing - travelling in the rain for example some water most go down the intake.
2yrs and no problems as yet.
-
I think any mag struggles to constantly come up with fresh and new ideas for articles and its a difficult job to please all.
tech articles and how to do things; 300tdi water pump etc in recent LRO(?) i think is good to give confidence and graphical view of how to do things.
its also good to see the bolt ons being put on but rarely do we ever see any feedback on what had been done. for example LRO recently showed Ashcrofts and fitting and underdive and expalining how it all worked. however with this example you don't get a linkage system to engage it; so how about - 'this is how we made our linkage using etc etc'. then after fitting how about some feedback saying how they found the product benefits etc etc.
they also did a crawler box, JE chipping to a 90, a GKN overdrive the list is probably endless, theres rarely any before and after points on it that are a true comparison. having said that i think the JE chipping showed before and after dyno readings, but again nothing on any quantity on feedback once the chipping had been done eg: mpg, crusing speed etc say over the first 2mths of use.
LRW or LRW recently did an article on testing various chips/intercooler/plug in modules as a comparison they did timings for 1/4 mile, 0-60 etc etc. they also had a stock vehcile as a benchmark. all good to see but some of the vehicles were discos, some 90s, some on MT some on road tyres some with snorkels etc etc so how can it be a real comparison?
i think more tech articles would prob please forum members, most of use being here to answer others tech queries and hopefully solve some of our own problems but also articles that show feedback 2mths down the line since fitting. - eg this plasma rope i had fitted 3mths ago is great for the codriver and ease of use but its a bugger to clean it after an event, i find using a bucket and cold water the best approach. i have also noticed that its frayed slightly due to being dragged across the ground so therefore value a protector sleeve more so than on a wire rope' anyway you get the idea.
-
Les, imspanners
thank you very much for the input. i think i will go for the electric thermostat setup with the additional switch for manual over ride for on.
so as the wading topic has been raised i may as well chase this one well. presumably i can add another switch in the earth from the cooling fan or between the relay and the fan to turn it off as desired irrelevant of the input at that time.
how about internal dia of the hoses, can anyone remember? 45mm???
-
thank you for the info, some good food for thought.
just had a look at the demon tweeks site, is it the pacet one at £46 + VAT?, seems alot of cash.
'return wire(switched feed from the switch) to the coil on the relay.'
if i did the above with the wiring would it not then get 24V at the coil if the thermostat was on and then it was also manually switched?
maybe the thermostat fails to work so fans are manually selected, thermo then starts working for what ever reason. unlikely i appreciate but just wondering what would happen. (my electics is like my welding - very poor)
don't suppose you know the internal diameter of hoses do you for 200tdi?
i notice vehicle wiring do a capillary one for around £30 has anyone any exp of this. it looks like the attachment method is simialr to kenlow etc with poking something in the top hose at a jct, something i am keen to avoid.
-
as Mark said i have one fitted to my truck cab. its prob worth searching on the old LRE forum, def site for rear winch setups there a wealth of info there from various topics and replies i had when i was contemplating the setup for mine about a year ago.
don't go cheap winch
go Husky - so unfashionable now that they are cheaper.
-
when the 200 tdi viscous packed up and i had two 12v electric fans lying around i decided to fit these instead. at the moment they are temp wired in to a user controlled switch.
what i would like is a thermostatic control but with user override of needed.
where is a good place to get a thermostat electrical switch from and how much should i expect to pay.
where do these fit into the vehicle? top hose connection?
what sort of temp should i set it to?
and most importantly how do i wire it up? how do you get user on/off function as well as the thermostatic control without blowing the fans?
many thanks in advance.
-
cheers for the offer think i should be OK, Peter will prob weld it up for me, he just doesn't know it yet!!!!
you can have a laugh when you pop around later.
-
decided to change the front suspension on the tdi today, well that is repalce the shock turrets with -2" ones for a trial.
anyway, drivers side done in 45mins including taking the header tank out etc and fitting new bump stops.
passenger side!!!!!
1hr 30mins just to undo the bottom shock nut let alone anything else.
on top of that i also noticed (had enough time) that a bit of the chassis looked a little (very) unhealthy near the turret, brake union holder behind the turret mount, so proded it with the screwdriver, and now theres a bloody great hole that will need patching.
i think some days you are better just to leave things alone!!!!
-
cheers
do you def havea codriver for SS?? ro know anyone that needs one ie Me
-
i found this lying around!!!!
ok, can someone tell me how to resize it please.
-
James
Normal bolt type, that use the same wheel studs, so simple swop over,
Tim,
so the exisitng thread/stud stays put and then an alloy specific nut goes over that looks like a bolt due to having the closed end?
in other words could you swap easily between alloys and steel wheels just by using different wheel nuts when you put the wheels on?
Who's Clever Then?
in International Forum
Posted
would it not always end up as 90deg becuase yep the snatch block would move as the angle changed, as would the strop to the tree in this case changing the applied F3 force. but the force F3 would always be perpendicular to the anchor piont.
in other words if the angle changed to 40 deg from the straight line the block would move with strop when the force was applied from the 3 O clock position to the 4 O clock position (for example)
its a good while since i have worked with these!!!