


paime
-
Posts
616 -
Joined
-
Last visited
-
Days Won
3
Content Type
Profiles
Forums
Events
Gallery
Blogs
Posts posted by paime
-
-

Some success at last! All painted and lacquered up and managed to get the dash back in last night. Those metal plates that fell out were the retaining plates for the rubber floor lining and all parts are present and correct, thankfully.
I now need to fit the windscreen which is my next problem. Does anyone have any tips for how to get the top seal into place and keep it there? Tried a bit last night but it was rather fiddly.

-
Have you lifted up the floor pans yet? I had a similar issue with mine and when i took the floors out i found a lot more rot. It's easy enough to repair but can be quite extensive and will let in water when you're driving in the rain etc.
-
3 hours ago, Arjan said:
😂
The name is heater, seriously heater..
https://www.princessauto.com/en/detail/36-000-btu-12v-auxiliary-heater/A-p4240006e
Brand Name Mobile Climate Control Item Name 36,000 BTU 12V Auxiliary Heater Type 12V Auxiliary Heater Voltage Rating (V) 12 V Current Rating (A) 14 A FYI : 36,000 BTU is about 10500 Watts......
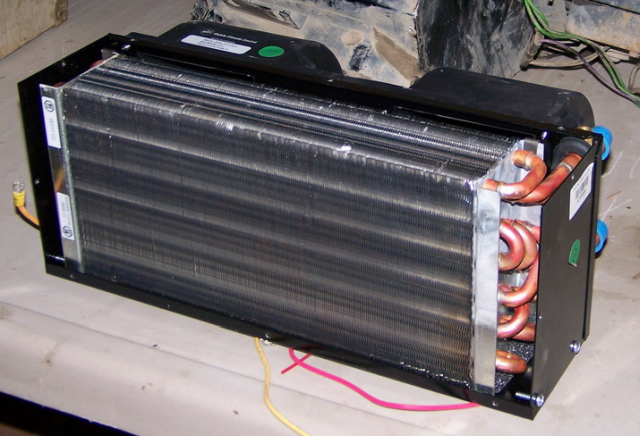
RED90 did a great write up many, many years ago (I have the PDF for you if need be) and through the ol LRA Forum (remember Addicts...) mine came from Canada to France through a relay..
He did a very, very nice build and made it almost look standard - very nice..
Thing generates serious heat - use it quite often to heat up deep frozen meals en route....
If you've got a link to the PDF that would be great. I'm looking to make some changes in advance of winter this year rather than waiting until the temperature drops to unhappy levels.
-
2 hours ago, Anderzander said:
36,000 BTU 😳
Is it legal? Do the ice caps melt a bit when you turn it on?
-
14 hours ago, TSD said:
If you haven't already, have a read of this thread. I tried a 20W PTC heater inserted in the windscreen vent tube. It did actually work over a tiny area, but you need a lot of airflow to demist a decent amount of screen, 170W hairdryer may not be enough for a decent effect. Typical automotive PTC heaters user for quick demist are over 1000W.
It will certainly work to some extent, the question is only if it works well enough to make it worth the time and effort. I'm building another car from the ground up, and I'm not putting a PTC in the (completely custom) heater box.
Just read through that thread and fell into a rabbit hole of PTC heaters. Interesting stuff! It's amazing nobody has come up with a kit that solves this issue yet, presumably because it's quite difficult to do.
14 hours ago, Arjan said:This is not for those who want originality and warmth...

RED90 did a piece on this conversion - he did a much neater job than me - but if you want warmth, this generates serious heat..
This thing starts bring warm air through the 300 Tdi within 5 minutes and makes people mid Winter in (we tested it by - 27 C) wanting to open windows in the 110. In the back.
However, it does require a bit of fabrication.
We have planned for the new galvanized bulkhead to take this monster as it keep the 110 hot..
What in the name of all things holy is this beastie??
-
I've been doing a bit of thinking about this whilst my dash is still exposed. Has anyone ever tried using the gubbins from a 12V hairdryer in their dash? I'm particularly thinking about the windscreen demisters here. Something like this: https://www.a2zcamping.co.uk/caravan-accessories/12-volt-hair-dryer-defroster.html taken to bits and then some ducting stuck on the end and routed via a t-piece to the window vents. It would mean the landy's heater is only for the footwell but i don't think that would make a difference. A simple switch on the dash somewhere would turn it on and off. Thoughts?
-
i replaced the matrix in my TD5 recently and it's not too bad a job. You've got to take off the air intake under the wing which involves removing the grill, moving the washer bottle out of the way and then removing the retaining bracket that fits to the inner wing. After that you've got the 4 bolts holding it on to the bulkhead which are reachable with a bit of contortion and then you just remove the heater cables and hoses and you're good to go. The matrix itself is easy removed by undoing all the grub screws. Buy a new heater box - bulkhead seal before you start as it'll most likely have fallen to pieces.
-
Right then chaps, bit of an embarrassing problem this one....after successfully removing my dash i kept all screws etc in their old locations (just put them in finger tight) so i would know where each on came from. I also labelled the electrical gubbins so they should go back nicely. I have, however, completely forgotten how the dash came apart and therefore have no idea how it goes back together. I started from the top down so i know i've got to start from the bottom up but other than that i'm scuppered. Does anyone have any walk-throughs they can point me in the direction of? I remember 2 supporting plates falling out from behind the lower dash panel and i have no idea where they were or what they were doing!
-
I'm struggling to persuade my associate that he should do my hinges for free so i'm back to square one. I've read a few bits and pieces on here but does anyone have any experience of replacing the hinges? I don't have a press at home, is it a non-starter?
-
2 hours ago, Ed Poore said:
I'd personally just get them blasted and pins replaced if that's a free option. You've got nothing to lose by doing it.
If you can't leave the vehicle without them attached then you could always source another pair and still get yours blasted, serviced and painted.
From what people have said nothing seems to last compared to the "old" Land Rover hinges. From some people I've spoken to my original 1994 hinges have less play in them than vehicles from the end of the production line.
I was considering doing exactly this. There's not a huge amount of play in my hinges but i was worried that they'd be too far gone to react well to a new pin and i'd end up replacing them anyway. I reckon i could get them blasted and painted for next to bu**er all and new pins would hopefully not cost me much. Worth a shot?
-
20 hours ago, DC_ said:
I got these a year ago and they never got painted, still looking good after a full season in Scotland.
Those seem quite reasonable and if they can survive our Scottish salty roads then you'd have to hope they'd survive anything...
-
 1
1
-
-
Check the windscreen hinges as well. You'll be able to see if the water is coming in by having a look just next to the A post. There will be some staining and probably rust if the seal has gone.
-
 1
1
-
-
I would love to have those aluminium hinges but they're just a bit too pricey. I can get mine blasted for free by a mate who works for a fab company and i'm tempted to get him to replace the pins as well but then i'd have to paint them afterwards and my paint skills are less than acceptable. Might be a starting point for me and if it doesn't work then i won't have lost anything.
-
Just a quick progress update on this one. My welding is now complete (thank god) and i've hit everything with a hammer and jumped up and down on the outriggers without anything moving. A huge thanks to those who persuaded me doing it myself was the best course of action. Definitely not the prettiest of jobs but i've learnt a huge amount (waxoyl is quite flammable, eh??) and i'm really quite proud of the outcome.
Next up is painting everything. Because it's just the outer exposed area of the bulkhead i'm painting, i'm using one of the spray cans. Everything is primed and good to go so hopefully the next pics will be a completed project!
-
3
-
-
Morning folks,
My bulkhead refurb is going well and it's almost time to look at the door hinges. The old ones are fairly horrific with rust stains galore but i don't want to spend money on the aluminium ones. I've found these (https://www.lrparts.net/full-front-door-hinge-kit-for-defender-td5-style-heavy-duty-door-hinges-with-stainless-steel-nut-bolts-and-plastic-shims.html) does anyone have any experience of them? Do they require a coat of paint before they go on?
Cheers
-
9 hours ago, lo-fi said:
As you're new to welding, I'd suggest doing the bare minimum on the bulkhead. The metal is half the thickness of the chassis, so double the chance of blowing holes and great potential for heat distortion on long runs on thin panels. Distortion on corners is pretty easy to control by comparison. As mentioned above: mock it up with some scrap plate first and practice the weld types and positions you'll have to do for real.
Well done getting the chassis glued together effectively. Do post some pics of the welds if you'd like some constructive critique.
Good point, i think i might be getting a little carried away. I've clarted everything in underseal now so no pics available but i'll post some of the corner repairs when i get to them. My biggest problem with welding seems to be getting the puddle where i want it. My hand will move perfectly straight with the torch (or so i think) but when i stop and have a look the puddle has wandered all over the place. I'm trying not to do too many runs, it's more of a continual spot welding approach starting on opposite ends of the panel then working inwards to try and prevent warping. Daft question perhaps but how should i be angling the torch?
-
Just a wee update on this. I've now got not 1 but 2 new outriggers welded on. It's not pretty welding but i'm going by the mantra of "there can't be enough weld" and things are sticking well. Jumped up and down on the offside outrigger this afternoon and it didn't budge. I've decided i'm going to leave the A pillar feet as well as they're not too bad on further inspection and some Jenolite then red oxide then underseal should keep them alive for a few more years.
Next up is the bulkhead corners (the part i originally started to fix 2 weeks ago before i followed the rust!) and i've got a couple of options. Has anyone fitted the repair panels that go right along the top to form a complete new top section? Seems like a good idea to replace as much metal as possible but i'm also conscious that i don't want to give myself more work than is strictly necessary.
-
Sounds like some mixed feelings on the Perkins engines then! Are they easy to work with? Plenty of spares kicking around?
-
Is a Perkins engine the factory-fitted 2 1/4 diesel?
-
I've seen this S3 which is for sale near me and i'm sorely tempted. Not sure what the chassis is like and it's missing a quarter window but she looks great fun. Apparently it has a Perkins diesel engine. I'm relatively new to Series' Landies but does anyone have any thoughts on it? Any screamingly obvious red flags i'm missing other than the rusty bulkhead? Am i wasting my time?
https://www.gumtree.com/p/land-rover/land-rover-series-3-1978-mot-tax-exempt-/1345920211
-
22 hours ago, MikeD said:
good luck with that, I have just "rescued" a foot from a corroded pillar and there are quite a few spot welds to remove, luckily for me I need to replace the pillar anyway
have you had a good look at the rest of the chassis? that is fairly heavy corrosion and you may be close to being better off replacing the chassisI haven't had time to tackle the pillar foot yet but it's on the list! The chassis isn't too bad, it's just taking me a while as i've never welded on this scale before. Thought i'd done some of my best welds last night then 50% of them broke free so i'm clearly not getting enough penetration. Trouble is, i'm always paranoid i just burn through the chassis so i'm trying to find the sweet spot in the middle.
-
14 hours ago, MR-HIPPO said:
I think that the feet slip inside the bottom of the door pillar, and are spot welded in place.
You would need to locate and drill out the spot welds in order to pull the old foot down out of the pillar.
I'll give that a bash and see how i get on. I'll get the new outrigger in place first though in case anything moves and then i won't have any reference points to line everything up.
-
Did some welding today and was quite pleased with how it turned out. Only burnt through the steel once and it was on a thin/formerly rusty bit so i wasn't too fussed. Removed the rest of the outrigger and started prepping the surface to take another plate before lining up the new outrigger. One problem i can see is the foot of the A pillar is probably beyond repair. I see YRM do some repair sections but how do i get the old one off? Do i cut above the lower hinge captive nuts and weld in the new section? Here's the repair piece:
https://yrmit.co.uk/product/lhs-lower-door-pillar-feet-land-rover-defender-series-23/
-
A wee update after today's activities. Managed to get the old rockslider off after a lot of persuasion and, in the end, a cutting disc. I'll have to take the rest of it off later as i've left the tube in the rear rock slider but it can wait until later.
Cut off quite a bit of the old outrigger and things were a bit more rusty than i'd hoped. The chassis behind isn't too bad but will need a patch welding on and the triangular bit (not sure what it's called) is holed quite badly so that will need replaced. More cutting to do tomorrow and then i'm hoping to trim the new outrigger to fit the old space. I'll be doing plenty of practice on the old cut off bits to try and get the welder settings correct.
.thumb.jpeg.9103019b494b0d65788295f3fff88bf8.jpeg)

.thumb.jpeg.bc4cb35b2d69f7147da2b99486d33d97.jpeg)


.jpeg.58043bd363d662b4da7dd9451f77d08e.jpeg)

.jpeg.3678348f0030bd9b701ae6e34409c121.jpeg)

Bulkhead woes
in Defender Forum (1983 - 2016)
Posted
It looks like the seal has been replaced recently as it's quite supple and doesn't look to be deformed. Do you still get dum dum anywhere? There are a few areas that could do with a bit of extra protection i think