


PaulMc
-
Posts
940 -
Joined
-
Last visited
-
Days Won
4
Content Type
Profiles
Forums
Events
Gallery
Blogs
Posts posted by PaulMc
-
-
There's some clever design and quite intricate plastic moulding in some of these connector shells.
.
-
Paul, your photo's of the 14 way plug have just answered a question for me, I was wondering how the opened to fit the terminals,
Ralph, the new connector shells come like that, with the secondary terminal locks open.
To open them on a used connector, there's a locking tab at each end of the secondary lock which has to be carefully levered out of it's locking hole, while applying gentle lifting pressure on the rear of the secondary lock.
Once the secondary terminal locks are opened (as in the pictures), you can insert terminals into empty cavities or, using a suitable tool (I use a safety pin), lift the terminal locking tab in a cavity (from the front of the connector) and withdraw that cavity's terminal and wire.
To close the secondary terminal locks, you ensure that the 'fingers' are in the slotted holes, then slide/press down on its rear and it 'clicks' into place.
The terminal locking tabs are then prevented from being lifted, so locking the terminals into the connector.
.
-
I think I’ve managed to find something that will fit:
http://uk.rs-online....sories/0336104/
Looking at the spec, it appears to be roughly the right size to fit in the dash, it does use LED instead but no major issue for me.
I managed to find the lamp holder for the fuel/temp gauge (part YAJ100390), I will connect to them using spade connector in a housing to make it more weather proof, likewise the same for the spade on the back of the gauges.
Finally I located these:
http://www.nexxia.co...ion=CAR%20AUDIO
Looks to be about the right size to fit into the speedo.
after that all i need is a shed load of wiring, a multiway connector for the other end (going to use the same as Retroanaconda used in his 'fitting a td5 dash' so I can carry on following it for the rest of the fitting)
I think that covers everything!
I'm now kind of glad I had issues, as otherwise I would not have started going down this route. Won’t know if it all works till I try building it and seeing if it fits in but that all part of the fun!
The Pink 10-Way ISO connectors from Nexxia will do the job, don't forget to order some terminals, as they're not included with the connector.
I have a small quantity of the correct Sumitomo 14-Way HD090 Connectors (and Terminals) that fit on to the end of the instrument harness to connect it to the main harness -
 .
.  .
. 
 .
.  .
. 
With MOQs, shipping and import taxes, I've got be asking at least £12.00 each for these, in order to cover my outlay.
PM me if you're interested.
.
-
You might even want to replace them with coloured LEDs.......very cool
Red, Gold and Green, perhaps?

.
-
I´ve just done this. have a look
The ones he is replacing are obviously ok, it´s the 3 smaller bulbs that light up the control buttons.
That's a good 'how to' video
Although, I'm not sure that his reasons for changing them would appeal to everyone

There's a page here, showing how to do it and which bulbs you need -
http://www.discopedi...Climate_Control
Although, I would ignore their advice to remove the Radio and its cage
If Mr Rasta's butter knife trick doesn't work for you, remove the coin tray, ash tray and cupholder (six screws) and release the CC unit's clips from below.
These are the bulbs -

Left to Right - JWH100060 - 8510251 - JWH100070
.
-
I'm sure I was reading a salisbury overhaul manual and it was warning that if you over cook "squashing" the housing to get the diff out by as much as a mm, you can ruin the caseing.
I remember from my VM1 course at SEME, being told that there was a finite number of times that a Salisbury axle could be spread to remove and replace the diff, after that it wouldn't go back to its original shape and was scrap.
I don't remember how many times exactly, but it wasn't many, something like 3 or 4 times maximum.
.
-
I prefer au naturale

.
-
With winter approaching, could anyone recommend a battery charger / conditioner ? There seem to be plenty on-line, but are they able to cope with 100Ah + batteries.
Cheers
Nick
I have a CTEK charger, which I wouldn't hesitate to recommend

The model I have (Multi XS 7000) has been updated to the MXS 7.0 - http://www.ctek.com/gb/en/chargers/MXS%207.0
There are a number of cheaper and more expensive chargers in their 12V range -
http://www.ctek.com/gb/en/chargers/12v
Also useful, are the range of 'Comfort Connect' accessories -
http://www.ctek.com/gb/en/accessories/56-758
.
-
A good website for tracking international post/parcels from its sender's to its recipient's country is -
Track Post/EMS shipments for 102 countries here - http://www.track-trace.com/post
You input your tracking number and select 'Track with options' - this then shows the tracking information from the sending postal service.
A tab on this page allows you to 'Select country' for the destination country, this then shows you the tracking information from the recipient country's postal service.
I tried your tracking number and got these results -
Royal Mail - same as Ralph posted above -
Your item, posted on 19/08/11 with reference RJ861017063GB has been passed to the overseas postal service for delivery in BOLIVIAWhen I selected Bolivia, I got -
Información del envió Nro. RJ861017063GBLlegada a la oficina de recepción: 12/09/2011 18:25 LPBSalida de la oficina de recepción: 20/09/2011 10:33 LPBAnd for Colombia, I got -
Ubicación Fecha/Hora Local DescripciónCTP BOGOTA-UPAQ 2011-09-27 14:18:00 CORREO LIMPIO.
-
I thought I might be right!
[image]
I did own one
Complete with vents
I still do

.
-
I quite like the 'smooth' look

.
-
As promised to 'Maverik', here are some pictures and info on crimping the terminals and assembling Sealed MQS connectors.
(the pictures are thumbnail links to the fullsize pictures in my Photobucket account and should open fullsize in a new browser window/tab)
Here's a couple of pics - showing the top and bottom of a side repeater connector cut from an old loom -
 .
. 
1. Dismantling a connector
(you shouldn't need to do this, but it makes the terminal retainers easier to see)
Pointing to - The locking tab that holds the inner part to the outer shell -
 .
. 
Inner part removed, sliding terminal lock opened -
 .
. 
Pointing to - The terminal locking/release tabs, which are pressed through the 'windows', to release the terminals from the connector.
The bottom one is uncovered by the sliding terminal lock, the top one can now be accessed through the window in the sliding terminal lock -
 .
. 
Terminals removed -
 .
.  .
. 
2. Assembly
Inserting terminals (note terminal orientation in respect to connector shell) -
(you don't need the inner part and outer shell dismantled to do this, but I've pictured them like this for clarity)
 .
. 
(shown with connector shell assembled to inner part - this is how you would do it on a new connector)
 .
. 
Sliding terminal lock 'open' -

Sliding terminal lock 'closed' - terminals now locked into connector -

Sliding terminal lock viewed from above - showing how it covers the terminal locking/release tabs -

3. Crimping the terminals
You can see from the pictures above, the orientation of the wire seal and that the 'neck' of the seal should be crimped under the insulation grip part of the terminal's crimps.
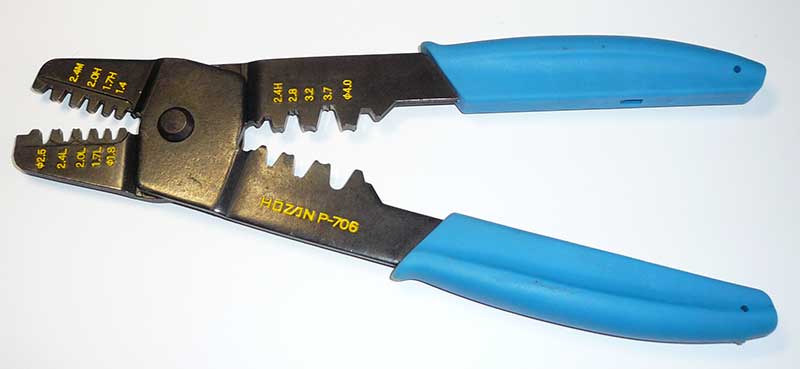
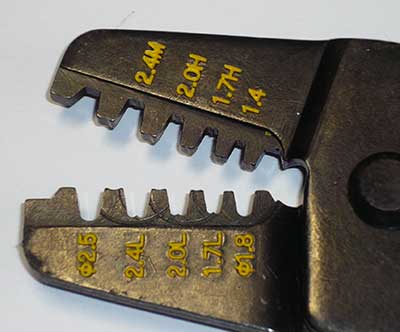
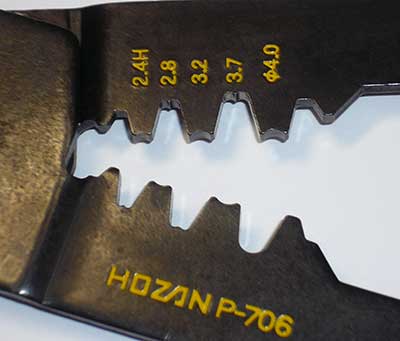
Crimping of the wire's conductor needs to be done carefully, with a suitable crimping tool.
AMP/Tyco's crimp tools and dies are silly money, but a good job can be done with a hand crimper for UNINSULATED terminals (NOT the type for the Red, Blue and Yellow pre-insulated type)
I use one of these Hozan tools from Eastern Beaver -
http://www.easternbe...ools/tools.html
 .
. 
But a perfectly acceptable job can be done with crimp tools such as these from VWP (and all the usual suspects) -
D1

MP71

.
-
I think 1988 was the last year of the Outer ribbed roof, so 1989 Model year.
That's correct, it was the 1989 model year (available from the end of 1988)
.
-
The connector for this type of Side Repeater is an AMP/Tyco (now TE Connectivity) 2-way Sealed MQS (Micro Quadlok System) connector -

Some LR vehicles use the fully-shrouded Black connector, some use the Grey half-shrouded connector but, AFAIK, they are interchangeable.
Sealed 2-way MQS Connectors can be bought from a BMW or a VAG Dealer, with the terminals and seals supplied separately or as a 'Repair Wire', which is a short length of cable with a terminal and seal pre-crimped onto it.
I've got a note of the BMW and VAG part numbers somewhere, but they're quite expensive from them.
Simtek sell the Black fully-shrouded connector -
2 way MQS female connector - £4.20 + postage (each)

Or...
They're available on eBay for £5.95 + postage (each)
http://www.ebay.co.uk/itm/110680880690

Or...
I can supply them to you, brand new (as in the above pics), with terminals and seals to suit 0.75mm² cable, for £3.00 each + postage, PM me if you're interested.
.
-
Hi i have a 2001 disco 2 a month ago i tried to use aux lamps on night run but not working checked fuses and bulbs . changed relay in engine compartment (R7)still not working also changed swith on dash no joy so ran live to bulb ok .called in at Landrover GL they checked all of same but could not give me clue to problem has any one idea how to fix problem begining to bug me know
thanks mike
R7 in the engine compartment fuse box has nothing to do with Auxiliary Lights, it's the 'Auxiliary Circuits' relay, which controls power to ignition switched circuits.
Do you have Genuine Land Rover Auxiliary Lights fitted?
If so, you may have the troublesome control unit VUB501690 fitted, callout #3 in this diagram -
VUB501690 is expensive to replace - http://www.brit-car.co.uk/product.php?xProd=134448
Unfortunately, replacing VUB501690 gives no guarantee of a trouble-free future

A cheaper, easier and longer lasting option is to replace the control unit with a relay.
See this write-up on how to do it, from Urban Panzer's website - http://www.discovery2.co.uk/spots.html
.
-
Could you not bolt a drop plate as seen on many Series Landrovers, to your existing towing brackets, and use it upside down? So it would be a riser plate rather than a drop plate
"therealboss" on thed2boysclub forum has done something smilar, using a 'Dixon-Bate style'
 adjustable coupling -
http://thed2boysclub.co.uk/forums/viewtopic.php?f=4&t=4023
 .
. 
Dixon Bate sell a two-hole slider -
Product Number: 68248
http://www.dixonbate.co.uk/spares/product.asp?PartNo=68248

.
-
Hi,
Looking for a part number pleae. I have tried the parts catalogue and despite my best efforts failed. I have looked under binnacle, dash, trim and everything else I can think of but can't find any parts close to the part I am needing.
It is the RHS end of the dash that the heater controls box & the right hand side of the clock binnacle attaches to.
Thank you.
picture enclosed:

You're looking for the Binnacle Mount MTC2808, callout #1 in this diagram -
Around £45 in flimsy plastic from Land Rover -
http://www.brit-car.co.uk/product.php?xProd=87394

Or for around the same money in steel from Raptor Engineering -
http://www.raptor-engineering.co.uk/landrover-dash-binnacle-mount

.
-
Thank you very much for your excellent and speedy reply paul

Do you know where I could possibly source the Sumitomo OE connector from as I would like to keep the connector standard to aid replacement of the switch in the future. I don't mind paying more to get the correct connector, but I suspect it may only be availble in large quantities!
James

Sorry, I don't know of anywhere selling them individually
If you could get hold a used one cut out of a loom, then new compatible terminals are available from a couple of sources.
If you know anyone with a Discovery II, then the Rear Fog Lamp Towing Cut Out Kit STC50181 uses the same connector, which is Land Rover part number - AFU3855 (not available as a spare part
)On the vehicle, an AFU3855 connector with a couple of loops of cable is removed from the rear loom and replaced with one with a relay which cuts the vehicles rear fog lights when a trailer with fog lights is plugged into the 12N connector.
The AFU3855 connector with the cable loops is thrown away.
STC50181 showing the AFU3855 connector -

I saw the kits at Billing a couple of years ago, Mailorder 4x4 (I think
 ) had stacks of them for around £7.00
I wish I'd bought one at the time for my DII, as they're now nearly £40

Although, there is this one on eBay for a bit less -
Discovery 2 Fog Light Cut Off Switch Towing STC50181

.
-
I'm in the process of installing TD5 gauges, a MUD console and generally tidying up the wiring of my 1997 defender 90. I'm having difficulty sourcing two connectors which I require, I've tried all the usual suspects that I buy electrical components from (VWP, polevolt, autosparks,Rs, etc) but I've had no luck. The two connectors that I require are:
2 x pink plugs used in the back of the TD5 speedo, they look similar to an ISO plug used for wiring in a car stereo but the TD5 one is 10 pin not like the standard 8 pin ISO plug and it has a yellow bar to lock the terminals in to the plug.
I also require a male and female connector for wiring in the master light switch as a previous owner has chopped the connectors off and soldered the wires together
The light switch and connector can be seen in my link below.James
The two 10-way ISO connectors can be bought here -
http://www.nexxia.co.uk/products.asp?section=CAR%20AUDIO&category=ISO%20Connectors
Connector shells and terminals are sold separately -
Male Accessory ISO Housing
An 10 way Accessory ISO block used for Accessory ISO connections such as CD Changers and displays. Requires M-55 terminals.
Part Code: M-53-1 (£2.50 inc VAT)

Car Radio connector ISO receptacles. ISO Receptacle that can be used with M-53-1 above. Wires can be crimpled into these receptacles and these clip into the housings.
Supplied as a pack of 10 - Part Code: M-55-1 (£2.50 inc VAT)
Supplied as a pack of 100 - Part Code: M-55 (£15.95 inc VAT)

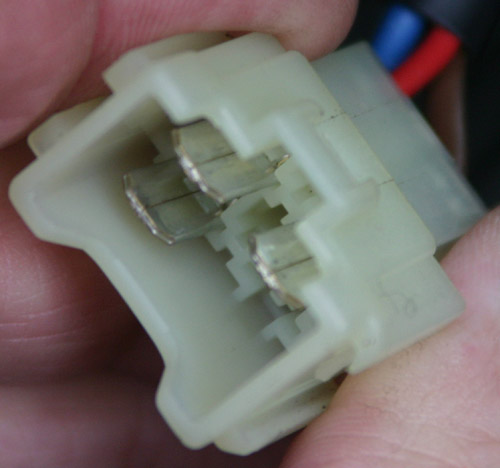
The OE Land Rover light switch connector is made by Sumitomo -
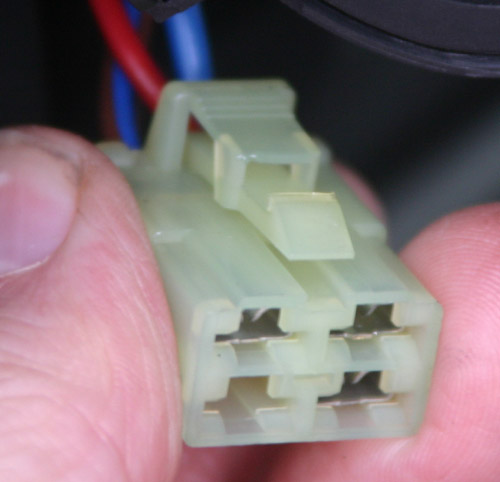 .
. 
A similar 4-way connector can be bought here -
http://www.kojaycat.com/Motorcycle%20connector%204%20way.htm
4 Way Tang Less Connector (4W-CNA-NAT)
Natural coloured connector is supplied complete with male & female terminals . It has 8 terminals at 6.3mm
4W-CNA-NAT - £5.85 +VAT

BUT... The light switch connector doesn't need to be identical to the Land Rover (Sumitomo) one and could be replaced by any 4-way connector with 6.3mm terminals for a lot less than the one from KojayCat.
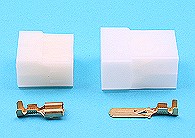
This one from Polevolt would do -
Ref: MC4KIT
Multiple connector kit 4 way
Supplied with 5 female and 5 male terminals.
Price each: (9 or fewer items) £0.80 (£0.96 Including VAT at 20%)
.
-
i have a budget and i'm not mincing about repairing doors, this is getting a pro respray and i will do this once and one only!
i expect to pay around £1200 for the parts, the b pillars i have may go again once stripped and checked
need leads to new doors please
Have a look here - http://stores.ebay.co.uk/Ridgeway-4x4-Land-Rovers
I think that they're OEM, rather than Genuine, but they look OK for the money.
.
-
Hi to all!
Firstly I would like to say that I'm new to this forum. I'm from Mauritius and I own a td5. I hope that you guys will share your experiences and help as we only have one local dealer and it comes damn expensive going through them for each single visit.
Now that's been said, i've bought my td5 ( yr 2002 model) and the speedometer and tachymeter are both inop. I've checked everything from electrical connections to abs sensors. I even went to the local dealer and it was confirmed that the whole instrument pack is faulty.
So my question is: is it possible to swap my instrument pack with another one from a series II but having a V8 engine? I've documented myself about the speedometer having it's signal from the SLABS and the tachymeter from the ECM for both diesel and petrol engines. Hence my question! Can anyone help here?
Regards
The Pipertachymeter spec.pdf
I don't know if it's possible, but I'm sure that someone on here might know.
Another place to sign-up to is the D2 Boys Club Forum - http://thed2boysclub.co.uk/forums/index.php
There's a lot of D2 knowledge and experience on there.
.
-
Hi all i am looking for a wiring diagram for the electric window circuit on a defender td5 would any one have one please.
Phil
The complete wiring diagram (including electric windows) for the post-2002 Defender, can be downloaded here -
http://exerro.com/oldsites/2009/indigoprime.com/landrover/Defender%20MY2002%20Wiring%20Diagram.pdf
.
-
There's an article in this months LRM (Sept. 2011) showing how they fitted Electric Windows to Lindsay Porter's post-2002 Defender, using Land Rover parts.
They used Carling switches to operate them but, apart from sourcing the switch connectors, the Land Rover switches are easier and, IMHO, look better.
.
-
I see this is for sale again ebay linky !!!! guess someone bid took a look and walked!!! or didn't get it down the drive..
Jason.
Looks as though it didn't meet its reserve last time (26 bids - up to £5200
) - STUNNING LAND ROVER EXPEDITION UNIT CAMPER SHOWER FRIDG.


 adjustable coupling -
 ) had stacks of them for around £7.00
Landyspareparts.com - anyone had any issues?
in Defender Forum (1983 - 2016)
Posted
I didn't word that very well
What I meant was - it's the female connector that fits on the main harness and mates with the male connector on the instrument harness.
This connector is of no use to you if you're making an instrument harness, as you need the male half, which I don't have.
However, if you've sourced a TD5 instrument harness and want to connect it to anything other than a TD5 main harness, then this connector would be very useful
.