


PaulMc
-
Posts
949 -
Joined
-
Last visited
-
Days Won
4
Content Type
Profiles
Forums
Events
Gallery
Blogs
Posts posted by PaulMc
-
-
Paul.... Any idea where to get blank switch covers from??
You can't buy the covers separately, you have to buy the complete switch blank.
Ash Grey switch blank - AMR5432
http://www.brit-car.co.uk/product.php/81915/0/switch_blank_plate_facia_def_dis11

Black switch blank - FBV000090PUY
http://www.brit-car.co.uk/product.php/116037/0/panel___blanking
[no picture]
Ash Grey heated seat switch blank - YXJ000020LNF
http://www.brit-car.co.uk/product.php/95338/0/switch_blank_defender_2a_

There's no Black version of the heated seat switch blank.
.
-
I am after sourcing some on off switches to go in the blanks of the td5 and puma dashes at work next to the fog light switch. Does anyone know what make they are or where to source them? Land rover only do replacement fog ones or air co etc with legends all ready on and want 50 quid each.
Many thanks
Matt
All of the TD5 (2002 onwards) and Tdci Puma switches are available from Land Rover.
Most of them aren't on/off switches, there's some that switch to earth and others that are non-latching momentary switches.
Several of them, as you've said, cost in excess of £50 each.
However, the Tdci Puma heated seat switch is still only around a fiver new

It's part number is - YUF500150LNF
http://www.rimmerbros.co.uk/Item--i-YUF500150LNF
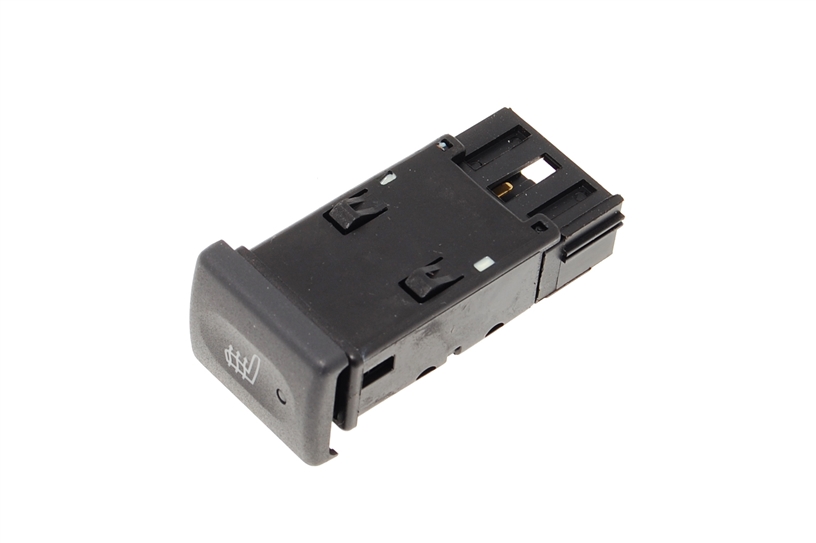
It's a latching, live-switching on/off switch, which uses the Black 5-way switch connector, available from a couple of sources (including me
 )
)It's wired, as follows -
Pin 1 - Live in from fused supply
Pin 2 - Dash illumination
Pin 3 - Not used (but is internally connected to Pin 5 - Earth)
Pin 4 - Switched live out to accessory (relay terminal 86)
Pin 5 - Earth
It will fit into any of the spare switch positions on the facia (except electric windows) if you remove the moulded keyway, arrowed below -

The switch front with the heated seat symbol can be unclipped and replaced with one from another switch, or a modified blank one.
I've used these switches with a modified blank switch front.
To do this, I drilled a 2.5mm hole in the blank switch front, cap so that the Orange 'tell-tale' LED can still be used, like this (bad pictures
 ) -
) -

There a number of ways to create your own symbol on the blank switch front.
The switch fronts are moulded in a translucent white plastic, which is then painted Ash Grey or Black.
If you were talented with a Dremel or similar (I'm not
 ), you could engrave the blank switch cap with a suitable symbol so that when back-lit, the symbol illuminates.
Here's a TD5 facia (not mine
 ), with home-made front fogs and Cruise control switches, in place of the heated seats switches -
Or you could use a stick-on symbol, like these from VWP, or MUDSTUFF -


The MUDSTUFF symbols are clear on black, so if you polished away a small area of the paint finish on the blank switch cap (under where the symbol is going to be stuck), the symbol will illuminate with the dash lights.
Although they haven't pictured the sheet, MUDSTUFF also do a White on Clear sheet, which could be used on a blank switch cap , without any polishing away of it's paint finish; of course, it wouldn't illuminate with the dash lights.
.
-
I saw this on the Defender2 forum - http://www.defender2.net/forum/topic21755.html


A brand new Mercedes Sprinter 2.6 Ton High Lift Hydraulic Jack, complete with Toolkit, £30 delivered (to mainland UK) -
http://www.ebay.co.uk/itm/261145375799Z3E7BPrS1ZeMQ!~~60_12.JPG)


It looks like a useful bit of kit (unlike the cr@ppy leaky jack that comes with the DII )
)
I bought one yesterday, should be here tomorrow
. -
Have a look at the posts from Ralph and myself, here - http://forums.lr4x4.com/index.php?showtopic=38381
Demon Tweeks do some rocker switches that look similar - http://www.demon-tweeks.co.uk/motorsport/switches/trillogy-illuminated-rocker-switches
"These Illuminated Rocker Switches from Trillogy are manufactured to imitate OEM style dashboard switches. They feature illuminated rockers and are ideally suited to the classic or kit car builder.
Switches have a current rating of 16 amps, have spade type terminals and will require 21x30mm cutouts."
 .
. 
 .
. 
 .
. 
 .
. 
 .
. 
.
-
I am hoping to fit leccy windows to my 110 using LR parts. The regulators and window clips are easy, but what door panels do I need? Part no would be useful.
Also has anyone got a wiring diagram for fitting said windows?
You can download the Defender 2002MY Wiring Diagram, here - http://www.landroverweb.com/Pdf-files/Defender%20MY2002%20Wiring%20Diagram.pdf
Hi,I believe the door panels/cards are the same, you just need to find a bung to fill in the hole of the window winder.
I also have a drivers electric window, which I haven't fitted yet, but have tried it using a 12v power supply. There's three wires; ones earth and the other two are up and down.
Steve
There are different door cards for doors with and without electric windows.
But, as they cost a small fortune to buy new, it would be a lot cheaper to blank-off the winder holes in your existing door cards.
The Defender window motor has only two wires to it.
The factory electric windows switches are double-pole changeover, and swap polarity to the two motor connections to change its direction between up and down.
I would try and find some good flexible wire to go between the bulkhead and door, I have had to repair quite a few due to the wires fatiguing and breaking.Will.
If you are using Land Rover electric windows regulators, you will need the factory door harnesses, as the motor connectors are not easy to obtain separately.
The door harness for just electric windows, is – LR016314

Although, as said above, the cable is quite thin and is known for breaking.
I'm not sure that making the door harness from thicker cable would prevent this from happening, as the way the door grommet is fitted, causes the cables to bend each time the door is closed and straighten each time it's opened, which creates a stress fracture in the copper conductor.
.
-
It sounds as though it may have been a Royal Navy Bomb Disposal Vehicle.
.
-
It's a Bosch 3-way Kompact connector.
(in the picture above, you can see the Bosch logo, just below the moulding date)
Simtek stock them -
http://www.simtekuk.co.uk/product.php/bosch_3_way_plug_kompact_code_1/?k=:::1732223

.
-
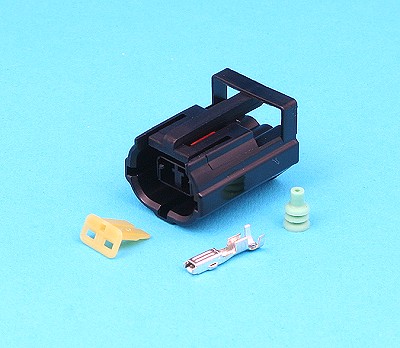
The BMW connector looks like this -
 .
. 
The colour (Water Blue) denotes that it is a neutral or 'zero coded' (code Z) connector.
i.e. - It has no keyways, is universal and will mate with all other connector 'codes' in the series.
.
-
I don't have the in-tank fuel pump/sender connector; but, as they are a BMW connector, they can be sourced from a BMW dealer.
The BMW description and part number is – 4-way female housing – 61 13 8 367 076 (superceding – 61 13 8 367 072)
If you need them, replacement terminals and wire seals can be bought from BMW (I don't have the current part numbers); but, I do have some of the terminals and wire seals, which I sourced through AMP (Tyco).
AMP (Tyco) make these connectors (as well as several other types of connector) exclusively for BMW, they won't sell them to you direct, you have to go through a BMW dealer.
However, some of the terminals and wire seals used in these connectors, are also used in some other commercially available Tyco connectors; so, these are available through Tyco distributors.If you're only replacing a damaged connector housing and don't need new terminals or wire seals; then, this is how you release the terminals from your existing connector –
The connector housing has a sliding lock plate on it's front, once this is slid open, the terminals can be pushed out from the front to the rear (they can be quite resistant to moving) – don’t pull on the cable, as it will probably pull it out of the terminal.
Locked (lock-plate slid over to the left) –
Opened (lock-plate slid over to the right) –
. -
A 1988 110 should have the rear fog lamp switch on the steering column.
PRC3432
http://www.lrseries.com/shop/product/listing/9798/PRC3432-SWITCH-REAR-FOG-LAMP.html

.
-
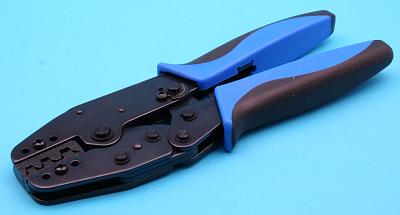
Anyone got a reccomendation for a crimper that does the Warning light panel terminals? The proper crimper is about £250
 so over £8 a crimp
I use one of these Hozan P-706 crimping tools -
http://www.ebay.co.uk/itm/Hozan-P-706-CRIMPING-TOOL-/190832887283

Not cheap, but very versatile.
Unlike the Tyco crimpers, which cost several hundred pounds, and will only crimp one type and size of terminal, these Hozan crimpers will crimp almost every type of terminal you'll find in the connectors used on late model Land Rovers.
I've used them to make perfect crimps on -
MQS sealed (TD5 horns, side repeaters)
MQS unsealed (TD5 clock, Tdci instrument connectors)
040" Multilock (TD5 instrument warning lights connectors)
070" Multilock (switch connectors)
090" Sumitomo unsealed (TD5 14-way instrument harness connector, hazard warning lights switch connector, 20-way circuit headers)
090" Sumitomo sealed (TD5 main/engine/chassis harness interconnects, Denso alternator connector)
070" Econoseal (NAS lamp connectors)
Junior Timer & Junior Power Timer - sealed and unsealed
As well as several other types of terminal.
.
-
I made reference to the VAG number in my eBay listing.
There's another ebay seller, selling the connector housings individually, without terminals -
http://www.ebay.co.uk/itm/170790428298
5tnQ~~60_12.JPG)
He works out a bit cheaper than the VAG dealer.
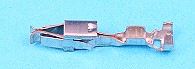
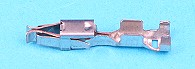
You can use standard Junior Power Timer female terminals in them...
But, the ones that most sellers stock are meant for the sealed connector series, so have a different shaped rear, to accomodate the wire seal, instead of crimping to the cable's insulation.
http://www.polevolt.co.uk/acatalog/Junior_Power_Timer_Connectors.html
 .
. 
Terminals from VAG
'Repair Wires' (terminals pre-crimped to Yellow cable) -
000 979 021 (0.5 mm²) (as above)
000 979 133 (1.0 mm²)
000 979 225 (2.5 mm²)
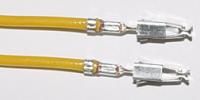
Loose Terminals
N 906 844 05 (1.0 mm²)
N 906 845 05 (2.5 mm²).
-
Hi All,
I've looked and looked on this thread but cannot find anywhere that I can find the top red plug and connectors for my speedo conversion, Could someone please point me in the direction of getting hold of one, I'm happy with the rest of the dials as I have red LED's in them and can see them fine and dandy at night just wanted a TD5 speedometer which I've done but instead of the crimped connectors I have on there I'd like the proper plug for it
TIA
John
Contact the seller of this auction http://www.ebay.co.uk/itm/151031007465 he doesn't have any listed at the moment but he regularly lists them.
That's me

I haven't relisted them because I only have one set left (3 connectors, in fact; so, if someone needs just one connector
 ), and I'm struggling to find more stocks.
These are genuine AMP/Tyco connectors and terminals, exactly the same parts as found on the factory wiring harness.
PM me if you're interested.
.
-
Only 2 of the 3-ways in the connector are used.
Pin 1 - Charge warning light - Brown/Yellow
Pin 2 - Ignition-switched live - White/Green (Discovery II) / Green/Yellow (Defender)
Pin 3 - Not used
The pin numbering in the connector is -

The above diagram is of the connector 'face' or front, the cables are inserted from the other side.
I can supply a new connector with terminals and wire seals. If you need one, drop me a PM.
.
-
The newer pumps use Econoseal connectors, which can be bought from Polevolt - http://www.polevolt.co.uk/acatalog/info_ESC2F.html
Don't worry about the different coloured connectors/pumps, the keyways are the same between the Black and Red versions.
Or, if you don't want to crimp the terminals to your existing harness, Land Rover do a 'service' link harness for fitting newer pumps into older vehicles - AMR3849
http://www.rimmerbros.co.uk/Item--i-AMR3849

Britcar do a Britpart and Allmakes version that's a bit cheaper than Genuine (the Britpart one is pictured with a Red Econoseal connector) -
Britpart (even they couldn't f*** this up, could they
 )
)http://www.brit-car.co.uk/product.php/188962/0/wiring_harness_washer_pump_def_rrc

Allmakes
http://www.brit-car.co.uk/product.php/202019/0/wiring_harness_washer_pump_def_rrc

.
-
Hi i am building one loom for my project defender, out of some other defender TD5 looms ( i want none ecu loom , but with ABS, C\L, E\W and alarm etc) and i have a central locking question.. The pink and orange wire for the central locking seem to go in the the area under the passender seat with a white connector on it. I thought the central locking was controled by the green alarm ecu under the dash. Does anybody know what this connects to, as i have wires going to front doors x 2 and rear door and to the alarm ecu? Or is it the link for the second 2 doors on the 110?
Thanks
The 3-way white connector on the main harness under the driver's seat (C2004), connects to (C2005) on the Link Harness, which runs to each of the rear side doors on the station wagon.
There are two versions of the link harness –
LR016437 – contains the wiring for the door entry switches (for courtesy interior lights/burglar alarm).
LR016438 – contains the wiring for the door entry switches and remote central locking.
(LR016438 pictured)

.
-
I've not been on here for a while and have only just seen this thread.
The OP's connector is a Delphi Weather-Pack connector.
Depending on the terminals and wire seals used, they can accomodate up to 3.0mm2 cable, and are rated for up to 20 Amps.
You can get some of the range from Simtek -
http://www.simtekuk.co.uk/index.php/automotive_connectors/delphi_connectors/?k=:12:359918:
.
-
I'm trying to do a good job, angle iron would make them very heavy. Who sells this expanded mesh then?
F.H.Brundle - http://www.fhbrundle.co.uk/groups/02__Expanded_Metal
.
-
I have a heater from a 200tdi therefore it has the old-style harness connector. However my main wiring harness is a td5 type, and so the connector for the heater is like this...

How do i go about chopping off the old connector from the heater, and adding a plug that will match my td5 harness above? Can it even be done?
Thanks
Phil
should be the same number of wires & same colour coding, just chop the connector off & re=terminate both ends or a tidier solution, PM PaulMc he maybe able to sort a suitable matching connector to re-terminate the heater motor wiring, thus keeping the main dash loom intact
Hello Phil,
As Ralph has said, if you don't want to cut the connector off of your main harness, I can supply a male connector to mate with the heater connector.
This would leave you the option of easily fitting a TD5 heater unit at a later date.
Paul.
-
Anyone know connector type and source for these? Alternative is to buy a loom, but I'd rather not as I only need the regulator connector for each door.
It's the round black connector in pic...

Thanks
Steve
The Window Motor Connector is the Grey Connector, it's made by FCI -

Here's a couple of pics of the connector on a front door loom that I have -
 .
. 
Its terminals are similar to the TE (AMP) Junior Power Timer terminals.
I don't have this connector and can't find anyone willing to sell less than 1500 pieces (not including terminals and wire seals)
It's probably easier to buy the door harnesses from Land Rover, they're not that expensive.
LR016314 - HARNESS FRONT DOOR, PASSENGER (& DRIVER), WITH POWER FRONT WINDOWS, LESS DOOR ENTRY REMOTE CONTROL UNIT -
£12.01 (+ £2.40 VAT in EU)

LR016315 - HARNESS FRONT DOOR, DRIVER, WITH POWER FRONT WINDOWS, WITH DOOR ENTRY REMOTE CONTROL UNIT -
£24.72 (+ £4.94 VAT in EU)

LR016316 - HARNESS FRONT DOOR, PASSENGER, WITH POWER FRONT WINDOWS, WITH DOOR ENTRY REMOTE CONTROL UNIT -
£24.72 (+ £4.94 VAT in EU)

.
-
I hope you can add a few more possibilities for a D1 of 1998 vintage too....
I have my rolling chassis sitting out in the yard and there is no vin on the chassis on the front legs nor the rear and neither is there anything to suggest any welding or repairs have taken place!!!
To say am miffed is understatement!!!
If it had been fitted with a replacement at some point in time would they have stamped it on there or not?
Here you are -


.
-
Can anyone tell me where to find the chassis number on a Disco 2 chassis. I always thought it was at the steering box mount.
On the RH side of the chassis behind the rear wheel -

.
-
Les,
I've been looking for a hand crimper to do an "F" crimp on terminals on 10mm2 cable, but can't find anything suitable.
For that size of cable, all that I can find are either, hexagon or indent crimpers, which are fine for tube terminals, but no good for open-barrel terminals.
I'm still looking and, if I find anything suitable, I'll post the details here.
.
-
Chaps,
What is the correct crimper for 9.3mm un-unsulated spade terminals I cant flippin find one !!!
Please note - Hammer and blunt screwdriver/ or pliers is not the right answer

Getting it through work

any linkys to one greatfully recieved

For up to 6.0mm2 cable, one of these does an excellent crimp -
http://www.polevolt....info_TT350.html
It's the one I'm using in my post here - http://forums.lr4x4....056#entry686080
.
 ) -
) - ), with home-made front fogs and Cruise control switches, in place of the heated seats switches -
 )
)

 )
)


switches
in Defender Forum (1983 - 2016)
Posted
Yes
Pop the blank out of the dash, and you'll see how the blank front is clipped to the body, this is the same for the switches and the blanks.
One of my pictures in an earlier post, shows an unclipped modified blank switch front, from behind.
You can see the 4 tabs that clip it to the switch/blank body - I use a jeweller's screwdriver to carefully lift the tabs.
Take care when un-clipping them, they're easily broken.
.