


PaulMc
-
Posts
940 -
Joined
-
Last visited
-
Days Won
4
Content Type
Profiles
Forums
Events
Gallery
Blogs
Posts posted by PaulMc
-
-
I found this on the web -
http://www.toine-hendriks.nl/hobbies/land_rover.htm
There's some useful info and details of modifications carried out by a Dutch owner to his TD5 Defender -
1. Where to put the 230 Volt external connection.
2. A better place for the OBD-2 connector.
3. Headlight switch using existing switch and relais.
4. Nanocom Evolution.
5. Rear-door-cover removing.
6. Sterling battery to battery loader.
7. Second battery under driver-seat.
8. Rear sparewheel carrier.
9. External roll cage.
10. Fight agains rust and Phillips-type screws.
11. Service and history.
12. Tools used since start LR pages [ generating tool-list ]
13. Problems with sensors and actuators.
14. Spare parts.
15. In-car PC..
16. Speciale goedkope tang voor blindklinkmoeren
17. Links
18. Cruise control
19. Alternative console mounting screws.
20. TD5 Fuel Pump. [under construction]
21. Diverse.
22. Parts
23. Start-up gearbox cooling.
24. Clutch
25. Alarm.
26. Exhaust gas temperature measurement.
27. Cleaning inter cooler.
28. Husky winch.
29. Cooling Liquid.
30. AS-10
Some of it is in English, some isn't.
.
-
Paul
it was a pin terminal I meant to fit into the plugs underneath:

I have a nice unused 60 amp fuse in there that would have been for the aircon ...
Which plug?
If you can, pop-out one of the terminals and post up some pics, they should be easy to identify/match.
.
-
Anyone know which ones for the under seat fuse box?
I don't know if you can add terminals to the underseat fusebox, it's connected to the various looms by multi-pole connectors.
I should also point out that my fusebox pictures above are from a 1999 TD5 main harness, which is significantly different to a 2002 one.
.
-
A quick browse of the Ripca/Ripaults website http://www.ripaults.com/ and catalogue, turned-up this -

They don't appear to list the terminals 3-4647 separately

They also don't sell direct to the public
However, they do have Ripca Marine that do sell direct

On there, I found -
Fuse holder inclusive 2 non insulated terminals - per 10 pieces

and -
3-4647-100 CRIMP TERMINAL 1 BOX OF100PCS TBV ZEKERINGHOUDER FHA19
I should add that I've never bought anything from Ripca Marine, so I can't vouch for them, but Ripca/Ripaults supply most of the usual Auto Electrical places.
.
-
A member on another forum asked how to release the terminals on a TD5 fuse box.
I took some pictures of one of my spare fuse boxes showing how to do it.
Two or three of the pictures show the terminals -
 .
.  .
. 
 .
.  .
. 
 .
.  .
. 
 .
. 
The only supplier (that I can find) who does anything with terminals that LOOK similar, is Polevolt.
Of course, they might not fit, but they do look quite similar -
http://www.polevolt.co.uk/acatalog/info_FBS1U.html
Unfortunately, they don't sell the terminals separately
.
-
Which cable end terminals do I need so that I can use the spare fuse slots ?
TIA
Mo
If it's the bulkhead fusebox you're referring to, then -
STC4034 - Connector to fit 0.5 - 1.0mm2 cable
STC4035 - Connector to fit 1.1 - 2.0mm2 cable
STC4036 - Connector to fit 2.5 - 3.0mm2 cable
They're expensive

See - http://forums.lr4x4.com/index.php?showtopic=25374
.
-
Hi
I'm looking for a 3 way switch to control my electric fan that will fit in the hole I have in the small switch panel to the lower right right of the steering wheel.
Does anyone know where I might get one?
Thanks
David
My 110 has a 3-way switch fitted down there.
It has a centre 'off' position, the up position switches on the instrument illumination, the down position switches on the interior lights.
I haven't got a picture of mine, but I found this one on the web -

I don't know it's part number, but I'm sure that Ralph could oblige
.
-
no ecu for the rear windows on disco 2. operated by the BCU/IDM and a lift relay. check fuse 13 in the passenger fusebox
On a DII, the BCU plays no part in switching the Rear Electric Windows, they're switched directly by the switches.
The only part the IDM plays, is to provide the earth to the Rear Window Relay's coil when the ignition is on.
Here's the wiring diagram -

.
-
Merlin Motorsport sell them separately and in different sizes, to suit different sized rivets -
RIVET CLAMP 3/16" Rivets - £2.22 Inc VAT each

.
-
Hi, just to clarify, its a standard 30Amp relay you have there? I must have miss understood something in another post that refered to a needing a latching relay.
As you have mentioned previously some switches stay depressed when activeated e.g. hazzard switch then others just pop up to the same level after being activated - these are the ones we're talking about, so does the switch do the "latching"? the illustation above doesn't really show that it does the latching, it more looks to me like a push to make switch that would need a "latch" further down the circuit?
Cheers
Mav
It's a standard 30Amp Relay.
The switch (YUG000540LNF) is a latching switch (the button stays 'down' when pressed and 'pops-up' when pressed again), it's just unusual in that it switches the earth path, rather than the live.
The internal design of the switch and the fact that it uses LEDs for it's backlight and tell-tale illumination, means that it has to be used as designed for these to work correctly.
Although, it is fairly easy to modify it's internals, so that it becomes a 'traditional' live switching on-off switch, with the LEDs working correctly.
I have already posted how to do this on other forums (and probably, on here as well) but I can post it again, if anyone wants?
.
-
Most useful!! Cheers Paul
My pleasure

.
-
in the modern world of health and safety it is quite possible they were actually removed from the car.
I know the traffic wombles weren't allowed to change a puncture on their vehicles, the spares are even removed. A man in a van has to come out and do it!!! (This was a few years ago, hopefully someone has seen sense now!)
My mate's wife is a HATO and she was told that the spare wheel/jack/toolkit isn't carried to save weight.
Because of the amount of kit that they need to carry, the spare wheel, etc.. would put the vehicle over it's GVW.
.
-
A push me pull you defender used to attend billing every year its a zebra stripe defender two front ends joined together at b pillar behind front doors ,i think it was owned by some guys from denmark or holland any pics anyone
Here are a few I found on the web in 2006 -
 .
.  .
. 
.
-
Callout #35 - MTC1557, "Plug - Inspection Opening" - £13.96 (inc. VAT) each - http://www.rimmerbros.co.uk/Item--i-MTC1557

.
-
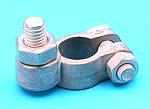
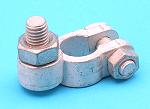
Sorry western I should have been more specific. I an after the terminal nut and captive bolt. Not the actual battery securing clamp.
As Ralph has said, in the post above, they're not available separately, you have to buy complete new positive and negative battery leads, at great expense
IMO, the type of battery clamps Land Rover use are cr@p


A heavy-handed gorilla of a previous owner had over-tightened the ones on mine and they were no longer able to clamp the battery posts tight enough.
I cut the connectors off of the ends of the battery cables and crimped on tube terminals with a 10mm hole, I can't remember if I used 25mm2 or 35mm2 terminals (there's about a foot of snow on my car at the moment, so I'm not going outside to have a look
 ) -
) -
and used these on the battery posts -
Positive & Negative battery connector with 10mm stud -
 .
. 
.
-
Hello
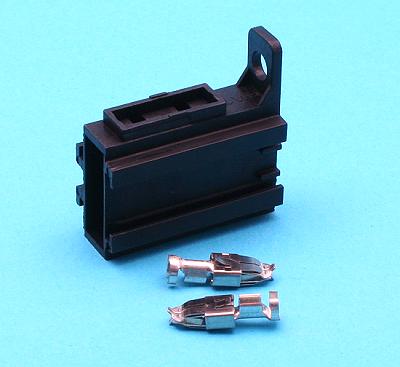
I've got myself a tow bar off the 'bay but it didn't have any electrics with it. I've picked up a socket and some cable but just wondered if anyone knew exactly the type of plug required to plug into the point near the ofside light, rather than scotch locking it. I've found a thread with the pin layout but not the plug type. It's a W reg Td5 if that makes a difference?
Cheers
Sam
The connector on the vehicle loom is a -
Sumitomo DL Sealed Series - 090/187(2.3/4.8mm) – HYBRID, 9-Way Female Housing, Part No. F(6195-0170)

The mating half you're looking for is a -
Sumitomo DL Sealed Series - 090/187(2.3/4.8mm) – HYBRID, 9-Way Male Housing, Part No. M(6195-0173)

You will also need 7 x 090(2.3mm) and 2 x 187(4.8mm) Male Terminals, with the appropriate Wire Seals for each Terminal (I have the Part No's if you want them )
I haven't found anywhere selling the connector shells or the 187(4.8mm) terminals in sensible quantities, only the 090(2.3mm) terminals.
1. You could do as suggested in the post above - use individual 2.3mm and 4.8mm male terminals pushed into the connector terminals but, IMHO, that's a bit of a bodge

2. You could change the connector for a more readily available version of the Sumitomo DL Sealed Series connector -
http://www.easternbeaver.com/Main/Elec__Products/Connectors/Sealed/SMDL/smdl.html
10-Way Sumitomo DL Sealed Series 090 Connector, Female and Male -
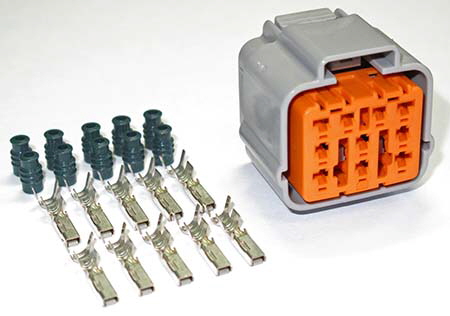
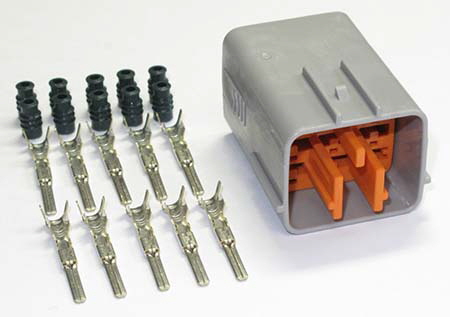
This would enable you to just transfer the 7 x 090 terminals on the vehicle loom to the new connector shell and, because you would be down-sizing the Aux. Live and Earth (pins 6 and 9), double-up the earth connection and down-rate the fuse on the Aux. Live.

3. You could just buy the Land Rover 12N Kit STC50081

Which plugs staight in, with no fuss

.
-
Land rover never made a spare wheel carrier for the bonnet suitable for alloy wheels...
They did make a kit for alloy wheels, the kit was part number STC7686, as opposed to STC7633 for steel wheels.
STC7686 is now listed as NLA, while STC7633 has been replaced (according to LRSeries) by LRSBOSPW, see here -
http://forums.lr4x4.com/index.php?showtopic=50756&view=findpost&p=458267
However, the retaining ring for alloy wheels is still listed in Microcat -

These pages from the instructions for STC7633 show the kit contents and the method of retaining a steel wheel -
 .
. 
These pages from the instructions for STC7686 show the kit contents and the method of retaining an alloy wheel -
 .
. 
.
-
BMW have connectors made for them by AMP-Tyco, although you can find some of them on Tyco's website, they are only supplied to BMW.
AFAIK, BMW Connector Shells, Terminals, Seals, etc... should be available from BMW Dealers.
Have a look at this online supplier - RealOEM.com: Online BMW Parts Catalogue
You have to select a vehicle model and then drill-down through => Vehicle Electrical System => Diverse Plugs and Connectors
Here are some example images which, if you click on them (on the website), will open the page for that type of connector/terminal, with a table showing availability and price -


For Bosch Connectors
Bosch do make their own connectors, see here - Bosch Industrial Business - Automotive - Connectors
There's a link on that page to their Automotive Connectors - Online Catalogue
That page also has links to pages (as well as - online catalogues, product info, etc...) for -
Special-OEM
Electric motors
Lighting technology
Relays
Horns
Switches
Sensors
Starters and Alternators
.
-
I have bought some 285/75R16 STT's and 16x8 modulars. I'm guessing in addition to my lift and cutting the arches, that I will need to use some spacers to avoid having terrible steering on full lock.
Can I get away with adding some 10mm wheel spacers- the ones without their own studs?
I'm talking about these: 10mm Wheel Spacers on Fleabay
Not with the standard length studs.
You could, if you fitted longer studs - FRC7577
But they're not cheap - do a forum search for "FRC7577" and "Wolf Rims"
.
-
"Once upon a time" there was somebody making a Defender replacement front bumper with a central towing pin in it, much the same idea as the standard military bumper but not as full of holes and probably a good deal stronger - I think it was made out of decent steel like 4mm/5mm sort of thickness. It basically looked exactly like the std Defender bumper but with the recess and tow pin in the middle.
I can't find it anywhere though ... anybody jog my memory as to who made it?
Southdown used to make a standard looking 5mm/6mm Defender bumper, with or without the central towing point (à la Military 90/110), but their website doesn't seem to list bumpers anymore

.
-
Some of it is in Russian
- but the important bits are in English try these instead http://lrcat.com/ & http://lrparts.ru/engl/
-
Does the switch just ground the relay to make it work? The switch has a 5 pin plug. Does anyone know what wires go where on the switch plug?
No, the Heated Seat Switches actually switch a live (unlike some of the other switches on a DII)
The pinouts for both Heated Seat Switches are -
Pin 1 - Live in from fused supply
Pin 2 - Live from Dash illumination
Pin 3 - Not used (but is internally connected to Pin 5 - Earth)
Pin 4 - Switched live out to Seat Heaters
Pin 5 - Earth
.
-
i need some sort of aux power for a lamp and i take it the red and black plugs bottom left of the speedo are for power could someone conferm this and if they are does any one now where to get or what fittings to use to plug into them. The other thing is would it just be easier to put in a cigarette lighter plug?
atb
Dave
Lucas CAB185 Here -
http://www.holden.co.uk/displayProduct-print.asp?pcode=CAB185

or STC3334 from Land Rover

.
-
Does it have a 'Raight Purdey Mouth' as well ....


.


Should my 110 have a rear ARB?
in Defender Forum (1983 - 2016)
Posted
My 1989 Hardtop (Van) doesn't have one fitted.
My understanding is that they were only fitted to vehicles with 2950kg GVW Levelled Suspension (most Station Wagons) and not fitted to vehicles with 3050kg GVW Unlevelled Suspension (Hardtops, Truck Cabs, HCPU)
.