


PaulMc
-
Posts
940 -
Joined
-
Last visited
-
Days Won
4
Content Type
Profiles
Forums
Events
Gallery
Blogs
Posts posted by PaulMc
-
-
I picked up a couple of Freelander-1 Auxilliary Lamp Wiring Kits at a Sortout and they have Delphi Sealed Metri-Pack 150 Series Connectors to connect to the Lamps.
I've not yet found anywhere in the UK selling sensible quantities of these Delphi Connectors.
... if I can't find Delphi Metri-Pack Connectors here in the UK, I'll replace them with AMP/Tyco Superseal Connectors, which are far more available.
Answering my own question, I've found a supplier of Delphi Sealed Metripack 150 Connectors, along with almost everything else Delphi.
They're USA based and ship from there, but have a UK website in pounds, shillings and pence
 , here -
http://gb.mouser.com/Interconnects/Automotive-Connectors/_/N-1ehb5/
They don't sell connector sets, only the component parts, so reference to the Delphi catalogue is essential.
Delphi Automotive Connector catalogues can be downloaded, in .pdf format, here -
http://connectors.delphi.com/automotive/
.
-
good find Paul
 , my adapted connectors are doing a fine job.
Glad to hear it Ralph
I forgot to add that these Sumitomo 090 female terminals F(8240-4422) are also the ones used in some of the Splice Connector Headers found in Land Rover looms.
i.e. C0759 & C0760, that are behind the Discovery 2 instrument binnacle, and are used for instrument/switch illumination and earth -
 .
. 
Very handy when adding extra binnacle switches.
.
-
Most of the wires are the same colours, which is quite handy. I don't know exactly how it is wired up behind the dash, but rather than each gauge piggybacking it's 12V feed and earth off the same wires, those wires are just moved to the new multi-plug where necessary. Just make sure the supplies that are required to be fused are so. The dash loom requires one 10A fused ignition-switched live, and two permanent 5A lives.
As for what's in the big plug, if you look at this PDF file, it shows the layout of the loom:
http://www.retroanac...g%20Diagram.pdf
The large multiplug is on the left, and the connections below it are what need to connect to it. For example pin 8 of the multi-plug needs to be connected to your wire from the temp sender, and pin 5 to the one from your fuel sender. In fact the only others are the gauge lighting feed (pin 4), the speedo transducer feed (pin 10), and some switched and non-switched 12V supplies. Plus a few earths. Remember, if you choose to replace the multi-plug with another one, keep the wiring the same (ie. pin 1 in the new plug is the same wire as pin 1 in the old plug), that way you can still use the diagrams.
Here is the pinout for the grey plug (as provided by Western, modified slightly by myself), should match my diagram above hopefully:

I have found an online supplier of new female terminals F(8240-4422) to suit this Sumitomo 14-way HD Series connector shell, he sells them in sets of 10 x male with 10 x female
Ref: FM090, for $2.90 + P&P, here -
http://www.easternbeaver.com/Main/Elec__Products/Connectors/090_Connectors/090_connectors.html
So now if you source a 2nd-hand connector shell from a scrappy, you won't need to splice wires together, you can now just make up a new loom
Amongst the other Sumitomo connector sets and terminals that he sells, he also supplies the Sumitomo 10-way HM Series connector used on the post 2002 Defender Hazard Warning Light Switch.
He supplies a connector set, comprising - female shell with 10 x female terminals + male shell, with 10 x male terminals
Ref: 10P090K-SMHM, for $6.49 + P&P, here -
http://www.easternbeaver.com/Main/Elec__Products/Connectors/090_Connectors/090_connectors.html

.
-
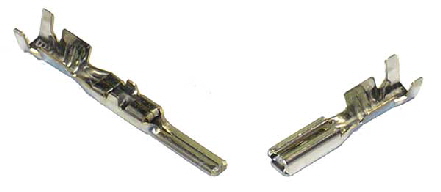
Ralph,
The connector you have is the Male half (denoted by the gender of it's terminals)
It's a Sumitomo HD Series 14-way connector, Pt. No. M(6098-0254)

The Female half you're looking for is Pt. No. F(6098-0253)

and the terminals (receptacles) to fit are -
F(8240-4412) for 0.3mm2 cable

and F(8240-4422) for 0.5 - 1.25 mm2 cable

I have found an online supplier of new female terminals F(8240-4422) to suit this Sumitomo 14-way HD Series connector shell, he sells them in sets of 10 x male with 10 x female
Ref: FM090, for $2.90 + P&P, here -
http://www.easternbeaver.com/Main/Elec__Products/Connectors/090_Connectors/090_connectors.html
So now if you source a 2nd-hand connector shell from a scrappy, you won't need to splice wires together, you can now just make up a new loom
Amongst the other Sumitomo connector sets and terminals that he sells, he also supplies the Sumitomo 10-way HM Series connector used on the post 2002 Defender Hazard Warning Light Switch.
He supplies a connector set, comprising - female shell with 10 x female terminals + male shell, with 10 x male terminals
Ref: 10P090K-SMHM, for $6.49 + P&P, here -
http://www.easternbeaver.com/Main/Elec__Products/Connectors/090_Connectors/090_connectors.html
.
-
... You would think that such a change in legislation would be for new production rather than being retrospective, however since when has common sense been an attribute of this government.
Same as the retrospective change of a vehicle's Road Tax band based on it's CO2 emissions

They're not so happy when rule changes are applied retrospectively to them
 -
-http://news.bbc.co.uk/1/hi/uk_politics/8312916.stm
.
-
OK so got around to taking some photos of the 130 door locks. I have uploaded them to picasa web albums which should mean no need to log in to view them....
Those are 'Safeways D120' locks -

I also had those fitted to the side doors on my Ford Granada Ghia Coupe.
I'm not sure if Safeways are still going, their website doesn't seem to exist anymore

This place are still listing them - http://www.aklocks.co.uk/catalog/vehicle-locking/vehicle-locks
There's an article on fitting them to a motorhome, here - http://www.motorhomeandaway.com/deadlocks.htm
and a Unimog, here - http://www.xor.org.uk/unimog/mymog/deadlock.htm
.
-
I remember seeing some years ago, some replacement lock barrels that were kind of like the barrels on a bicycle 'd' lock, the keys were just like the 'd' lock keys (kind of tubular)
a friend was fitting them to a Ford XR4i, but he'd got them off the net and they were available for other cars.
does anyone have any idea about these replacement barrels? if they're available, and if they're any good?
i've looked on google but can't find much....
It sounds like you're referring to 'Hykee' Locks, I fitted them to my old Ford Granada Ghia Coupe.
When I bought my 110 in 1989, I was dismayed to find that the door key was the same as several 90/110's in our Regiment

So I ordered and fitted Hykee barrels for it -
 .
.  .
.  .
.  .
. 
Hykee used to advertise in all the classic car magazines and supplied replacement security lock barrels for most classic and modern (at the time) cars.
The Proprietor was a Mr D S Crooke
- I 'phoned him and explained what I wanted. He said that he hadn't supplied barrels for a 110 before, so he went and bought a barrel set from his local Land Rover dealer to use as patterns.He was then able to supply me a set of 3 barrels (2 x front doors and rear door) with 2 x keys for £52.50 and a couple of spare keys at £2.75 each
Hykee were based in Broadstairs, Kent, but I haven't seen their adverts for several years and an internet search for 'Hykee' results in a range of van locks using the Hykee name.
.
-
Thanks very much for that
 will see if I can get this pink anti-freeze
I used Halfords Advanced Antifreeze, which is an OAT (Organic Acid Technology) formulation, in my D2 V8

.
-
Thank you, for this answer, on the other hand on the grids that I' for my Defender, I have to buy do not have the translucent plate, is this normal???? where can I find this plate.
Regards
The exploded diagram shows all of the component parts used to make a complete intake grille.
The 'translucent plate' shown is actually a piece of foam rubber, bonded to the inside back panel of the grille and designed to stop water splashes through the grille - excess water then runs off the foam rubber and exits through the drain hole (bottom right of the grille in the picture).
.
-
I bought the 4mm to 70mm type (the range of sizes are a bit more useful for automotive purposes) from another seller on eBay last year -
HYDRAULIC CRIMPING TOOL CRIMPERS CRIMPER 4-70MM RANGE
Exactly the same as above - Chinese made
- but fairly good quality, nevertheless 
I've used mine to crimp several Copper Tube Terminals, also various sizes of Anderson Connector Terminals - and have been quite impressed with the results.
.
-
Have a look at this -
http://www.rapitypes.com/case_study_lrw.html

The vehicle has an intake hole on each wing, same as 2.5TD/200Tdi (LH side) and 300Tdi/TD5 (RH side), the inside of the 'Wolf' intake shields these holes and forces the air drawn-in through it's grille to pass up and over an internal baffle, before entering the intake holes.
The two intakes are joined together by pipework under the bonnet, before the air filter, see below -
(click on thumbnail for full size image in new window)

.
-
... there's also the MOD/military/winterised setup that is similiar to PaulMC's pics but replaced the wingtop heater plastic plate/inlet with a rigid steel pipe, the heater then drew in its air from a Series 3 style inlet on the front of the wing side panel.
Like these -
(click on thumbnail for full size image in new window)
 .
. 
C&S Tat used to have most of these bits and still have some of it on their website -
http://www.emlra.org/C&S%20Barrow%20index/wading.htm
.
-
Ashcroft's were selling brand new, crated, Short Bellhousing R380's.
http://www.ashcroft-transmissions.co.uk/part_79.html

Sadly, now out of stock
.
-
If fitting a snorkel to a 2.5 N/A or 2.5 petrol, you could fit the 2.5TD or 200Tdi wing intake and associated plumbing, then use a Rebel/Mantec/Safari Snorkle to suit.
BUT - the seal around the wing and the joins in the plastic trunking under the wing (not to mention the rubber flap drain valve) are difficult to seal effectively and are a potential source of leaks.
I've got a Rebel Snorkle on my 2.5TD and I'm seriously thinking of taking the pipe along and through the top of the wing, doing away with side grille completely.
 .
.  .
. 
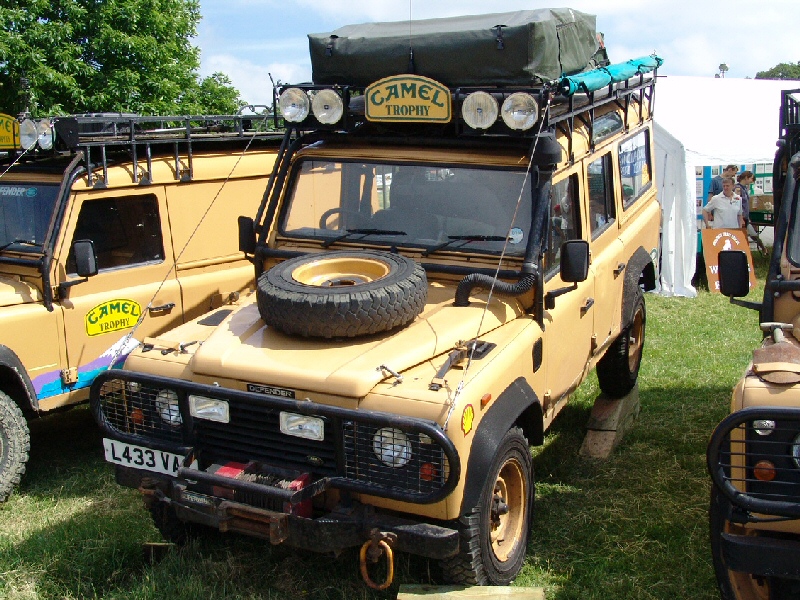
If you think that along the top of the wing looks 'homemade', have a look at how Land Rover did it for some Camel Trophy vehicles
 -
-
.
-
The pictures of the Blue 110 look more like someones home made attempt than a genuine parts offering!
Here's the 4-Cylinder Raised Air Intake page from Microcat -
The standard intake hosing on my 200Tdi goes through the gap between heater and inner wing, under the washer bottle. As Mr Milemarker says above.
I don't see why an N/A would be any different?
Unlike the 2.5TD and 200TDi vehicles, the 2.5 N/A Diesel (and 2.5 Petrol) don't have an air intake on the N/S wing.
.
-
hi,
trying to fix up a snorkal to my 1988 90 but i am struggling to get the hoses to the bulkhead and up to the wing.
i think that i might have to get rid of the heater box, but cnt seem to even get that out.
any ideas on where to run the hoses or hints on how to get the heater box out would be appreciated.
thanks
Ben
The Genuine Snorkel for the 2.5 N/A Engine looked like this -
 .
.  .
. 
 .
.  .
. 

.
-
Also does anyone know of any battery protectors that automatically disconnect the load if the voltage drops too low? i've got one but it only copes with 20 Amps.
Thanks!
This is what you're looking for - PriorityStart! - Intelligent, Automatic Battery Isolation
-
I have a 200TDI Discovery with the standard size steel rims and Cooper ST,s. I seem to go through periods of slow punchures, got one last weekend and one today. My local tyre fitter keeps re-sealing and cleaning the rims but always says buy some new rims it will solve the problem. Is there any sealant I can put in the tyres, if not any thoughts on Modulars or Eight Spoke to replace the origoals.
I used this stuff in my old Range Rover -
http://shop.difflock.com/-c-61_62.html
It solved the problem I had with two of my tyres going down slowly.
They never went completey flat - once they got to about 18psi they stopped going down
I attributed the problem to porous rims.
-
About Hexalock, I never tried by myself but I consider it’s solved
(You have to read the whole thing):
Thanks for the link, I'll have a read through that.
I found Club CDFreaks a few years ago and tried all of the suggested methods in this thread -
http://club.cdfreaks.com/f80/hexalock-4-0-a-193675/
but none of them worked for me
-
patpat,
Thanks for the info and the utilities, especially FreeRAVE, that'll be useful
I preferred Unicat/EPC to Microcat - so much easier to navigate.
There's a good site (in German) that gives details on getting it running under XP, here - http://landrover.110.st/epc.htm
I'm currently running July 2009 Microcat on XP Professional, using the 'fixed' mg16.dll and this script to start it -
http://www.hubbard.nightmail.ru/Microcat/lrmc.js (the date in the script will need changing to suit the edition you're running)
which I modified from a script that came with a Hyundai version of Microcat, that I 'found' (for my wife's car).
I've been running various versions of Microcat with this script for 3 years and have had no problems so far.
Although, I've discovered that if I try to look at the 'HST Body Kit' page on RR Sport Accessories in my current version, it Blue Screens my PC
Do you have any info on cracking the Hexalock protection on the Heritage Motor Centre's - Original Technical Publications CDs?
I have early editions of LHP1 and LHP2 (RR Classic) that have no protection and it's very convenient to have copies of them on the hard disk's of my computers.
The other CDs I have are later editions with Hexalock protection - which means that they'll only run with the original CD in the drive - very inconvenient, especially as one of my laptops doesnt have a built-in CD drive
-
Paul, please use my full quote if you do not mind, I feel my sentiment has been misrepresented.
Chris
Sorry Chris, no misrepresentation intended
I've edited to correct my faux pas
-
I didn't have to listen to him all weekend, but in small doses, I don't think that Jerry is that bad
I quizzed him on Saturday morning about the point of these show "restorations" - was it for charity? - who's vehicles are they? - who pays for the parts?
He told me that they were his vehicles, he pays or contributes towards the parts and after they're finished he sometimes uses them for a while, but ultimately he sells them to finance the next "restoration".
He also told me that he charges the show organisers £30 an hour to be there - ooh!, you're cheap, I said - fortunately, he found that amusing
-
I formed a poor opinion of Jerry Thurston when he was on television but having done some television myself I know that is not real life and filming/editing techniques can portray people quite differently to how they might come across in real life - Craig Charles comes across as a nice guy on telly! I have not exchanged more than a few pleasantries with JT face to face so I do not know him well enough to dislike him. I do, however, find his interest in old series and mending stuff for the sake of it rather dull and for that reason his arena commentary gets on my tits. That, and having heard it too many times!
Chris
My mate, who's a Prison Officer at Belmarsh, would beg to differ
-
You need a copy of Microcat.
This is the parts software used by Land Rover Main Dealers.
You can download a copy of the March 2009 edition, which has been kindly provided by James (Retroanaconda), here -
http://www.retroanaconda.com/james/microcat/index.html
Make sure you read the instructions about the 'Crack' and the 'Microlauncher' to overcome the date issue.
 , here -


 -
-


Genuine Land Rover aux lighting switches
in Defender Forum (1983 - 2016)
Posted
AN UPDATE ON SWITCH CONNECTORS
'One Touch' Fog Lamp ECU Connector
Having now sourced a Sumitomo 4-way HM Series connector, I can definately say that the connector for the Fog Lamp ECU isn't a standard connector with .090" (2.3mm) terminals
The shell is slightly larger than the standard HM Series and uses .110" (2.8mm) terminals, it's definately made by Sumitomo, but it isn't in any of their catalogues
The only source I have for this connector is from a scrappy - Rover 100/200/400, Defender, Discovery 1 & 2, Freelander 1
I have no source for the terminals - re-use existing terminals or splice wires together.
Hazard Warning Light Switch
The 10-way connector for the Hazard Warning Light Switch is from the Sumitomo HM Series range -
The connector shell is Pt. No. F(6090-1220)
and the terminals are Pt. No's -
F(8240-4412) for cables 0.2 - 0.3 mm2
F(8240-4422) for cables 0.5 - 1.25 mm2
The connector shell can be sourced from a scrappy - Rover 100/200/400, Defender, Discovery 1 & 2, Freelander 1, Suzuki VStrom Handlebars -
New terminals can be sourced from a company called Eastern Beaver
They sell them in sets of 10 x male with 10 x female
Ref: FM090, for $2.90 + P&P, here -
http://www.easternbeaver.com/Main/Elec__Products/Connectors/090_Connectors/090_connectors.html
So now if you source a 2nd-hand connector, you won't need to splice wires together, you can now just make up a new loom.
Or you could just buy a complete new connector
Eastern Beaver also supplies a connector set, comprising - female shell with 10 x female terminals + male shell, with 10 x male terminals
Ref: 10P090K-SMHM, for $6.49 + P&P, here -
http://www.easternbeaver.com/Main/Elec__Products/Connectors/090_Connectors/090_connectors.html
Headlamp Level Adjustment Switch
You can source this connector from a scrappy - Headlamp Levelling Switch/Blower Speed Switch/Earth Header in - Metro/Rover 100, 1990 onwards, Rover 200 3/5 door & 400 4 door Series (Oct 92 to Feb 96), Defender, Discovery 1 & 2, Freelander 1
Until recently, you could also buy it new (without terminals) as YPC10004 from a Rover Cars dealer, but it's now been discontinued as a spare.
If you source a 2nd-hand connector shell, Eastern Beaver sell the correct Sumitomo terminals to suit
Ref: .250 Female Receptacles to suit .4mm2, 2mm2 and 3mm2 cable for $0.20 each, here -
http://www.easternbeaver.com/Main/Elec__Products/Connectors/Special/special.html
Eastern Beaver also sell a 6-way .250" (6.3mm) Yazaki connector that is dimensionally identical to the correct Sumitomo connector and is a perfect fit for this switch
Ref: Connector Set 6PF250 for $4.73 + P&P, here -
http://www.easternbeaver.com/Main/Elec__Products/Connectors/250_Connectors/250_connectors.html
Front and Rear Fog Lamp Switches
These two switches use the AMP/Tyco 5-way (Black) Multilock connector 347477-1
Dingocroft now sell this connector, complete with terminals
Ref: ZZPLUG01 for £4.77 (Including VAT at 15%), here -
http://shop.dingocroft.co.uk/acatalog/Electrical_Miscellany.html#aZZPLUG01
.