


CwazyWabbit
-
Posts
7,222 -
Joined
-
Last visited
-
Days Won
30
Content Type
Profiles
Forums
Events
Gallery
Blogs
Posts posted by CwazyWabbit
-
-
If your mates are anything like mine I'd be reminding them about walking when it snows.
The last time one of them took the p!ss out of my landy I winched their car betweeen two ballards.

Now that really should have a picture attached... please tell me you have one!

-
I think the answer is send to Mythbusters

They'll just blow both engines up..... or shoot them!

-
Another thought I had was that maybe too much resin may also be detrimental, the extra mass means to bring the overall tempeature up you have to heat all the resin so the end result is it takes longer to defrost the nozzle ... also means that it takes longer to cool it down as well....
How much resin/plastic/gunk did the original heated nozzle have?
-
oh.......guess what i'm doing at the weekend

Putting your mind at rest so you don't spend every minute of driving your Land Rover wondering if your flex plate is about to die. I think it's well worth the few hours of work to check .... probably quicker than waiting for the recovery truck to

-
Back on track then
Why didn't you warn me I needed sunglasses?

-
You buy some locks because you're fed up with a different key for every one, you have to take 1/2 the door apart to get at it, the screws are corroded in, they snap but it doesn't matter because you have new locks, then you find out you have 1/2 a lock , it doesn't come with the only bit you're likely to break.
At least it's only 10% less secure with the doors unlocked
At least it's 10% more secure with the doors unlocked as the scrote will be confused while trying to unlock it
Corrected that for you

-
whimper... whimper ....

I guess it wouldn't have been economical to strip and store parts/panels to sell off.... could've made a few quid out of doors if these were used in dry climates....
-
That was my thought, is this supposed to be on all the time and if so how much current is it drawing?
It's supposed to be on all the time when the weather is cold. It should draw 1/4 of an amp when it's on.
I wonder what the thermal conductivity of araldite is? Would heat transfer be greater with a different resin?
Mav, how did you test the jet was/wasn't free ? I'm thinking a bit of a push from the washer pump may push some of the ice out IYSWIM
-
Wabbit chap, would one simply wire a live to one side of the resistor and earth to the other to make it work ?
Mo
Yep, I'd be inclined to wire it so that you wouldn't forget to turn it off. So either a switched live or maybe wire it like the heated rear window so it was only on while the engine was running.
-
That will be running at about 1/4 of an amp and 3 watts. The nearest preferred value to that would be a 47 ohm resistor, you can get them easily in 3 watt or 5 watt. I'd imagine 3 watt would be sufficient as moulding it into the nozzle will act as a heatsink.
You can get 4 of them for 99p with £1.30 postage on our favorite auction site (proper electronics places will charge lots of postage) ...... so you can do the rear window nozzle to! In fact you have enough to put two in parallel in each nozzle for twice the defrosting power (and of course battery drain)
http://www.ebay.co.uk/itm/300358884799
So we just need you to finish your testing Mav ;-)
-
Do they use lots of salt on their roads?
If not they won't need the washers much so the problem would be less evident. Also it may be vehicles sold to colder climates have some form of winterizing done either by Land Rover or the importer.
EDIT: Just noticed your location, I guess you can answer those questions
May also be that you guys just have much better screenwash which is quite likely
-
Cheers for that
Are you just planning on wiring them to come on with the ignition switch, or will the be seperately switched?
Or maybe wiring them to switch on with the heated rear window ?
-
Here you go mo, unfotunatly I'd already extracted the heating element from the plastic jets, looks like this. I've removed the plug and will put some small blade connectors on so it will fit through the bulkhead hole

A bit of dremil action to make a hole...

and some slots for the wires...

Araldited into place...

and then "potting" the rest of it, bot cold in the garage so will finish it off tomorrow when its set - I intend on filling the hole thing to make it a suitable heat sink... hopefully.

Will do some freezer testing when I've got the wires set in.
Mav
Mav, could you test the resistance of the resistor? It would be interesting to know the resistance as you could just buy a suitable resistor to do the job.
-
That'll make one very secure toolbox!
-
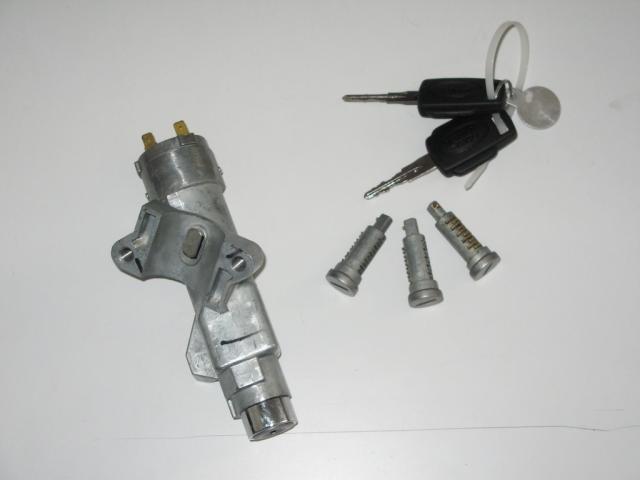
Well, I went ahead and bought CWB500630, and this is what I got in the box:
The problem now is that the ignition switch does not have a pre-heat position like my old one (from the original 2.5TD engine installation) so I'm going to have to fit a glow plug relay in order to make this work.
Will write it all up properly when I've finished.
Nick.
When it came to fitting the new barrels in the doors did you buy new handles and a new rear door lock?
I don't suppose you remember what the differences were?
I've ordered the same kit and I was wondering if modifying the old handles would be possible, I've seen a diagram in rave that shows the locking sleeve in the old handle is removeable so I was considering making a longer one to accommodate the longer barrels.
Not sure if it would be possible to mod the rear door lock.... but if I can save the cost of the new handles that'll be a bonus
-
My vote is to use an eezi bleed pressure bleeder, made it a totally painless exercise
-
I'd imagine it will have stripped the driver member splines in which case no more than the above need be done. If it has stripped the diff end of the shaft or snapped it you are at a guess looking at removing the diff cover. There is also a tool available that is a strong magnet on a telescopic pole meant to retrieve the broken part of the shaft without stripping the diff, obviously this leaves some shrapenel in the diff which should hopefully come out with an oil change.
Pull the shafts first and see what has happened, by the sounds of it your 110 isn't going anywhere at the moment so a little investigation would do no harm.
-
It is basically undo five bolts holding the drive flange, pull it off and the half shaft will come with it. Remove circlip and clean off old drive flange/member gasket. Refitting is as they say is the reverse of removal. It's easier with steel wheels as you don't have to remove them, alloys need removing.
-
I know it's a boring question but how are you going to get paint onto the new cross member ends?
-
I doubt the handbrake light is part of the MOT as it isn't fitted to all defenders from my understanding. Worth fixing the board at 133 pounds but marginal at 12 by the time you have ordered the LED paid delivery etc
-
It could just mean my pump is buggered though I suppose... it does however start almost instantly even if left for a week.
-
I know when I changed the fuel filter last time I had to turn the engine over before I could get the pump to fill the filter and I remember feeling a difference then.
I just went outside to have a feel of my one to refresh the memory (oo-er) and in all honesty it didn't feel to have much back pressure (could easily be mistaken for none tbh) so I started and stopped the engine again and the pressure still felt the same. I'm fairly certain that it was really floppy when stuck on the cam though.....
-
Do you know if the LED's are replaceable, and also (sorry to be a pain) should I get 12v at pin 14 on the warning panel 16 way plug or is this a feed through LED to earth.
They might not be replaceable as a user serviceable part but they should be quite easy to do for someone handy with a soldering iron. Even though they are surface mount they aren't too difficult. How much is the entire board?
-
If you suspect the lack of back pressure on the lift pump is because of the cam position turn the engine over slowly by hand and try again to pump, should soon become obvious if it is the cam causing the lack of pressure or not.


Keys and Barrels
in Defender Forum (1983 - 2016)
Posted
Well I've fitted the ignition barrel, took a bit of playing with the meter to work out what went where as the numbers are different on the back compared to my old switch and I don't have a wiring diagram for a my2002 defender.
Anyone that has fitted one of these care to comment on my wiring? The car does start and everything seems ok so I guess it is pretty much right.
1) White with red stripe (Crank)
2) Brown (Live Supply)
3) White (Switched live/live while cranking)
4/5) White with orange (Switched live/off while cranking)
Next the door barrels.....